Cisco 7912G Administration Guide - Page 38
Cisco IP Phone 7902G., Administration Tool BAT - ip manual
 |
UPC - 746320852409
View all Cisco 7912G manuals
Add to My Manuals
Save this manual to your list of manuals |
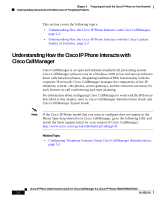
Page 38 highlights
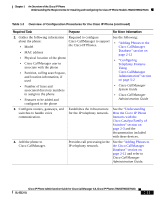
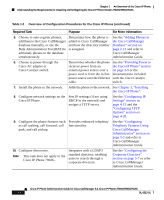
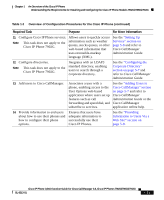
Chapter 1 An Overview of the Cisco IP Phone Understanding the Requirements for Installing and Configuring the Cisco IP Phone Models 7902G/7905G/7912G Table 1-2 Overview of Configuration Procedures for the Cisco IP Phone (continued) Required Task Purpose For More Information 5. Choose to auto-register phones, Determines how the phone is See the "Adding Phones to add them to the Cisco CallManager added to Cisco CallManager the Cisco CallManager database manually, or use the and how the directory number Database" section on Bulk Administration Tool (BAT) to is assigned. page 2-12 and refer to add many phones to the database Cisco CallManager simultaneously. Administration Guide. 6. Choose to power through the Cisco AC adapter or Cisco Catalyst switch. Determines whether the phone See the "Providing Power to receives power from an the Cisco IP Phone" section external power source over a on page 2-9 or the power cord or from the in-line documentation included power source over the Ethernet with the Cisco Catalyst cable. switch. 7. Install the phone in the network. Adds the phone to the network. See Chapter 3, "Installing the Cisco IP Phone". 8. Configure network settings on the Sets IP settings (if not using Cisco IP Phone. DHCP in the network) and assigns a TFTP server. See the "Configuring IP Settings" section on page 4-15 and the "Configuring TFTP Options" section on page 4-28. 9. Configure the phone features such Provides enhanced telephony as call waiting, call forward, call functionality. park, and call pickup. See the "Configuring Telephony Features Using Cisco CallManager Administration" section on page 5-2 and refer to Cisco CallManager Administration Guide. 10. Configure directories. Note This task does not apply to the Cisco IP Phone 7902G. Integrates with a LDAP3 standard directory, enabling users to search through a corporate directory. See the "Configuring the Corporate Directory" section on page 5-7 or refer to Cisco CallManager Administration Guide. 1-14 Cisco IP Phone Administration Guide for Cisco CallManager 3.3, Cisco IP Phones 7902G/7905G/7912G OL-6313-01
-
 1
1 -
2
-
3
-
4
-
5
-
6
-
7
-
8
-
9
-
10
-
11
-
12
-
13
-
14
-
15
-
16
-
17
-
18
-
19
-
20
-
21
-
22
-
23
-
24
-
25
-
26
-
27
-
28
-
29
-
30
-
31
-
32
-
 33
33 -
 34
34 -
 35
35 -
 36
36 -
 37
37 -
 38
38 -
 39
39 -
 40
40 -
 41
41 -
 42
42 -
 43
43 -
44
-
45
-
46
-
47
-
48
-
49
-
50
-
51
-
52
-
53
-
54
-
55
-
56
-
57
-
58
-
59
-
60
-
61
-
62
-
63
-
64
-
65
-
66
-
67
-
68
-
69
-
70
-
71
-
72
-
73
-
74
-
75
-
76
-
77
-
78
-
79
-
80
-
81
-
82
-
83
-
84
-
85
-
86
-
87
-
88
-
89
-
90
-
91
-
92
-
93
-
94
-
95
-
96
-
97
-
98
-
99
-
100
-
101
-
102
-
103
-
104
-
105
-
106
-
107
-
108
-
109
-
110
-
111
-
112
-
113
-
114
-
115
-
116
-
117
-
118
-
119
-
120
-
121
-
122
-
123
-
124
-
125
-
126
-
127
-
128
-
129
-
130
-
131
-
132
-
133
-
134
-
135
-
136
-
137
-
138
-
139
-
140
-
141
-
142
-
143
-
144
-
145
-
146
-
147
-
148
-
149
-
150
-
151
-
152
-
153
-
154
-
155
-
156
-
157
-
158
-
159
-
160
-
161
-
162
-
163
-
164
-
165
-
166
-
167
-
168
-
169
-
170
-
171
-
172
-
173
-
174
-
175
-
176
-
177
-
178
-
179
-
180
-
181
-
182
-
183
-
184
 |
 |