Cisco 7912G Administration Guide - Page 78
Enabling DHCP, Using the Phone Configuration Web Cisco IP Phone Models 7902G/7905G/7912G
 |
UPC - 746320852409
View all Cisco 7912G manuals
Add to My Manuals
Save this manual to your list of manuals |
Page 78 highlights
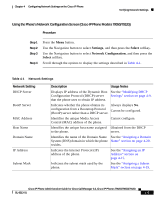
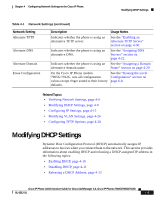
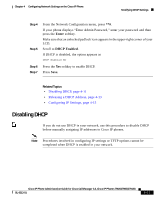
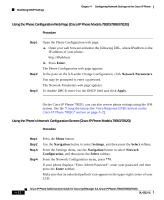
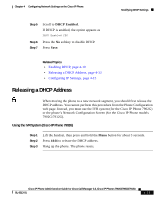
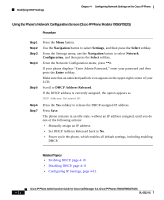
Modifying DHCP Settings Chapter 4 Configuring Network Settings on the Cisco IP Phone Enabling DHCP Cisco IP Phones enable DHCP by default, but you can reset the protocol if it becomes disabled. Using the Phone Configuration Web Page (Cisco IP Phone Models 7902G/7905G/7912G) Procedure Step 1 Step 2 Step 3 Open the Phone Configuration web page. a. Open your web browser and enter the following URL, where IPaddress is the IP address of your phone http://IPaddress b. Press Enter. The Phone Configuration web page appears. In the pane on the left under Change Configuration, click Network Parameters. You may be prompted to enter a password. The Network Parameters web page appears. To enable DHCP, enter 1 in the DHCP field and click Apply. On the Cisco IP Phone 7902G, you can also review phone settings using the IVR system. See the "Using the Interactive Voice Response (IVR) System on the Cisco IP Phone 7902G" section on page A-22. Using the Phone's Network Configuration Screen (Cisco IP Phone Models 7905G/7912G) Procedure Step 1 Step 2 Step 3 Press the Menu button. Use the Navigation button to select Settings, and then press the Select softkey. From the Settings menu, use the Navigation button to select Network Configuration, and then press the Select softkey. 4-10 Cisco IP Phone Administration Guide for Cisco CallManager 3.3, Cisco IP Phones 7902G/7905G/7912G OL-6313-01
-
 1
1 -
2
-
3
-
4
-
5
-
6
-
7
-
8
-
9
-
10
-
11
-
12
-
13
-
14
-
15
-
16
-
17
-
18
-
19
-
20
-
21
-
22
-
23
-
24
-
25
-
26
-
27
-
28
-
29
-
30
-
31
-
32
-
33
-
34
-
35
-
36
-
37
-
38
-
39
-
40
-
41
-
42
-
43
-
44
-
45
-
46
-
47
-
48
-
49
-
50
-
51
-
52
-
53
-
54
-
55
-
56
-
57
-
58
-
59
-
60
-
61
-
62
-
63
-
64
-
65
-
66
-
67
-
68
-
69
-
70
-
71
-
72
-
 73
73 -
 74
74 -
 75
75 -
 76
76 -
 77
77 -
 78
78 -
 79
79 -
 80
80 -
 81
81 -
 82
82 -
 83
83 -
84
-
85
-
86
-
87
-
88
-
89
-
90
-
91
-
92
-
93
-
94
-
95
-
96
-
97
-
98
-
99
-
100
-
101
-
102
-
103
-
104
-
105
-
106
-
107
-
108
-
109
-
110
-
111
-
112
-
113
-
114
-
115
-
116
-
117
-
118
-
119
-
120
-
121
-
122
-
123
-
124
-
125
-
126
-
127
-
128
-
129
-
130
-
131
-
132
-
133
-
134
-
135
-
136
-
137
-
138
-
139
-
140
-
141
-
142
-
143
-
144
-
145
-
146
-
147
-
148
-
149
-
150
-
151
-
152
-
153
-
154
-
155
-
156
-
157
-
158
-
159
-
160
-
161
-
162
-
163
-
164
-
165
-
166
-
167
-
168
-
169
-
170
-
171
-
172
-
173
-
174
-
175
-
176
-
177
-
178
-
179
-
180
-
181
-
182
-
183
-
184
 |
 |