Cisco 7912G Administration Guide - Page 99
Assigning a Backup TFTP Server
 |
UPC - 746320852409
View all Cisco 7912G manuals
Add to My Manuals
Save this manual to your list of manuals |
Page 99 highlights
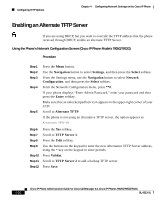
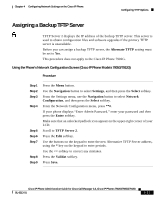
Chapter 4 Configuring Network Settings on the Cisco IP Phone Configuring TFTP Options Assigning a Backup TFTP Server TFTP Server 2 displays the IP address of the backup TFTP server. This server is used to obtain configuration files and software upgrades if the primary TFTP server is unavailable. Before you can assign a backup TFTP server, the Alternate TFTP setting must be set to Yes. This procedure does not apply to the Cisco IP Phone 7902G. Using the Phone's Network Configuration Screen (Cisco IP Phone Models 7905G/7912G) Procedure Step 1 Step 2 Step 3 Step 4 Step 5 Step 6 Step 7 Step 8 Step 9 Press the Menu button. Use the Navigation button to select Settings, and then press the Select softkey. From the Settings menu, use the Navigation button to select Network Configuration, and then press the Select softkey. From the Network Configuration menu, press **#. If your phone displays "Enter Admin Password," enter your password and then press the Enter softkey. Make sure that an unlocked padlock icon appears in the upper-right corner of your LCD. Scroll to TFTP Server 2. Press the Edit softkey. Use the buttons on the keypad to enter the new Alternative TFTP Server address, using the * key on the keypad to enter periods. Use the
-
 1
1 -
2
-
3
-
4
-
5
-
6
-
7
-
8
-
9
-
10
-
11
-
12
-
13
-
14
-
15
-
16
-
17
-
18
-
19
-
20
-
21
-
22
-
23
-
24
-
25
-
26
-
27
-
28
-
29
-
30
-
31
-
32
-
33
-
34
-
35
-
36
-
37
-
38
-
39
-
40
-
41
-
42
-
43
-
44
-
45
-
46
-
47
-
48
-
49
-
50
-
51
-
52
-
53
-
54
-
55
-
56
-
57
-
58
-
59
-
60
-
61
-
62
-
63
-
64
-
65
-
66
-
67
-
68
-
69
-
70
-
71
-
72
-
73
-
74
-
75
-
76
-
77
-
78
-
79
-
80
-
81
-
82
-
83
-
84
-
85
-
86
-
87
-
88
-
89
-
90
-
91
-
92
-
93
-
 94
94 -
 95
95 -
 96
96 -
 97
97 -
 98
98 -
 99
99 -
 100
100 -
 101
101 -
 102
102 -
 103
103 -
 104
104 -
105
-
106
-
107
-
108
-
109
-
110
-
111
-
112
-
113
-
114
-
115
-
116
-
117
-
118
-
119
-
120
-
121
-
122
-
123
-
124
-
125
-
126
-
127
-
128
-
129
-
130
-
131
-
132
-
133
-
134
-
135
-
136
-
137
-
138
-
139
-
140
-
141
-
142
-
143
-
144
-
145
-
146
-
147
-
148
-
149
-
150
-
151
-
152
-
153
-
154
-
155
-
156
-
157
-
158
-
159
-
160
-
161
-
162
-
163
-
164
-
165
-
166
-
167
-
168
-
169
-
170
-
171
-
172
-
173
-
174
-
175
-
176
-
177
-
178
-
179
-
180
-
181
-
182
-
183
-
184
 |
 |