Dell 1135N User Guide - Page 19
Macintosh, Linux, Print & Fax
 |
View all Dell 1135N manuals
Add to My Manuals
Save this manual to your list of manuals |
Page 19 highlights
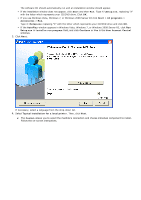
driver name > Maintenance. 3. Select the option as you wish, follow the instruction on the window. Macintosh The software CD provides the driver files that allow you to use the CUPS driver for printing on a Macintosh computer. Also, it provides you with the TWAIN driver for scanning on a Macintosh computer. 1. Make sure that the machine is connected to your computer and powered on. 2. Insert the supplied software CD into your CD/DVD drive. 3. Double-click the CD-ROM icon that appears on your Macintosh desktop. 4. Double-click the MAC_Installer folder. 5. Double-click the Installer OS X icon. 6. Enter the password and click OK. 7. The Dell Installer window opens. Click Continue. 8. Read the license agreement and click Continue. 9. Click Agree to agree to the license agreement. 10. Select Easy Install and click Install. Easy Install is recommended for most users. All components necessary for machine operations will be installed. If you select Custom Install, you can choose individual components to install. 11. When the message which warns that all applications will close on your computer appears, click Continue. 12. After the installation is finished, click Quit. If you have installed scanner driver, click Restart. 13. Open the Applications folder > Utilities > Print Setup Utility. For Mac OS X 10.5 ~ 10.6, open the Applications folder > System Preferences and click Print & Fax. 14. Click Add on the Printer List. For Mac OS X 10.5 ~ 10.6, press the "+" icon; a display window will pop up. 15. For Mac OS X 10.3, select the USB tab. For Mac OS X10.4, click Default Browser and find the USB connection. For Mac OS X 10.5 ~ 10.6, click Default and find the USB connection. 16. For Mac OS X 10.3, if Auto Select does not work properly, select Dell in Printer Model and your machine name in Model Name. For Mac OS X 10.4, if Auto Select does not work properly, select Dell in Print Using and your machine name in Model. For Mac OS X 10.5 ~ 10.6, if Auto Select does not work properly, select Select a driver to use... and your machine name in Print Using. Your machine appears on the Printer List, and is set as the default machine. 17. Click Add. If the printer driver does not work properly, uninstall the driver and reinstall it. Follow steps below to uninstall the driver for Macintosh. 1. Make sure that the machine is connected to your computer and powered on. 2. Insert the supplied software CD into your CD/DVD drive. 3. Double-click CD-ROM icon that appears on your Macintosh desktop. 4. Double-click the MAC_Installer folder. 5. Double-click the Installer OS X icon. 6. Enter the password and click OK. 7. The Dell Installer window opens. Click Continue. 8. Select Uninstall and click Uninstall. 9. When the message which warns that all applications will close on your computer appears, click Continue . 10. When the uninstall is done, click Quit. Linux Follow the steps below to install the driver for Linux. While installing the driver, the Unified Linux Driver package will automatically be installed as well. The supplied software CD provides you with the Unified Linux Driver package for using your machine with a
-
 1
1 -
2
-
3
-
4
-
5
-
6
-
7
-
8
-
9
-
10
-
11
-
12
-
13
-
 14
14 -
 15
15 -
 16
16 -
 17
17 -
 18
18 -
 19
19 -
 20
20 -
 21
21 -
 22
22 -
 23
23 -
 24
24 -
25
-
26
-
27
-
28
-
29
-
30
-
31
-
32
-
33
-
34
-
35
-
36
-
37
-
38
-
39
-
40
-
41
-
42
-
43
-
44
-
45
-
46
-
47
-
48
-
49
-
50
-
51
-
52
-
53
-
54
-
55
-
56
-
57
-
58
-
59
-
60
-
61
-
62
-
63
-
64
-
65
-
66
-
67
-
68
-
69
-
70
-
71
-
72
-
73
-
74
-
75
-
76
-
77
-
78
-
79
-
80
-
81
-
82
-
83
-
84
-
85
-
86
-
87
-
88
-
89
-
90
-
91
-
92
-
93
-
94
-
95
-
96
-
97
-
98
-
99
-
100
-
101
-
102
-
103
-
104
-
105
-
106
-
107
-
108
-
109
-
110
-
111
-
112
-
113
-
114
-
115
-
116
-
117
-
118
-
119
-
120
-
121
-
122
-
123
-
124
-
125
-
126
-
127
-
128
-
129
-
130
-
131
-
132
-
133
-
134
-
135
-
136
-
137
-
138
 |
 |