Dell 1135N User Guide - Page 46
Deciding the form of copy output, Setting copy timeout
 |
View all Dell 1135N manuals
Add to My Manuals
Save this manual to your list of manuals |
Page 46 highlights
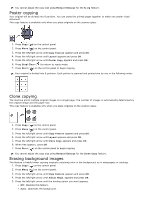
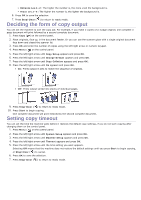
Enhance Lev.1~2: The higher the number is, the more vivid the background is. Erase Lev.1~4: The higher the number is, the lighter the background is. 6. Press OK to save the selection. 7. Press Stop/Clear ( ) to return to ready mode. Deciding the form of copy output You can set the machine to sort the copy job. For example, if you make 2 copies of a 3 page original, one complete 3 page document will print followed by a second complete document. 1. Press Copy ( ) on the control panel. 2. Place originals, face up, in the document feeder. Or you can use the scanner glass with a single original document face down and closed the scanner lid. 3. Press OK and enter the number of copies using the left/right arrow or numeric keypad. 4. Press Menu ( ) on the control panel. 5. Press the left/right arrow until Copy Setup appears and press OK. 6. Press the left/right arrow until Change Default appears and press OK. 7. Press the left/right arrow until Copy Collation appears and press OK. 8. Press the left/right arrow until On appears and press OK. On: Prints output in sets to match the sequence of originals. Off: Prints output sorted into stacks of individual pages. 9. Press Stop/Clear ( ) to return to ready mode. 10. Press Start to begin copying. One complete document will print followed by the second complete document. Setting copy timeout You can set the time the machine waits before it restores the default copy settings, if you do not start copying after changing them on the control panel. 1. Press Menu ( ) on the control panel. 2. Press the left/right arrow until System Setup appears and press OK. 3. Press the left/right arrow until Machine Setup appears and press OK. 4. Press the left/right arrow until Timeout appears and press OK. 5. Press the left/right arrow until the time setting you want appears. Selecting Off means that the machine does not restore the default settings until you press Start to begin copying, or Stop/Clear ( ) to cancel. 6. Press OK to save the selection. 7. Press Stop/Clear ( ) to return to ready mode.
-
 1
1 -
2
-
3
-
4
-
5
-
6
-
7
-
8
-
9
-
10
-
11
-
12
-
13
-
14
-
15
-
16
-
17
-
18
-
19
-
20
-
21
-
22
-
23
-
24
-
25
-
26
-
27
-
28
-
29
-
30
-
31
-
32
-
33
-
34
-
35
-
36
-
37
-
38
-
39
-
40
-
 41
41 -
 42
42 -
 43
43 -
 44
44 -
 45
45 -
 46
46 -
 47
47 -
 48
48 -
 49
49 -
 50
50 -
 51
51 -
52
-
53
-
54
-
55
-
56
-
57
-
58
-
59
-
60
-
61
-
62
-
63
-
64
-
65
-
66
-
67
-
68
-
69
-
70
-
71
-
72
-
73
-
74
-
75
-
76
-
77
-
78
-
79
-
80
-
81
-
82
-
83
-
84
-
85
-
86
-
87
-
88
-
89
-
90
-
91
-
92
-
93
-
94
-
95
-
96
-
97
-
98
-
99
-
100
-
101
-
102
-
103
-
104
-
105
-
106
-
107
-
108
-
109
-
110
-
111
-
112
-
113
-
114
-
115
-
116
-
117
-
118
-
119
-
120
-
121
-
122
-
123
-
124
-
125
-
126
-
127
-
128
-
129
-
130
-
131
-
132
-
133
-
134
-
135
-
136
-
137
-
138
 |
 |