Dell 1135N User Guide - Page 8
Understanding the Status LED, Numeric keypad - scan not available
 |
View all Dell 1135N manuals
Add to My Manuals
Save this manual to your list of manuals |
Page 8 highlights
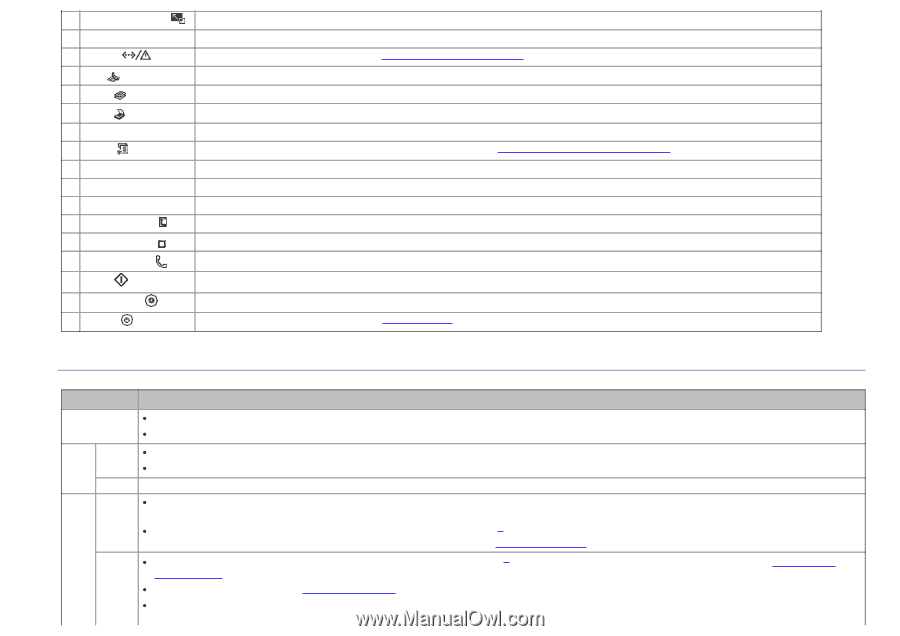
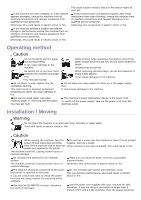
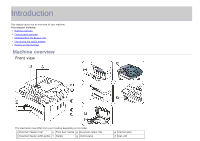
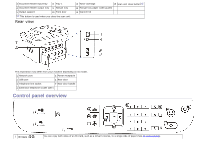
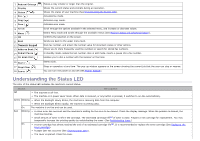
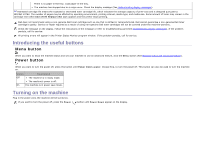
2 Reduce/Enlarge ( 3 Display 4 Status ( ) 5 Fax ( ) 6 Copy ( ) 7 Scan ( ) 8 Arrow 9 Menu ( ) 10 OK 11 Back 12 Numeric keypad 13 Address Book ( ) 14 Redial/Pause ( ) 15 On Hook Dial ( ) 16 Start ( ) 17 Stop/Clear ( ) 18 Power ( ) ) Makes a copy smaller or larger than the original. Shows the current status and prompts during an operation. Shows the status of your machine (See Understanding the Status LED). Activates fax mode. Activates copy mode. Activates scan mode. Scroll through the options available in the selected menu, and increase or decrease values. Enters Menu mode and scrolls through the available menus (See Machine status and advanced feature). Confirms the selection on the screen. Sends you back to the upper menu level. Dials fax number, and enters the number value for document copies or other options. Allows you to store frequently used fax numbers or search for stored fax numbers. In standby mode, redials the last number. Also in edit mode, inserts a pause into a fax number. Enables you to dial a number with the receiver on the hook. Starts a job. Stops an operation at any time. The pop-up window appears on the screen showing the current job that the user can stop or resume. You can turn the power on and off (See Power button). Understanding the Status LED The color of the status LED indicates the machine's current status. Status Description Off The machine is off-line. The machine is in power saver mode. When data is received, or any button is pressed, it switches to on-line automatically. Green Blinking When the backlight slowly blinks, the machine is receiving data from the computer. When the backlight blinks rapidly, the machine is printing data. On The machine is on-line and can be used. Red Blinking A minor error has occurred and the machine is waiting for the error to be cleared. Check the display message. When the problem is cleared, the machine resumes. Small amount of toner is left in the cartridge. The estimated cartridge life[a] of toner is close. Prepare a new cartridge for replacement. You may temporarily increase the printing quality by redistributing the toner. (See Redistributing toner.) On A toner cartridge has almost reached the end of its estimated cartridge life[a]. It is recommended to replace the toner cartridge (See Replacing the toner cartridge). A paper jam has occurred (See Clearing paper jams). The cover is opened. Close the cover.
-
 1
1 -
2
-
 3
3 -
 4
4 -
 5
5 -
 6
6 -
 7
7 -
 8
8 -
 9
9 -
 10
10 -
 11
11 -
 12
12 -
 13
13 -
14
-
15
-
16
-
17
-
18
-
19
-
20
-
21
-
22
-
23
-
24
-
25
-
26
-
27
-
28
-
29
-
30
-
31
-
32
-
33
-
34
-
35
-
36
-
37
-
38
-
39
-
40
-
41
-
42
-
43
-
44
-
45
-
46
-
47
-
48
-
49
-
50
-
51
-
52
-
53
-
54
-
55
-
56
-
57
-
58
-
59
-
60
-
61
-
62
-
63
-
64
-
65
-
66
-
67
-
68
-
69
-
70
-
71
-
72
-
73
-
74
-
75
-
76
-
77
-
78
-
79
-
80
-
81
-
82
-
83
-
84
-
85
-
86
-
87
-
88
-
89
-
90
-
91
-
92
-
93
-
94
-
95
-
96
-
97
-
98
-
99
-
100
-
101
-
102
-
103
-
104
-
105
-
106
-
107
-
108
-
109
-
110
-
111
-
112
-
113
-
114
-
115
-
116
-
117
-
118
-
119
-
120
-
121
-
122
-
123
-
124
-
125
-
126
-
127
-
128
-
129
-
130
-
131
-
132
-
133
-
134
-
135
-
136
-
137
-
138
 |
 |