Dell 1135N User Guide - Page 23
Basic setup - driver software
 |
View all Dell 1135N manuals
Add to My Manuals
Save this manual to your list of manuals |
Page 23 highlights
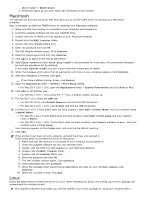
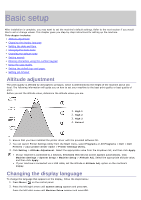
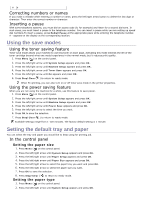
Basic setup After installation is complete, you may want to set the machine's default settings. Refer to the next section if you would like to set or change values. This chapter gives you step-by-step instructions for setting up the machine. This chapter includes: Altitude adjustment Changing the display language Setting the date and time Changing the clock mode Changing the default mode Setting sounds Entering characters using the number keypad Using the save modes Setting the default tray and paper Setting job timeout Altitude adjustment The print quality is affected by atmospheric pressure, which is determined by the height of the machine above sea level. The following information will guide you on how to set your machine to the best print quality or best quality of print. Before you set the altitude value, determine the altitude where you are. 1. High 1 2. High 2 3. High 3 4. Normal 1. Ensure that you have installed the printer driver with the provided software CD. 2. You can launch Printer Settings Utility from the Start menu, select Programs or All Programs > Dell > Dell Printers > your printer driver name > Printer Settings Utility. 3. Click Setting > Altitude Adjustment. Select the appropriate value from the dropdown list, and then click Apply. If your machine is connected to a network, Embedded Web Service screen appears automatically. Click Machine Settings > System Setup > Machine Setup > Altitude Adj. Select the appropriate altitude value, and then click Apply. If your machine is connected via a USB cable, set the altitude in Altitude Adj. option on the machine's display. Changing the display language To change the language that appears on the display, follow the steps below: 1. Press Menu ( ) on the control panel. 2. Press the left/right arrow until System Setup appears and press OK. Press the left/right arrow until Machine Setup appears and press OK.
-
 1
1 -
2
-
3
-
4
-
5
-
6
-
7
-
8
-
9
-
10
-
11
-
12
-
13
-
14
-
15
-
16
-
17
-
 18
18 -
 19
19 -
 20
20 -
 21
21 -
 22
22 -
 23
23 -
 24
24 -
 25
25 -
 26
26 -
 27
27 -
 28
28 -
29
-
30
-
31
-
32
-
33
-
34
-
35
-
36
-
37
-
38
-
39
-
40
-
41
-
42
-
43
-
44
-
45
-
46
-
47
-
48
-
49
-
50
-
51
-
52
-
53
-
54
-
55
-
56
-
57
-
58
-
59
-
60
-
61
-
62
-
63
-
64
-
65
-
66
-
67
-
68
-
69
-
70
-
71
-
72
-
73
-
74
-
75
-
76
-
77
-
78
-
79
-
80
-
81
-
82
-
83
-
84
-
85
-
86
-
87
-
88
-
89
-
90
-
91
-
92
-
93
-
94
-
95
-
96
-
97
-
98
-
99
-
100
-
101
-
102
-
103
-
104
-
105
-
106
-
107
-
108
-
109
-
110
-
111
-
112
-
113
-
114
-
115
-
116
-
117
-
118
-
119
-
120
-
121
-
122
-
123
-
124
-
125
-
126
-
127
-
128
-
129
-
130
-
131
-
132
-
133
-
134
-
135
-
136
-
137
-
138
 |
 |