Dell C1765NFW Dell Users Guide - Page 273
Prefix Dial, System, Admin Menu, Fax Settings, Line Type
 |
View all Dell C1765NFW manuals
Add to My Manuals
Save this manual to your list of manuals |
Page 273 highlights
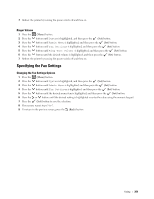
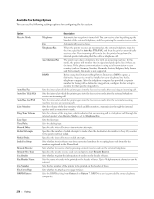
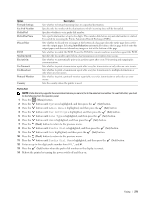
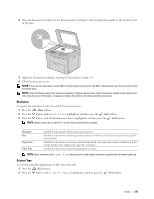
Option Forward Settings Fax Fwd Number Prefix Dial Prefix Dial Num Discard Size ECM Modem Speed Fax Activity Fax Transmit Fax Broadcast Protocol Monitor Country Description Sets whether to forward incoming faxes to a specified destination. Specifies the fax number of the destination to which incoming faxes will be forwarded. Specifies whether to set a prefix dial number. Sets a prefix dial number of up to five digits. This number dials before any auto dial number is started. It is useful for accessing the Private Automatic Branch Exchange (PABX). Sets whether to discard text or images at the bottom of a fax page when the entire page does not fit onto the output paper. Selecting Auto Reduction automatically reduces the fax page to fit it onto the output paper, and does not discard any images or text at the bottom of the page. Sets whether to enable the ECM. To use the ECM, the remote machines must also support the ECM. Specifies the fax modem speed when a fax transmission or reception error occurs. Sets whether to automatically print a fax activity report after every 50 incoming and outgoing fax communications. Sets whether to print a transmission report after every fax transmission or only when an error occurs. Sets whether to print a transmission report after every fax transmission to multiple destinations or only when an error occurs. Sets whether to print a protocol monitor report after every fax transmission or only when an error occurs. Sets the country where the printer is used. Prefix Dial NOTE: Prefix Dial only supports the environment where you send a fax to the external line number. To use Prefix Dial, you must do the following from the operator panel. 1 Press the (Menu) button. 2 Press the button until System is highlighted, and then press the (Set) button. 3 Press the button until Admin Menu is highlighted, and then press the (Set) button. 4 Press the button until Fax Settings is highlighted, and then press the (Set) button. 5 Press the button until Line Type is highlighted, and then press the (Set) button. 6 Press the button until PBX is highlighted, and then press the (Set) button. 7 Press the (Back) button to return to the previous menu. 8 Press the button until Prefix Dial is highlighted, and then press the (Set) button. 9 Press the button until On is highlighted, and then press the 10 Press the (Back) button to return to the previous menu. (Set) button. 11 Press the button until Prefix Dial Num is highlighted, and then press the (Set) button. 12 Enter an up-to-five-digit prefix number from 0-9, *, and #. 13 Press the (Set) button when the prefix dial number on the display is correct. 14 Reboot the printer by turning the power switch off and then on. Faxing 271
-
 1
1 -
2
-
3
-
4
-
5
-
6
-
7
-
8
-
9
-
10
-
11
-
12
-
13
-
14
-
15
-
16
-
17
-
18
-
19
-
20
-
21
-
22
-
23
-
24
-
25
-
26
-
27
-
28
-
29
-
30
-
31
-
32
-
33
-
34
-
35
-
36
-
37
-
38
-
39
-
40
-
41
-
42
-
43
-
44
-
45
-
46
-
47
-
48
-
49
-
50
-
51
-
52
-
53
-
54
-
55
-
56
-
57
-
58
-
59
-
60
-
61
-
62
-
63
-
64
-
65
-
66
-
67
-
68
-
69
-
70
-
71
-
72
-
73
-
74
-
75
-
76
-
77
-
78
-
79
-
80
-
81
-
82
-
83
-
84
-
85
-
86
-
87
-
88
-
89
-
90
-
91
-
92
-
93
-
94
-
95
-
96
-
97
-
98
-
99
-
100
-
101
-
102
-
103
-
104
-
105
-
106
-
107
-
108
-
109
-
110
-
111
-
112
-
113
-
114
-
115
-
116
-
117
-
118
-
119
-
120
-
121
-
122
-
123
-
124
-
125
-
126
-
127
-
128
-
129
-
130
-
131
-
132
-
133
-
134
-
135
-
136
-
137
-
138
-
139
-
140
-
141
-
142
-
143
-
144
-
145
-
146
-
147
-
148
-
149
-
150
-
151
-
152
-
153
-
154
-
155
-
156
-
157
-
158
-
159
-
160
-
161
-
162
-
163
-
164
-
165
-
166
-
167
-
168
-
169
-
170
-
171
-
172
-
173
-
174
-
175
-
176
-
177
-
178
-
179
-
180
-
181
-
182
-
183
-
184
-
185
-
186
-
187
-
188
-
189
-
190
-
191
-
192
-
193
-
194
-
195
-
196
-
197
-
198
-
199
-
200
-
201
-
202
-
203
-
204
-
205
-
206
-
207
-
208
-
209
-
210
-
211
-
212
-
213
-
214
-
215
-
216
-
217
-
218
-
219
-
220
-
221
-
222
-
223
-
224
-
225
-
226
-
227
-
228
-
229
-
230
-
231
-
232
-
233
-
234
-
235
-
236
-
237
-
238
-
239
-
240
-
241
-
242
-
243
-
244
-
245
-
246
-
247
-
248
-
249
-
250
-
251
-
252
-
253
-
254
-
255
-
256
-
257
-
258
-
259
-
260
-
261
-
262
-
263
-
264
-
265
-
266
-
267
-
 268
268 -
 269
269 -
 270
270 -
 271
271 -
 272
272 -
 273
273 -
 274
274 -
 275
275 -
 276
276 -
 277
277 -
 278
278 -
279
-
280
-
281
-
282
-
283
-
284
-
285
-
286
-
287
-
288
-
289
-
290
-
291
-
292
-
293
-
294
-
295
-
296
-
297
-
298
-
299
-
300
-
301
-
302
-
303
-
304
-
305
-
306
-
307
-
308
-
309
-
310
-
311
-
312
-
313
-
314
-
315
-
316
-
317
-
318
-
319
-
320
-
321
-
322
-
323
-
324
-
325
-
326
-
327
-
328
-
329
-
330
-
331
-
332
-
333
-
334
-
335
-
336
-
337
-
338
-
339
-
340
-
341
-
342
-
343
-
344
-
345
-
346
-
347
-
348
-
349
-
350
-
351
-
352
-
353
-
354
-
355
-
356
-
357
-
358
-
359
-
360
-
361
-
362
-
363
-
364
-
365
-
366
-
367
-
368
-
369
-
370
-
371
-
372
-
373
-
374
-
375
-
376
 |
 |