Dell C1765NFW Dell Users Guide - Page 276
Lighter/Darker, Sending a Fax Automatically, One Touch Dial, Contacts, Redial/Pause, Speed Dial
 |
View all Dell C1765NFW manuals
Add to My Manuals
Save this manual to your list of manuals |
Page 276 highlights
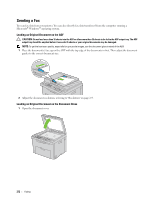
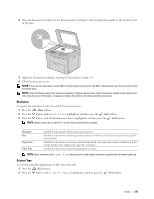
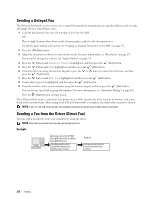
3 Press the button to select the desired setting, and then press the (Set) button. Text Photo Suitable for documents with text. Suitable for documents with photos. Lighter/Darker To adjust the contrast to make the fax lighter or darker than the original: 1 Press the (Fax) button. 2 Press the button until Lighter/Darker is highlighted, and then press the (Set) button. 3 Press the or button to select the desired setting, and then press the (Set) button. NOTE: Values marked by an asterisk (*) are the factory default menu settings. Lighter2 Lighter1 Normal* Darker1 Darker2 Makes the fax lighter than the original. Works well with dark print. Works well with standard typed or printed documents. Makes the fax darker than the original. Works well with light print or faint pencil markings. Sending a Fax Automatically 1 Load the document(s) face up with top edge in first into the ADF: OR Place a single document face down on the document glass, and close the document cover. For details about loading a document, see "Loading an Original Document on the ADF" on page 272. 2 Press the (Fax) button. 3 Adjust the document resolution to suit your fax needs. For more information, see "Resolution" on page 273. If you need to change the contrast, see "Lighter/Darker" on page 274. 4 You can select a fax number in one of the following ways: • Ensure that Fax to is highlighted, and then press the (Set) button. Press the button until Phone Book is highlighted, and then press the (Set) button. Press the button to select the recipients. • Press the One Touch Dial button. • Press the (Contacts) button, select All Entries, Group Dial, or Search using the button, and then press the (Set) button. All Entries Group Dial Search Displays a list of registered fax numbers. Press the button to select the recipients. Press the button to select the recipients. Searches a fax number from the Phone Book. Enter the text you want to search, and then press the (Set) button. Press the button to select the recipients. • Press the (Redial/Pause) button to redial. • Press the (Speed Dial) button. Enter the speed dial number between 01 and 99 using the numeric keypad, and then press the (Set) button. 274 Faxing
-
 1
1 -
2
-
3
-
4
-
5
-
6
-
7
-
8
-
9
-
10
-
11
-
12
-
13
-
14
-
15
-
16
-
17
-
18
-
19
-
20
-
21
-
22
-
23
-
24
-
25
-
26
-
27
-
28
-
29
-
30
-
31
-
32
-
33
-
34
-
35
-
36
-
37
-
38
-
39
-
40
-
41
-
42
-
43
-
44
-
45
-
46
-
47
-
48
-
49
-
50
-
51
-
52
-
53
-
54
-
55
-
56
-
57
-
58
-
59
-
60
-
61
-
62
-
63
-
64
-
65
-
66
-
67
-
68
-
69
-
70
-
71
-
72
-
73
-
74
-
75
-
76
-
77
-
78
-
79
-
80
-
81
-
82
-
83
-
84
-
85
-
86
-
87
-
88
-
89
-
90
-
91
-
92
-
93
-
94
-
95
-
96
-
97
-
98
-
99
-
100
-
101
-
102
-
103
-
104
-
105
-
106
-
107
-
108
-
109
-
110
-
111
-
112
-
113
-
114
-
115
-
116
-
117
-
118
-
119
-
120
-
121
-
122
-
123
-
124
-
125
-
126
-
127
-
128
-
129
-
130
-
131
-
132
-
133
-
134
-
135
-
136
-
137
-
138
-
139
-
140
-
141
-
142
-
143
-
144
-
145
-
146
-
147
-
148
-
149
-
150
-
151
-
152
-
153
-
154
-
155
-
156
-
157
-
158
-
159
-
160
-
161
-
162
-
163
-
164
-
165
-
166
-
167
-
168
-
169
-
170
-
171
-
172
-
173
-
174
-
175
-
176
-
177
-
178
-
179
-
180
-
181
-
182
-
183
-
184
-
185
-
186
-
187
-
188
-
189
-
190
-
191
-
192
-
193
-
194
-
195
-
196
-
197
-
198
-
199
-
200
-
201
-
202
-
203
-
204
-
205
-
206
-
207
-
208
-
209
-
210
-
211
-
212
-
213
-
214
-
215
-
216
-
217
-
218
-
219
-
220
-
221
-
222
-
223
-
224
-
225
-
226
-
227
-
228
-
229
-
230
-
231
-
232
-
233
-
234
-
235
-
236
-
237
-
238
-
239
-
240
-
241
-
242
-
243
-
244
-
245
-
246
-
247
-
248
-
249
-
250
-
251
-
252
-
253
-
254
-
255
-
256
-
257
-
258
-
259
-
260
-
261
-
262
-
263
-
264
-
265
-
266
-
267
-
268
-
269
-
270
-
 271
271 -
 272
272 -
 273
273 -
 274
274 -
 275
275 -
 276
276 -
 277
277 -
 278
278 -
 279
279 -
 280
280 -
 281
281 -
282
-
283
-
284
-
285
-
286
-
287
-
288
-
289
-
290
-
291
-
292
-
293
-
294
-
295
-
296
-
297
-
298
-
299
-
300
-
301
-
302
-
303
-
304
-
305
-
306
-
307
-
308
-
309
-
310
-
311
-
312
-
313
-
314
-
315
-
316
-
317
-
318
-
319
-
320
-
321
-
322
-
323
-
324
-
325
-
326
-
327
-
328
-
329
-
330
-
331
-
332
-
333
-
334
-
335
-
336
-
337
-
338
-
339
-
340
-
341
-
342
-
343
-
344
-
345
-
346
-
347
-
348
-
349
-
350
-
351
-
352
-
353
-
354
-
355
-
356
-
357
-
358
-
359
-
360
-
361
-
362
-
363
-
364
-
365
-
366
-
367
-
368
-
369
-
370
-
371
-
372
-
373
-
374
-
375
-
376
 |
 |