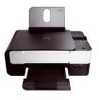
Dell V305 User Guide - Page 79
Using the PIN Method
 |
UPC - 884116004004
View all Dell V305 manuals
Add to My Manuals
Save this manual to your list of manuals |
Page 79 highlights
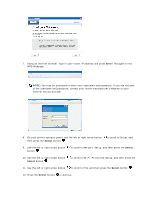
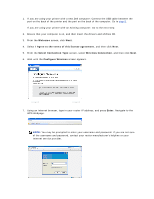
Using WiFi Protected Setup to Configure the Printer on a Wireless Network (for advanced users only) Wi-Fi Protected Setup (WPS) is only available if you are using a WPS-enabled router. If you are not sure if your router is WPS-enabled, check the router for the WPS logo. Before beginning WPS-enabled setup, you must know the router IP address. If you are unsure of the router IP address, follow the instructions for Using USB Cable to Configure the Printer on a Wireless Network (recommended for most users). NOTE: If your wireless network security is disabled, make sure to enable the security settings before proceeding with WPS configuration. (Consult your wireless router manufacturer's documentation.) If you do not enable your wireless network security, configuring your printer using WPS may change your wireless network settings. You will then be required to reconnect your computer to your router with your new wireless network settings. Using the PIN Method 1. If you are using your printer with a new Dell computer: Connect the USB cable between the port on the back of the printer and the port on the back of the computer. Go to step 5. If you are using your printer with an existing computer: Go to the next step. 2. Ensure that your computer is on, and then insert the Drivers and Utilities CD. 3. From the Welcome screen, click Next. 4. Select I Agree to the terms of this license agreement, and then click Next. 5. From the Select Connection Type screen, select Wireless Connection, and then click Next. 6. Wait until the Configure Wireless screen appears.
-
 1
1 -
2
-
3
-
4
-
5
-
6
-
7
-
8
-
9
-
10
-
11
-
12
-
13
-
14
-
15
-
16
-
17
-
18
-
19
-
20
-
21
-
22
-
23
-
24
-
25
-
26
-
27
-
28
-
29
-
30
-
31
-
32
-
33
-
34
-
35
-
36
-
37
-
38
-
39
-
40
-
41
-
42
-
43
-
44
-
45
-
46
-
47
-
48
-
49
-
50
-
51
-
52
-
53
-
54
-
55
-
56
-
57
-
58
-
59
-
60
-
61
-
62
-
63
-
64
-
65
-
66
-
67
-
68
-
69
-
70
-
71
-
72
-
73
-
 74
74 -
 75
75 -
 76
76 -
 77
77 -
 78
78 -
 79
79 -
 80
80 -
 81
81 -
 82
82 -
 83
83 -
 84
84 -
85
-
86
-
87
-
88
-
89
-
90
-
91
-
92
-
93
-
94
-
95
-
96
-
97
-
98
-
99
-
100
-
101
-
102
-
103
-
104
-
105
-
106
-
107
-
108
-
109
-
110
-
111
-
112
-
113
-
114
-
115
-
116
-
117
-
118
-
119
-
120
-
121
-
122
-
123
-
124
-
125
-
126
-
127
-
128
-
129
-
130
-
131
-
132
-
133
 |
 |
