Epson C31CA85090 Software User Guide - Page 50
Update Mode
 |
View all Epson C31CA85090 manuals
Add to My Manuals
Save this manual to your list of manuals |
Page 50 highlights
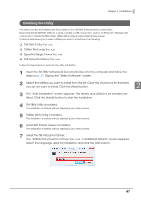
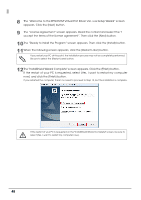
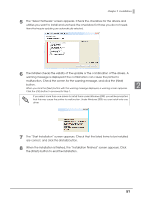
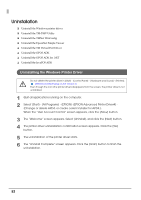
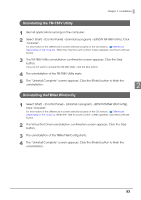
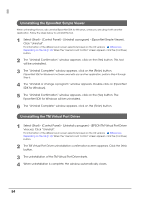
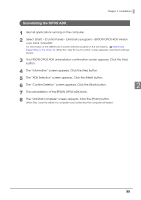
Update Mode • When installing, connect just one printer. Do not connect multiple printers. • When you are prompted whether to restart the computer during the installation, select [No] and continue the installation. Restart the computer and the printer after all the installation is finished. If you select [Yes] and restart the computer during the installation, the rest of the drivers will not be installed. The update mode allows you to update the printer driver already existing on the system, or check to see if the selected newer version of printer driver can exist with the existing printer driver on the same system. When the Advanced Printer Driver, OPOS ADK, OPOS ADK for .NET, JavaPOS ADK, and TM Virtual Port Driver are already installed, the driver installation is carried out in the update mode. Under Windows 2000, you will be just notified that installing the new driver may cause the printer to malfunction due to the incompatibility with the existing one. 1 Insert the TM-T88V Software & Documents Disc into the computer. The TM-T88V Software Installer is automatically read and the "EPSON TM-T88V Software Installer" screen appears. Click the [Install Now] button. The displayed language can be changed from [Select language]. When the TM-T88V Software Installer is not automatically read, double click the [TMInstallNavi.exe] icon in the TM-T88V Software & Documents Disc. 2 The "License Agreement" screen appears. Read the content and select the "I accept the terms in the license agreement". Then click the [Next] button. 3 The "Update Software" screen appears. The system is checked and existing driver and its version are displayed. Click the [Next] button. 4 The "Select Printer Language (Resident Character)" screen appears. Select the language of your printer and click the [Next] button. The language can be checked in "Resident Character" that is printed in the self test. To start the self test, turn on the power button while holding down the FEED button with the paper roll cover closed. Continue holding down the FEED button until printing starts. 50
-
 1
1 -
2
-
3
-
4
-
5
-
6
-
7
-
8
-
9
-
10
-
11
-
12
-
13
-
14
-
15
-
16
-
17
-
18
-
19
-
20
-
21
-
22
-
23
-
24
-
25
-
26
-
27
-
28
-
29
-
30
-
31
-
32
-
33
-
34
-
35
-
36
-
37
-
38
-
39
-
40
-
41
-
42
-
43
-
44
-
 45
45 -
 46
46 -
 47
47 -
 48
48 -
 49
49 -
 50
50 -
 51
51 -
 52
52 -
 53
53 -
 54
54 -
 55
55 -
56
-
57
-
58
-
59
-
60
-
61
-
62
-
63
-
64
-
65
-
66
-
67
-
68
-
69
-
70
-
71
-
72
-
73
-
74
-
75
-
76
-
77
-
78
-
79
-
80
-
81
-
82
-
83
-
84
-
85
-
86
-
87
-
88
-
89
-
90
-
91
-
92
-
93
-
94
-
95
-
96
-
97
-
98
-
99
-
100
-
101
-
102
-
103
-
104
-
105
-
106
-
107
-
108
-
109
-
110
-
111
-
112
-
113
-
114
-
115
-
116
-
117
-
118
-
119
-
120
-
121
-
122
-
123
-
124
-
125
-
126
-
127
-
128
 |
 |