Epson C31CA85090 Software User Guide - Page 78
The advanced settings screen for the barcode appears. Specify the barcode, the [OK] button.
 |
View all Epson C31CA85090 manuals
Add to My Manuals
Save this manual to your list of manuals |
Page 78 highlights
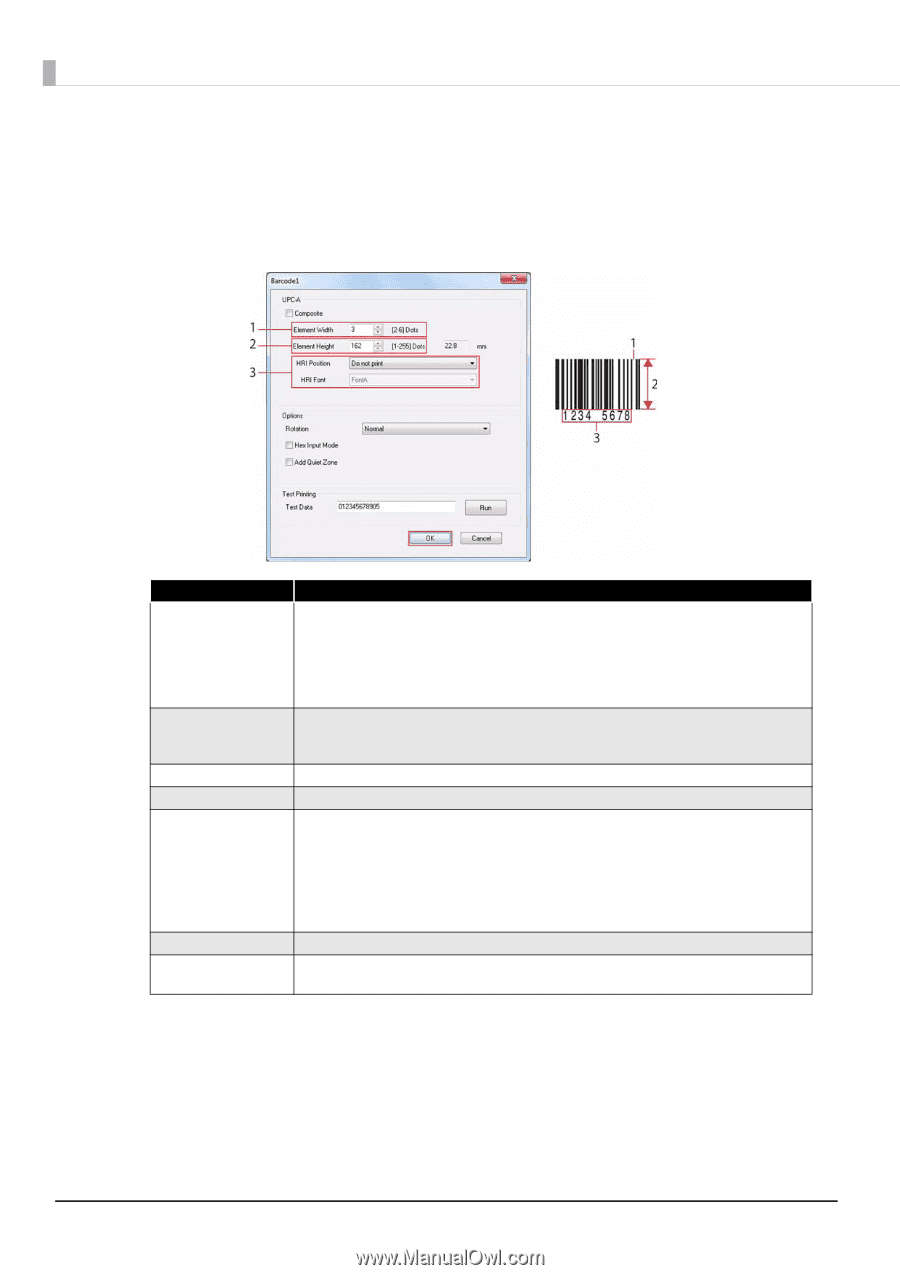
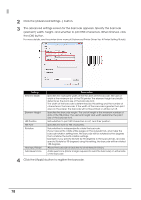
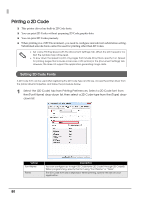
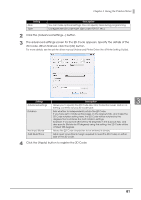
2 Click the [Advanced Settings...] button. 3 The advanced settings screen for the barcode appears. Specify the barcode (element) width, height, and whether to print HRI characters. When finished, click the [OK] button. For more details, see the printer driver manual (Advanced Printer Driver Ver. 4 Printer Setting Guide). Setting Element Width Element Height HRI Position HRI Font Rotation Hex Input Mode Add Quiet Zone Description Specifies the narrowest width of the thin lines of the barcode. The unit of width is the minimum dot of the TM printer. The element height and width determines the point size of the barcode font. The width of the barcode is determined by this setting and the number of characters in the barcode. If the width of the barcode is greater than print area on the paper, the barcode will not be printed or will be cut off. Specifies the barcode height. The unit of height is the minimum number of dots of the TM printer. The element height and width determine the point size of the barcode font. Sets whether to print HRI characters or not, and their position. Specifies the font for HRI characters. Sets whether to independently rotate the barcode. If you have set to rotate entire pages on the [Layout] tab, and make the barcode rotation setting here, the barcode will be rotated by the degrees that combine the both rotation settings. Example: If you specify [Rotate by 90 degrees] in the [Layout] tab, and also specify [Rotate by 90 degrees] using this setting, the barcode will be rotated 180 degrees. Allows the barcode characters to be entered in binary. Adds quiet zone (blank margin required to read the barcode) on either side of the barcode. 4 Click the [Apply] button to register the barcode. 78
-
 1
1 -
2
-
3
-
4
-
5
-
6
-
7
-
8
-
9
-
10
-
11
-
12
-
13
-
14
-
15
-
16
-
17
-
18
-
19
-
20
-
21
-
22
-
23
-
24
-
25
-
26
-
27
-
28
-
29
-
30
-
31
-
32
-
33
-
34
-
35
-
36
-
37
-
38
-
39
-
40
-
41
-
42
-
43
-
44
-
45
-
46
-
47
-
48
-
49
-
50
-
51
-
52
-
53
-
54
-
55
-
56
-
57
-
58
-
59
-
60
-
61
-
62
-
63
-
64
-
65
-
66
-
67
-
68
-
69
-
70
-
71
-
72
-
 73
73 -
 74
74 -
 75
75 -
 76
76 -
 77
77 -
 78
78 -
 79
79 -
 80
80 -
 81
81 -
 82
82 -
 83
83 -
84
-
85
-
86
-
87
-
88
-
89
-
90
-
91
-
92
-
93
-
94
-
95
-
96
-
97
-
98
-
99
-
100
-
101
-
102
-
103
-
104
-
105
-
106
-
107
-
108
-
109
-
110
-
111
-
112
-
113
-
114
-
115
-
116
-
117
-
118
-
119
-
120
-
121
-
122
-
123
-
124
-
125
-
126
-
127
-
128
 |
 |