Epson LQ 1050 Technical Manual - Page 122
Disconnect connectors CN4, CN5, CN6, CN7, CN8, CN9, and CN 10, which connect the printer
 |
View all Epson LQ 1050 manuals
Add to My Manuals
Save this manual to your list of manuals |
Page 122 highlights
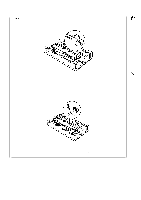
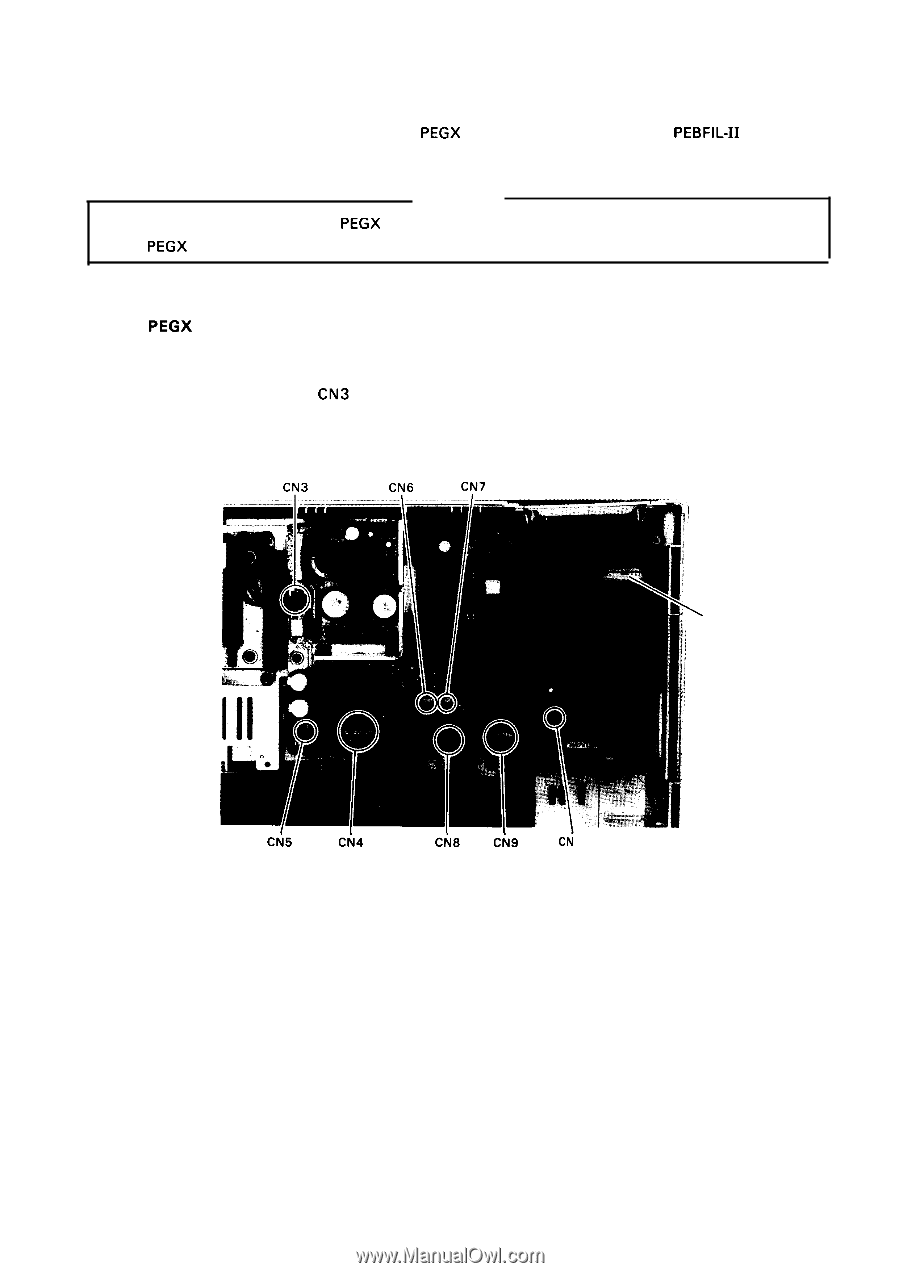
REV.-A 4.2.4 Circuit Board Removal This printer includes two circuit boards: the PEGX controller circuit board and PEBFIL-11 filter circuit board. CAUTION Electricity leaks when you put the PEGX board on the electric-conductor materials. The lithium battery on the PEGX board always supply DC voltage to the static-RAM. 4.2.4.1 PEGX Board Removal Step 1: Remove the upper case (Refer to Section 4.2. 1.). Step 2: Remove the push tractor unit (Refer to Section 4.2.3.). Step 3: Disconnect connector CN3 which connects the power transformer. Step 4: Disconnect connectors CN4, CN5, CN6, CN7, CN8, CN9, and CN 10, which connect the printer mechanism. CN3 CN6 CN7 'Lithium Battery CN5 CN4 CN8 CN9 CN 10 Figure 4-10. Connectors Removal 4-9
-
 1
1 -
2
-
3
-
4
-
5
-
6
-
7
-
8
-
9
-
10
-
11
-
12
-
13
-
14
-
15
-
16
-
17
-
18
-
19
-
20
-
21
-
22
-
23
-
24
-
25
-
26
-
27
-
28
-
29
-
30
-
31
-
32
-
33
-
34
-
35
-
36
-
37
-
38
-
39
-
40
-
41
-
42
-
43
-
44
-
45
-
46
-
47
-
48
-
49
-
50
-
51
-
52
-
53
-
54
-
55
-
56
-
57
-
58
-
59
-
60
-
61
-
62
-
63
-
64
-
65
-
66
-
67
-
68
-
69
-
70
-
71
-
72
-
73
-
74
-
75
-
76
-
77
-
78
-
79
-
80
-
81
-
82
-
83
-
84
-
85
-
86
-
87
-
88
-
89
-
90
-
91
-
92
-
93
-
94
-
95
-
96
-
97
-
98
-
99
-
100
-
101
-
102
-
103
-
104
-
105
-
106
-
107
-
108
-
109
-
110
-
111
-
112
-
113
-
114
-
115
-
116
-
 117
117 -
 118
118 -
 119
119 -
 120
120 -
 121
121 -
 122
122 -
 123
123 -
 124
124 -
 125
125 -
 126
126 -
 127
127 -
128
-
129
-
130
-
131
-
132
-
133
-
134
-
135
-
136
-
137
-
138
-
139
-
140
-
141
-
142
-
143
-
144
-
145
-
146
-
147
-
148
-
149
-
150
-
151
-
152
-
153
-
154
-
155
-
156
-
157
-
158
-
159
-
160
-
161
-
162
-
163
-
164
-
165
-
166
-
167
-
168
-
169
-
170
-
171
-
172
-
173
-
174
-
175
-
176
-
177
-
178
-
179
-
180
-
181
-
182
-
183
-
184
-
185
-
186
-
187
-
188
-
189
-
190
-
191
-
192
-
193
-
194
-
195
-
196
-
197
-
198
-
199
-
200
-
201
-
202
-
203
-
204
-
205
-
206
-
207
-
208
-
209
-
210
-
211
-
212
-
213
-
214
-
215
-
216
-
217
-
218
-
219
-
220
-
221
-
222
-
223
-
224
-
225
 |
 |
REV.-A
4.2.4 Circuit Board Removal
This printer includes two circuit boards: the
PEGX
controller circuit board and
PEBFIL-11
filter circuit
board.
CAUTION
Electricity leaks when you put the
PEGX
board on the electric-conductor materials. The lithium battery
on the
PEGX
board always supply DC voltage to the static-RAM.
4.2.4.1
Step 1:
Step 2:
Step 3:
Step 4:
PEGX
Board Removal
Remove the upper case (Refer to Section 4.2. 1.).
Remove the push tractor unit (Refer to Section 4.2.3.).
Disconnect connector
CN3
which connects the power transformer.
Disconnect connectors CN4, CN5, CN6, CN7, CN8, CN9, and CN 10, which connect the printer
mechanism.
CN3
CN6
CN7
‘Lithium Battery
CN5
CN4
CN8
CN9
CN
10
Figure 4-10. Connectors Removal
4-9