HP BL260c HP BladeSystem c-Class Enclosure Troubleshooting Guide - Page 21
Use the Insight Display Enclosure Settings information to change the OA1 IP address, Verification
 |
UPC - 883585668663
View all HP BL260c manuals
Add to My Manuals
Save this manual to your list of manuals |
Page 21 highlights
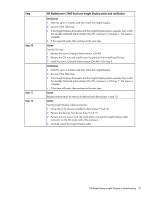
Step Step 6 Step 7 HP BladeSystem c7000 Enclosure Insight Display action and verification Verification 1 Wait for up to 2 minutes, and then check the Insight Display. 2 Do one of the following: • If the issue still exists, continue to the next step. • If the Insight Display illuminates and the Insight Display buttons operate properly, then test the OA tray connection. Continue to step 9. Action Test the Onboard Administrator: 1 Remove OA #X. 2 Install the OA #Y, if present, or a known-working Onboard Administrator into OA bay 1. Verification 1 Wait for up to 2 minutes, and then check the Insight Display. 2 Do one of the following: • If the issue still exists, then test the OA tray connection. Continue to step 9. • If the Insight Display illuminates and the Insight Display buttons operate properly, then OA #X failed. If OA #X has failed, do one of the following: • If replacing OA #X with a service spare part, then continue to the next step. • If replacing OA #X with OA #Y, then continue to step 8. Action Obtain the OA1 IP settings from the enclosure administrator. Static OA1 IP settings: 1 Use the Insight Display Enclosure Settings information to change the OA1 IP address to static. 2 Enter the following information recorded in the previous step: • IP address • Netmask • Gateway 3 Record or tear off the replaced Onboard Administrator password from the label on the OA tray. DHCP OA IP settings: 1 Use the Insight Display Enclosure Settings information to change the OA1 IP address to DHCP. 2 Record the following information: • New OA IP address • DNS name of the old Onboard Administrator from the label • DNS name of the new Onboard Administrator from the label 3 Record or tear off the replaced Onboard Administrator password from the label on the OA tray. HP BladeSystem Insight Display troubleshooting 21
-
 1
1 -
2
-
3
-
4
-
5
-
6
-
7
-
8
-
9
-
10
-
11
-
12
-
13
-
14
-
15
-
 16
16 -
 17
17 -
 18
18 -
 19
19 -
 20
20 -
 21
21 -
 22
22 -
 23
23 -
 24
24 -
 25
25 -
 26
26 -
27
-
28
-
29
-
30
-
31
-
32
-
33
-
34
-
35
-
36
-
37
-
38
-
39
-
40
-
41
-
42
-
43
-
44
-
45
-
46
-
47
-
48
-
49
-
50
-
51
-
52
-
53
-
54
-
55
-
56
-
57
-
58
-
59
-
60
-
61
-
62
-
63
-
64
-
65
-
66
-
67
-
68
-
69
-
70
-
71
-
72
-
73
-
74
-
75
-
76
-
77
-
78
-
79
-
80
-
81
-
82
-
83
-
84
-
85
-
86
-
87
-
88
-
89
-
90
-
91
-
92
-
93
-
94
-
95
-
96
-
97
-
98
-
99
-
100
-
101
-
102
-
103
-
104
-
105
-
106
 |
 |
