HP BL260c HP BladeSystem c-Class Enclosure Troubleshooting Guide - Page 55
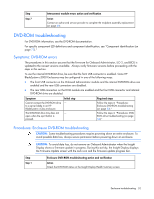
DVD-ROM drive troubleshooting action and verification, If Insight Display reports DVD Connect Status
 |
UPC - 883585668663
View all HP BL260c manuals
Add to My Manuals
Save this manual to your list of manuals |
Page 55 highlights
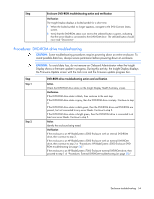
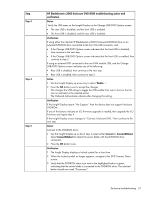
Step Step 3 Step 4 Step 5 Step 6 Step 7 DVD-ROM drive troubleshooting action and verification Action 1 Eject the internal DVD-ROM drive. • For an HP BladeSystem c3000 Enclosure installed in a rack, press the top corner of DVD-ROM drive. • For an HP BladeSystem c3000 Tower Enclosure, press the right corner of the DVD- ROM drive. 2 Reseat the internal DVD-ROM drive. Verification If Insight Display DVD-ROM drive status is black, then proceed to step 2 of "Procedures: Enclosure DVD-ROM troubleshooting (on page 52)." If the DVD-ROM status is gray or green, then continue to the next step. Action Press the eject button on the DVD-ROM drive. Verification If the DVD-ROM drive ejects, then the repair is complete. If the DVD-ROM drive does not eject, then proceed to step 2 of "Procedures: HP BladeSystem c3000 Enclosure DVD-ROM troubleshooting (on page 56)." Action Connect to the DVD-ROM drive: 1 Use the Insight Display to navigate to the Enclosure Settings screen. 2 Select DVD Drive 'Connect...' 3 Press the OK button. Verification If Insight Display reports "DVD Connect Status," then continue to step 7. If the Insight Display does not report DVD Connect Status, then continue to the next step. Action 1 On the Change USB/DVD Options screen, use the Insight Display up arrow key to highlight No Change. 2 Press the OK button twice. Verification Be sure that the Insight Display changes to the DVD Connect Status screen. Continue to the next step. Action 1 On the Insight Display, highlight all bays. 2 Select Change. 3 Press the OK button. Verification Be sure that the Insight Display changes to the Connect: Enclosure DVD screen. Continue to the next step. Enclosure troubleshooting 55
-
 1
1 -
2
-
3
-
4
-
5
-
6
-
7
-
8
-
9
-
10
-
11
-
12
-
13
-
14
-
15
-
16
-
17
-
18
-
19
-
20
-
21
-
22
-
23
-
24
-
25
-
26
-
27
-
28
-
29
-
30
-
31
-
32
-
33
-
34
-
35
-
36
-
37
-
38
-
39
-
40
-
41
-
42
-
43
-
44
-
45
-
46
-
47
-
48
-
49
-
 50
50 -
 51
51 -
 52
52 -
 53
53 -
 54
54 -
 55
55 -
 56
56 -
 57
57 -
 58
58 -
 59
59 -
 60
60 -
61
-
62
-
63
-
64
-
65
-
66
-
67
-
68
-
69
-
70
-
71
-
72
-
73
-
74
-
75
-
76
-
77
-
78
-
79
-
80
-
81
-
82
-
83
-
84
-
85
-
86
-
87
-
88
-
89
-
90
-
91
-
92
-
93
-
94
-
95
-
96
-
97
-
98
-
99
-
100
-
101
-
102
-
103
-
104
-
105
-
106
 |
 |
