HP BL260c HP BladeSystem c-Class Enclosure Troubleshooting Guide - Page 57
Verify the USB status on the Insight Display on the Change USB/DVD Options screen
 |
UPC - 883585668663
View all HP BL260c manuals
Add to My Manuals
Save this manual to your list of manuals |
Page 57 highlights
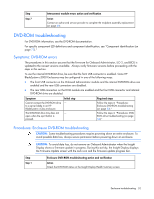
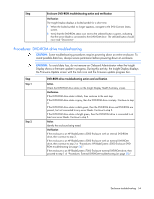
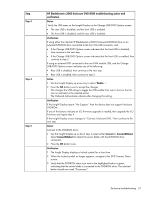
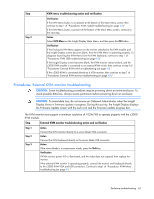
Step Step 3 Step 4 Step 5 HP BladeSystem c3000 Enclosure DVD-ROM troubleshooting action and verification Action Verify the USB status on the Insight Display on the Change USB/DVD Options screen: • The rear USB is disabled, and the front USB is enabled. • The front USB is disabled, and the rear USB is enabled. Verification If using either the internal HP BladeSystem c3000 Enclosure DVD-ROM drive or an external DVD-ROM drive connected to the front OA USB connector, and: • If the Change USB/DVD Options screen indicates that the front USB is disabled, then continue to the next step. • If the Change USB/DVD Options screen indicates that the front USB is enabled, then continue to step 5. If using an external DVD connected to the rear KVM module USB, and the Change USB/DVD Options screen indicates one of the following: • Rear USB is disabled, then continue to the next step. • Rear USB is enabled, then continue to step 5. Action 1 Use the Insight Display up arrow key to select 'Enable...'. 2 Press the OK button twice to accept the changes. This changes the USB setting to toggle the USB enable from rear to front or front to rear as indicated in the selected action. The Onboard Administrator reboots after changing this setting. Verification If the Insight Display reports "No Support," then the device does not support Enclosure DVD-ROM. If any of the buttons indicate an iLO firmware upgrade is needed, then upgrade the iLO firmware and repeat step 4. If the Insight Display screen changes to "Connect: Enclosure DVD," then continue to the next step. Action Connect to the DVD-ROM drive: 1 Use the Insight Display up or down keys to select either Connect or Connect&Reboot. Select Connect&Reboot to reboot the server blade with the DVD-ROM drive connected. 2 Press the OK button twice. Verification 1 The Insight Display displays a locked symbol for a short time. 2 When the locked symbol no longer appears, navigate to the DVD Connect Status screen. 3 Verify that the DVD-ROM status icon next to the highlighted button is green, indicating that the server blade is connected to the DVD-ROM drive. The selected button should now read "Disconnect." Enclosure troubleshooting 57
-
 1
1 -
2
-
3
-
4
-
5
-
6
-
7
-
8
-
9
-
10
-
11
-
12
-
13
-
14
-
15
-
16
-
17
-
18
-
19
-
20
-
21
-
22
-
23
-
24
-
25
-
26
-
27
-
28
-
29
-
30
-
31
-
32
-
33
-
34
-
35
-
36
-
37
-
38
-
39
-
40
-
41
-
42
-
43
-
44
-
45
-
46
-
47
-
48
-
49
-
50
-
51
-
 52
52 -
 53
53 -
 54
54 -
 55
55 -
 56
56 -
 57
57 -
 58
58 -
 59
59 -
 60
60 -
 61
61 -
 62
62 -
63
-
64
-
65
-
66
-
67
-
68
-
69
-
70
-
71
-
72
-
73
-
74
-
75
-
76
-
77
-
78
-
79
-
80
-
81
-
82
-
83
-
84
-
85
-
86
-
87
-
88
-
89
-
90
-
91
-
92
-
93
-
94
-
95
-
96
-
97
-
98
-
99
-
100
-
101
-
102
-
103
-
104
-
105
-
106
 |
 |
