HP Photosmart Premium Fax e-All-in-One Printer - C410 User Guide - Page 126
Print Settings, Device Services
 |
View all HP Photosmart Premium Fax e-All-in-One Printer - C410 manuals
Add to My Manuals
Save this manual to your list of manuals |
Page 126 highlights
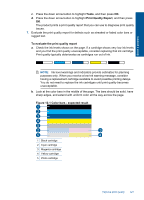
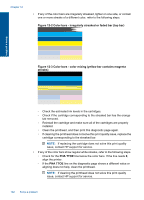
Solve a problem Chapter 12 NOTE: If aligning the printer does not solve this print quality issue, contact HP support for service. 8. Clean the ink cartridges if you see streaking, fading, or ragged text on the print quality report. To clean the cartridges from the software a. Load letter or A4 unused plain white paper into the input tray. b. In the HP Solution Center, click Settings. c. In the Print Settings area, click Printer Toolbox. d. Click the Device Services tab. e. Click Clean the printhead. f. Follow the prompts until you are satisfied with the quality of the output, and then click Done. There are several levels of cleaning, and a new test page prints after each level. Each stage lasts about two minutes, uses one sheet of paper, and uses an increasing amount of ink. After each stage, review the quality of the test page. You should only initiate the next phase of cleaning if the test page still shows streaks or fading. If print quality still seems poor after you complete both stages of cleaning, try aligning the printer. If print quality problems persist after cleaning and aligning, contact HP support. 9. If the print quality report has alignment errors such as crooked vertical lines, align the printer. To align the printer a. Load letter or A4 unused plain white paper into the input tray. b. Press Setup. c. Press the down arrow button to highlight Tools, and then press OK. d. Press the down arrow button to highlight Align Printer, and then press OK. The printer prints a test page, aligns the printhead, and calibrates the printer. 10. Look at the large text above the alignment pattern. The type should be sharp and clear. Figure 12-10 Sample text area - expected result If the text is uneven and ragged at one end, and a new black cartridge was just installed, the automatic device servicing routines may solve the problem in a day or so. 124 Solve a problem
-
 1
1 -
2
-
3
-
4
-
5
-
6
-
7
-
8
-
9
-
10
-
11
-
12
-
13
-
14
-
15
-
16
-
17
-
18
-
19
-
20
-
21
-
22
-
23
-
24
-
25
-
26
-
27
-
28
-
29
-
30
-
31
-
32
-
33
-
34
-
35
-
36
-
37
-
38
-
39
-
40
-
41
-
42
-
43
-
44
-
45
-
46
-
47
-
48
-
49
-
50
-
51
-
52
-
53
-
54
-
55
-
56
-
57
-
58
-
59
-
60
-
61
-
62
-
63
-
64
-
65
-
66
-
67
-
68
-
69
-
70
-
71
-
72
-
73
-
74
-
75
-
76
-
77
-
78
-
79
-
80
-
81
-
82
-
83
-
84
-
85
-
86
-
87
-
88
-
89
-
90
-
91
-
92
-
93
-
94
-
95
-
96
-
97
-
98
-
99
-
100
-
101
-
102
-
103
-
104
-
105
-
106
-
107
-
108
-
109
-
110
-
111
-
112
-
113
-
114
-
115
-
116
-
117
-
118
-
119
-
120
-
 121
121 -
 122
122 -
 123
123 -
 124
124 -
 125
125 -
 126
126 -
 127
127 -
 128
128 -
 129
129 -
 130
130 -
 131
131 -
132
-
133
-
134
-
135
-
136
-
137
-
138
-
139
-
140
-
141
-
142
-
143
-
144
-
145
-
146
-
147
-
148
-
149
-
150
-
151
-
152
-
153
-
154
-
155
-
156
-
157
-
158
-
159
-
160
-
161
-
162
-
163
-
164
-
165
-
166
-
167
-
168
-
169
-
170
-
171
-
172
-
173
-
174
-
175
-
176
-
177
-
178
-
179
-
180
-
181
-
182
-
183
-
184
-
185
-
186
-
187
-
188
-
189
-
190
-
191
-
192
-
193
-
194
-
195
-
196
-
197
-
198
-
199
-
200
-
201
-
202
-
203
-
204
-
205
-
206
-
207
-
208
-
209
-
210
-
211
-
212
-
213
-
214
-
215
-
216
-
217
-
218
-
219
-
220
-
221
-
222
-
223
-
224
-
225
-
226
-
227
-
228
-
229
-
230
-
231
-
232
-
233
-
234
-
235
-
236
-
237
-
238
-
239
-
240
-
241
-
242
-
243
-
244
-
245
-
246
-
247
-
248
-
249
-
250
-
251
-
252
-
253
-
254
-
255
-
256
-
257
-
258
-
259
-
260
-
261
-
262
-
263
-
264
 |
 |