Panasonic WJHD500A WJHD500A User Guide
Panasonic WJHD500A - Digital Disk Recorder Manual
 |
View all Panasonic WJHD500A manuals
Add to My Manuals
Save this manual to your list of manuals |
Panasonic WJHD500A manual content summary:
- Panasonic WJHD500A | WJHD500A User Guide - Page 1
Digital Disk Recorder Operating Instructions Model No. WJ-HD500A ENGLISH FRANÇAIS REMOTO TIMER OPRATE ALARM ALARM RESET ALARM SUSPEND HDD Drdisekr WJ-HD A Before attempting to connect or operate this product, please read these instructions carefully and save this manual for future use. - Panasonic WJHD500A | WJHD500A User Guide - Page 2
and maintenance (servicing) instructions in the literature accompanying the appliance. For U.S.A NOTE: This equipment has been tested and found to comply with the limits for a Class A digital the instruction manual, may Model No. WJ-HD500A Serial No. WARNING: To reduce the - Panasonic WJHD500A | WJHD500A User Guide - Page 3
Hard Disk End Setup 48 Manual Recording Setup 48 s Manual Recording Mode Setting 48 s Event Recording (Manual Recording 49 s Alarm Active Mode (Manual 64 s Alarm Mode on the Spot Monitor 64 DISPLAY SETUP 65 s Camera Title Setup 65 s Display Setting (Multiscreen Monitor 65 s Title Display - Panasonic WJHD500A | WJHD500A User Guide - Page 4
PREFACE The WJ-HD500A Digital Disk Recorder is a combination of a Hard Disk Recorder with a Video Multiplexer; it is able to record the images of up to sixteen sequentially controlled video inputs on the built-in hard disk. A multi-recording function records simultaneously several images from - Panasonic WJHD500A | WJHD500A User Guide - Page 5
the appliance becomes wet. Turn the power off and refer servicing to qualified service personnel. Moisture may damage the appliance and also cause electric is dirty. When the dirt is hard to remove, use a mild detergent and wipe gently. • Be sure to install the disk recorder horizontally. • Do not - Panasonic WJHD500A | WJHD500A User Guide - Page 6
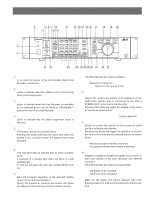
INDEX ALARM SEARCH DISPLAY STOP BPLAY/ PAUSE REC REV FWD FS 16 Digital Disk Recorder WJ-HD A #1 #0 @9 @8 @7 @6 @5 @4 @3 @2 @1 q Operate Indicator (OPERATE) Is on when the power of the WJ-HD500A Digital Disk Recorder is turned on. w Timer Indicator (TIMER) Lights to indicate when the - Panasonic WJHD500A | WJHD500A User Guide - Page 7
the monitor and recorded on the Hard Disk. Orange: The input is recorded on the Hard Disk (no display). !2 Set Group Selection Button (GROUP SELECT) Selects the camera group from among group 1, 2, 3 and 4. Pressing this button will start the recording manually when the Timer parameter is set to OFF - Panasonic WJHD500A | WJHD500A User Guide - Page 8
available recording space of the Disk Recorder (HDD) is running low. #1 Hard Disk Drive Indicator (HDD) Lights to indicate when the Hard Disk is activated. s Rear View Recording Output Pin No. Designation 14 Disk Recorder Error Output 2 Manual Recording Output 15 Ground 3 Emergency Recording - Panasonic WJHD500A | WJHD500A User Guide - Page 9
with PS•Data (Panasonic Security Data) mode. %1 Remote Port [REMOTE (WV-CU50)] This port is provided for controlling the Disk Recorder with the maximum recording rate, for example 60 fps, connect this output to the cameras to synchronize the system. %3 Serial Port (SERIAL) For connecting a Personal - Panasonic WJHD500A | WJHD500A User Guide - Page 10
RESET (0 DISPLAY REC STOP (1 *0 (2 REMOTE (3 &1 Lock Button (LOCK) Toggles to enable or disable the button lock function on both front panels of the Disk Recorder and Remote Controller. The LED indicates the status as shown below. On: The button lock is enabled. Off: The button lock is - Panasonic WJHD500A | WJHD500A User Guide - Page 11
Multiscreen Monitor on and off, such as camera and group titles, operating status and so the WJHD500A Disk Recorder. *2 Copy Button (COPY) Copies the selected images on to the DVD-RAM disk when the playback. *8 Record Button (RECORD) Starts recording manually if applicable. The LED turns on to - Panasonic WJHD500A | WJHD500A User Guide - Page 12
The installations described below should be made by qualified service personnel or system installers. s Installing the Optional Hard Disk At the time of shipment from the factory, the WJ-HD500A Disk Recorder is equipped with one hard disk drive; an optional drive can be installed to increase - Panasonic WJHD500A | WJHD500A User Guide - Page 13
Motion Detector Board The Motion Detector Board WJ-HDB501 is installed exclusively in the WJ-HD500A Disk Recorder. 1. Unplug the power cord from the WJ-HD500A Digital Disk Recorder, or disconnect the plug from the AC outlet. 2. Remove the top cover of the Disk Recorder by removing the 11 screws, as - Panasonic WJHD500A | WJHD500A User Guide - Page 14
the Optional Network Board The Network Board WJ-HDB502 is installed exclusively in the WJ-HD500A Disk Recorder. 1. Unplug the power cord from the WJ-HD500A Digital Disk Recorder, or disconnect the plug from the AC outlet. 2. Remove the top cover of the Disk Recorder by removing the 11 screws, as - Panasonic WJHD500A | WJHD500A User Guide - Page 15
the rack mounting brackets in the rack, securing it with four screws (not included). • FS 16 • • 500 DiRgietcaol Drdisekr WJ-HD A Cautions: • The cooling fan inside the Disk Recorder is subject to wear and needs to be replaced periodically. • Do not block the ventilation opening or slots in - Panasonic WJHD500A | WJHD500A User Guide - Page 16
Shown below are examples of system connections. 16 Cameras REMOTO TIMER OPERATE ALARM ALARM RESET ALARM SUSPEND HDD FULL LOCK PLAY/ PAUSE REC REV FWD FS 16 Digital Disk Recorder WJ-HD A Digital Disk Recorder WJ-HD500A WJ-HDB502 POWER ON OFF Multiscreen Monitor PS-Data - Panasonic WJHD500A | WJHD500A User Guide - Page 17
with the Monitors Connect the monitors to the SPOT OUT connector and MULTISCREEN OUT connector on the rear of the Disk Recorder with the coaxial cable. Disk Recorder WJ-HD500A SPOT OUT OUT MULUTI SCREEN Remote Controller WV-CU50 POWER ON OFF Spot Monitor POWER ON OFF Multiscreen Monitor 17 - Panasonic WJHD500A | WJHD500A User Guide - Page 18
the multiple Disk Recorders are equipped in the system. Connect the CONTROL port and ALARM port as shown below. Refer to the SEQ TIMING in the SEQUENCE SETUP menu for further setting. Sequence Timing Output Ground 4 Sequence Timing Input Ground 75 15 CONTROL WJ-HD500A (1st) ALARM WJ-HD500A (2nd - Panasonic WJHD500A | WJHD500A User Guide - Page 19
Group Recording Output Pin No. Designation 14 Disk Recorder Error Output 2 Manual Recording Output 15 Ground 3 Emergency Recording Output rear of the WJHD500A Disk Recorder as shown below. The WJ-HD500A will display the warning for thermal error on the monitor. WJ-HD500A CONTROL Port 13 - Panasonic WJHD500A | WJHD500A User Guide - Page 20
signal from the disk recorder, the disk recorder's power is turned off Disk Recorder WJ-HD500A Power Failure Process Completion Output Power Failure Detect Input Ground (19) (17) (16) UPS Shut Down Line Fail signal (Normally Open) Common CBefore connecting the UPS, refer to the manual of your UPS - Panasonic WJHD500A | WJHD500A User Guide - Page 21
3rd unit is located at the end of the SCSI chain. Up to 6 extension units can be added. SCSI Cable SCSI Cable SCSI Cable Digital Disk Recorder WJ-HD500A SCSI ID = 6 and 7 IN SPOT OUT EEXXTT SSTTOORRAAGGEE COPY DATA OUT MULTISCREENOUT AUDIO CONTROL ALARM MODE 16 15 14 13 12 11 10 - Panasonic WJHD500A | WJHD500A User Guide - Page 22
EXT STORAGE port on the WJHD500A and the EXT IN port on the 2nd Extension Unit with the supplied (WJ-HDE510) SCSI cable. Plug the cable end with magnetic core into the EXT STORAGE port, and the other ends into the EXT IN port. EXT STORAGE Digital Disk Recorder WJ-HD500A SCSI ID=6 and 7 IN SPOT - Panasonic WJHD500A | WJHD500A User Guide - Page 23
WJ-HD500A Digital Disk Recorder as well as for storing the data of the extension hard disk drive units in the system. 1. Connect between the COPY port on the WJ-HD500A refer to the operating instructions of each unit for further information. EXT STORAGE Digital Disk Recorder WJ-HD500A SCSI ID=6 and - Panasonic WJHD500A | WJHD500A User Guide - Page 24
. w Set the termination to ON for the units at both ends of the PS •Data line. Use the MODE selector on the rear of the WJ-HD500A Disk Recorder to set the termination. e Use the optional RS-485 cable for connection. Note: To be able to use PS •Data mode, the communication functions - Panasonic WJHD500A | WJHD500A User Guide - Page 25
11 10 9 8 7 6 VIDEO GEN-LOCK OUT REMOTE(WV-CU50) SERIAL SIGNAL GND 10/100BASE-T 5 4 3 2 1 5 4 3 2 1 Digital Disk Recorder AC IN ON OFF POWER WJ-HD500A DB9 1 2 3 4 5 6 7 8 WJ-HD500A DB9 2 (RXD) 3 (TXD) 4 (ER) 5 (GND) 6 (DR) 7 (RTS) 8 (CTS) PC DB9 1 2 3 4 5 6 7 8 PC DB25 2 (TXD - Panasonic WJHD500A | WJHD500A User Guide - Page 26
PREPARATIONS 27 - Panasonic WJHD500A | WJHD500A User Guide - Page 27
system. • Hard Disk malfunctions [✽] Refer servicing to qualified service per- sonnel. ¢¢GB indicates the hard disk capacity. Note: If the Disk Recorder is left in this state for about five minutes, it will automatically restart by reconfiguring the system (disk remove). Normal camera images will - Panasonic WJHD500A | WJHD500A User Guide - Page 28
Hard Disk in the unit. 1. Power up the Disk Recorder by pressing the POWER switch. 2. The Disk Recorder will run through a series of instructions ADD 3:3:3:3:- 4:¢¢GB 4:ADD 4:4:4:4:- PASSWORDB----- 4. Select the ALL password (5-digit) by pressing the Numeric buttons (1 - 10). Refer to the password - Panasonic WJHD500A | WJHD500A User Guide - Page 29
. 1DISK: Enables formatting only a specified Hard Disk. ALL: Enables formatting all Hard Disks. If the "1DISK" is selected in the menu, move the cursor to the Hard Disk number to be formatted by pressing the A, B, D or C button, then press the SET button. The instructions appear in the lower-left - Panasonic WJHD500A | WJHD500A User Guide - Page 30
unit. 1. Insert the DVD-RAM disk into the DVD Extension Unit. 2. Press and hold the SETUP/ESC button for two seconds or more to display the WJ-HD500 SETUP menu on the screen of the Multiscreen Monitor. WJ-HD500 SETUP TIMER OFF REC SETUP COMMON SETUP *MANUAL WITHOUT AUDIO *TIMER WITHOUT AUDIO - Panasonic WJHD500A | WJHD500A User Guide - Page 31
hard disks, the other disk still records the data normally. This ensures reliability of the system, since the data will always be available on one of the disks. Camera Images Recording Auxiliary Recording Manual Recorder Group 1 Timer Group 2 Recorder Group 3 Group 4 Emergency Recorder WJ - Panasonic WJHD500A | WJHD500A User Guide - Page 32
the ALL password (5-digit) by pressing the Numeric password, press the SETUP/ ESC button. 6. If the password is correct, the instructions shown below appear in the lower-left corner of the menu. FORMAT MENU MAIN the menu. Normal camera images will appear on the monitor after five seconds. 33 - Panasonic WJHD500A | WJHD500A User Guide - Page 33
are changes to the previous system, as shown below. • Hard disks were removed from the Disk Recorder or the extension unit. • One or more of the hard disks installed in the Disk Recorder or the extension unit have failed. The Disk Recorder and Extension Units will operate normally by recomposing the - Panasonic WJHD500A | WJHD500A User Guide - Page 34
selected camera images in a single spot. This function is not available when CAMERA GENLOCK ON is selected on the COMMON SETUP menu. Disk Recorder WJ-HD500A SPOT that images are being recorded. (✽✽ indicates the remaining space of the Hard Disk when the HDD DISKEND is set to STOP in the setup menu - Panasonic WJHD500A | WJHD500A User Guide - Page 35
Disk Recorder trouble. THERMAL ✽: Indicates thermal error in the Disk Recorder or the extension units. (✽ indicates the extension unit number) HDD ✽✽%: Is displayed when the remaining space of the Hard Disk in the setup menu. o Camera Title Display Displays the camera title edited in the setup menu - Panasonic WJHD500A | WJHD500A User Guide - Page 36
The WJ-HD500A Hard Disk Recorder records the images on the Hard Disk as shown below, dividing space into six disk sectors. There are three recording modes, Time Lapse, Multi Shot and One Shot, to obtain reliable records by selecting the mode best suited for your purpose. s Hard Disk As described - Panasonic WJHD500A | WJHD500A User Guide - Page 37
. • Manual and External (Power-on) Timer Recording is recorded in this mode on the Manual Recorder. Refer to the Manual Recording Setup shown below. For example, camera inputs 1, 2, 3 and 4 are assigned to a group. • Dynamic Recording is set to OFF Records the assigned camera input in a specified - Panasonic WJHD500A | WJHD500A User Guide - Page 38
the number of particular images that have activated the alarm. When the system is equipped with specified combination camera, it starts recording alarm images after the camera moves to the specified preset position. The One Shot Recording mode records images on the Timer Recorder corresponding - Panasonic WJHD500A | WJHD500A User Guide - Page 39
SETUP PROCEDURES 41 - Panasonic WJHD500A | WJHD500A User Guide - Page 40
below. 1. Confirm that the camera and peripherals are connected correctly and securely and that all system components are turned on. 2. The Disk Recorder has been powered up of the Multiscreen Monitor. WJ-HD500 SETUP TIMER OFF REC SETUP COMMON SETUP *MANUAL WITHOUT AUDIO *TIMER WITHOUT AUDIO - Panasonic WJHD500A | WJHD500A User Guide - Page 41
WJ-HD500 SETUP menu has eight main submenus. Seven of these are further divided into additional submenus. The mark indicates that the item has a submenu for more detailed setups. SETUP TIMER SETTING RECORDING SETUP Common Recording Setup Manual Setting Camera Defined Setting Disk Management Error - Panasonic WJHD500A | WJHD500A User Guide - Page 42
. WJ-HD500 SETUP TIMER OFF REC SETUP COMMON SETUP *MANUAL WITHOUT AUDIO *TIMER WITHOUT AUDIO *EMERGENCY WITHOUT AUDIO MULTIPLEXER SETUP ALARM SETUP DISPLAY SETUP COMMUNICATION SETUP SYSTEM SETUP DVD *.** 1. Move the cursor to the TIMER parameter in the WJHD500 - Panasonic WJHD500A | WJHD500A User Guide - Page 43
WJ-HD500 SETUP menu, press the SETUP/ESC button. s Recording Quality Setup These items let you determine the image quality recorded on the Hard Disk. STD. q Camera Sync Setting This item lets you determine camera synchronization in the system. 1. Move the cursor to the CAMERA GENLOCK parameter on - Panasonic WJHD500A | WJHD500A User Guide - Page 44
will cause improper recording. s Group Setup As described before, the Disk Recorder activates the recording function of the assigned cameras in four groups when the TIMER is set to INT (internal). These items let you determine the camera's group for recording. q Group Title Setup This item lets you - Panasonic WJHD500A | WJHD500A User Guide - Page 45
item lets you enable or disable recording of the camera and group titles with the image on the Hard Disk. 1. Move the cursor to the TITLE EMBEDDED disable recording of the clock (date and time) with the image on the Hard Disk. 1. Move the cursor to the TIME EMBEDDED parameter in the COMMON SETUP menu - Panasonic WJHD500A | WJHD500A User Guide - Page 46
item lets you enable or disable uninterrupted recording when the hard disk space is used up. 1. Move the cursor to . These items let you determine the image quality and active mode for manual recording. 1. Move the cursor to MANUAL in the WJ-HD500 SETUP menu by pressing the D or C button. 2. Pressing - Panasonic WJHD500A | WJHD500A User Guide - Page 47
depending on the remaining storage capacity of the hard disk. The factory default setting is SF-24H. FRAME FIELD FRAME 3DIM ON FRAME 3DIM OFF CAMERA GENLOCK ON OFF ON OFF ON OFF REC the + or - button. The parameters are the same as MANUAL REC MODE. The factory default setting is SF-24H. 2. Move - Panasonic WJHD500A | WJHD500A User Guide - Page 48
select the active mode for other cameras. 5. When all camera modes are completed, press the SETUP/ESC button to return to the previous MANUAL REC SETUP menu. 6. To return to the WJ-HD500 SETUP, press the SETUP/ ESC button. Timer Recording Setup The Disk Recorder can record the images triggered by - Panasonic WJHD500A | WJHD500A User Guide - Page 49
3-1 PROG1(WITHOUT AUDIO) NO START END G1 G2 G3 G4 1 0:00 6:00 T/L T/L T/L T/L RATE 7.5 7.5 1 10 2 6:00 12:00 M/S - O/S O/S RATE 10 5 1 3 12:00 18:00 M/S M/S M/S M/S RATE 5 2 2 5 4 18:00 24:00 O/S M/S - M/S RATE 15 10 10 SET TOTAL REC RATE ON EACH TABLE G1+G2+G3+G4= UNDER 60FPS 3-1 - Panasonic WJHD500A | WJHD500A User Guide - Page 50
not be possible to set the recording time, depending on the remaining storage capacity of the hard disk. The factory default setting is SF-24H. 4. If the parameter SP is selected for 3DIM ON FRAME 3DIM OFF CAMERA GENLOCK ON OFF ON OFF ON OFF REC RATE 60FPS 30FPS 10FPS 10FPS 30FPS 15FPS 52 - Panasonic WJHD500A | WJHD500A User Guide - Page 51
Select the desired active mode for assigned group cameras by pressing the + or - button. REC+ recording for between 2 seconds and 6 minutes. MANUAL: Enables alarm recording while the alarm signal enable or disable alarm data backup on the DVD-RAM disk. Refer to the DVD DRIVE SETUP for details. OFF: - Panasonic WJHD500A | WJHD500A User Guide - Page 52
menu by pressing the D or C button, then select an active mode for group cameras when an alarm is received by pressing the + or - button. REC+ALM: Enables shown in the table. FIELD/FRAME FIELD FRAME 3DIM ON FRAME 3DIM OFF CAMERA GENLOCK ON OFF ON OFF ON OFF REC RATE 60FPS 30FPS 10FPS 10FPS 30FPS - Panasonic WJHD500A | WJHD500A User Guide - Page 53
menu by pressing the D or C button, then select an active mode for group cameras when an alarm is received by pressing the + or - button. REC+ALM: Enables shown in the table. FIELD/FRAME FIELD FRAME 3DIM ON FRAME 3DIM OFF CAMERA GENLOCK ON OFF ON OFF ON OFF REC RATE 60FPS 30FPS 10FPS 10FPS 30FPS - Panasonic WJHD500A | WJHD500A User Guide - Page 54
rear of the Disk Recorder. 1. Move the cursor to EMERGENCY in the WJ-HD500 SETUP the remaining storage capacity of the hard disk. The factory default setting is SF 3DIM ON FRAME 3DIM OFF CAMERA GENLOCK ON OFF ON OFF between 2 seconds and 6 minutes. MANUAL: Enables recording while the input signal - Panasonic WJHD500A | WJHD500A User Guide - Page 55
functions such as sequence and power on status for this Disk Recorder. 1. Select MULTIPLEXER SETUP in the WJ-HD500 SETUP menu by pressing the D or C button the + or - button. 1 - 16: Displays the image of the selected camera number. 4A - 4D: Displays the assigned images in quad. Refer to the QUAD - Panasonic WJHD500A | WJHD500A User Guide - Page 56
This item lets you select the pattern to be displayed on the Multiscreen Monitor when a 4-segment (Quad) display is selected in spot or sequence. The camera images can be assigned to the segments as shown below. 1. Move the cursor to QUAD PATTERN SETUP in the SEQUENCE SETUP menu by pressing the - Panasonic WJHD500A | WJHD500A User Guide - Page 57
number to be displayed for the CAM editing area by pressing the + or - button. 1 - 16: Displays the image of the selected camera number. --: Disables the display and will skip automatically. 4. Move the cursor to the PRESET editing area by pressing the B button, then select a preset position to - Panasonic WJHD500A | WJHD500A User Guide - Page 58
set by pressing the + or - button. 1 - 16: Selects an assigned camera image in single spot mode. SPOT SEQ: Selects a sequence pattern programmed in the This item lets you select a display pattern on the Spot Monitor when the Disk Recorder's power is turned on. 1. Move the cursor to the SPOT OUTPUT - Panasonic WJHD500A | WJHD500A User Guide - Page 59
Secret View Setting When the video input is displayed in the spot mode on the Spot Monitor, the Multiscreen Monitor is enabled to skip the step in sequence or display a blackout in multiscreen for that selected input image. This function is called Secret View and the item lets you enable or disable - Panasonic WJHD500A | WJHD500A User Guide - Page 60
C button. 3. To return to the previous WJ-HD500 SETUP menu, press the SETUP/ESC button. the ALARM port located on the rear of the Disk Recorder. 1. Move the cursor to TERMINAL TRIGGER by pressing the A, B, D or C button. 3. Select a camera number (1 - 16) corresponding to the input for the CAM - Panasonic WJHD500A | WJHD500A User Guide - Page 61
lets you enable or disable the video loss alarm function when the Disk Recorder detects the interruption of the video signal. 1. Move the 15 *OFF 16 *OFF 4. Move the cursor to the sensitivity editing area for the camera by pressing the A, B, D or C button, then select the desired mode by pressing - Panasonic WJHD500A | WJHD500A User Guide - Page 62
MODE MULTI OUTPUT in the ALARM SETUP menu by pressing the D or C button. 2. Select either SPOT or OFF by pressing the + or - button. SPOT: The camera image that has activated the alarm is displayed in single spot mode. OFF: Ignores alarm activation and continues to display the images in the mode - Panasonic WJHD500A | WJHD500A User Guide - Page 63
or item parameter in the menu by pressing the D or C button. 3. To return to the previous WJ-HD500 SETUP menu, press the SETUP/ESC button. s Camera Title Setup This item lets you edit the camera title to be displayed on the monitor screen. Up to 8 alphanumeric characters can be displayed on the - Panasonic WJHD500A | WJHD500A User Guide - Page 64
: Black border The factory default setting is WHITE. s Title Display Setting (Spot Monitor) This item lets you enable or disable the display of the camera and group title on the Spot Monitor. 1. Move the cursor to the TITLE DISPLAY parameter in the DISPLAY SETUP menu by pressing the D or C button - Panasonic WJHD500A | WJHD500A User Guide - Page 65
s Clock and Status Display Position Setting This item lets you select the positions where the clock and status displays are placed on the Multiscreen Monitor. 1. Move the cursor to the CLOCK&STATUS POSITION parameter in the DISPLAY SETUP menu by pressing the D or C button. 2. Select a position to be - Panasonic WJHD500A | WJHD500A User Guide - Page 66
or C button. 3. To return to the previous WJ-HD500 SETUP menu, press the SETUP/ESC button. s and the Disk Recorders when the system is controlled with the PS •Data mode (Panasonic Security Data). TIME ALARM DATA 001 9600 8 NONE 1 OFF 1S CAMERA NUMBER SETUP q Baud Rate This item lets you set - Panasonic WJHD500A | WJHD500A User Guide - Page 67
14 014 15 015 16 016 2. Move the cursor to the input (CAM-PORT) parameter to edit by pressing the D, C, A or B button, then select a camera number by pressing the + or - button. ---: No assignment. 001 - 128: Assigns the selected number. Note: Make sure not to assign the same number to more - Panasonic WJHD500A | WJHD500A User Guide - Page 68
set the parameters for communication between the SERIAL port of the Disk Recorder and an external device. 1. Move the cursor to button. q Unit Address Setting This item lets you set the unit address of the Disk Recorder in the system. 1. Move the cursor to the UNIT ADDRESS parameter by pressing the - Panasonic WJHD500A | WJHD500A User Guide - Page 69
is needed, select OFF. The factory default setting is OFF (no retry). s Network Setup When the optional Network Board is installed in the Disk Recorder, the Disk Recorder can be controlled from a Client PC via the Ethernet Hub. These items let you set the parameters for communication between the 10 - Panasonic WJHD500A | WJHD500A User Guide - Page 70
Move the cursor to SYSTEM SETUP in the WJ-HD500 SETUP menu by pressing the C or ***** ***** ON USER DEFINED SETUP *LOAD DISK MANAGEMENT ERROR REPORT SYSTEM INFORMATION 2. Select the right by pressing the B button, then select the last 2 digits for the year by pressing the + or - button. 5. Move - Panasonic WJHD500A | WJHD500A User Guide - Page 71
cursor moves to the right editing area. 2. Select a 5-digit password in the editing area. Select the first digit by pressing the + or - button. 3. Move the lets you enable or disable the buzzer sound accompanying operation of the Disk Recorder's buttons. 1. Move the cursor to the BUZZER parameter in - Panasonic WJHD500A | WJHD500A User Guide - Page 72
:OK ¢¢GB SEP12.00 16:25 5. To return to the previous setup menu, press the SETUP/ESC button. s Disk Management The Hard Disk status can be displayed on the monitor screen. 1. Move the cursor to DISK MANAGEMENT in the SYSTEM SETUP menu by pressing the C or D button, then press the SET button. The - Panasonic WJHD500A | WJHD500A User Guide - Page 73
0:01:28 POWER LOSS (TOTAL 100) 9-5 SYSTEM INFORMATION HARDWARE VERSION MAIN VMD 1.00 1.00 SOFTWARE VERSION MAIN 1.00 N/W 1.00 2. Pressing the C or D button will move the cursor to detector board is installed in the disk recorder. 2. To return to the previous SYSTEM SETUP menu, press the SETUP/ESC - Panasonic WJHD500A | WJHD500A User Guide - Page 74
system. 1. Move the cursor to DVD on the WJ-HD500 SETUP menu by pressing the C or D or disable this function (alarm backup) on the DVD-RAM disk. 1. Move the cursor to AUTO COPY(EVENT) on (EVENT) will enable manual or automatic alarm data backup for the specified cameras. However, Timer Recording - Panasonic WJHD500A | WJHD500A User Guide - Page 75
Display This item lets you select status display mode on the multiscreen monitor when the remaining storage capacity is running low on the DVD-RAM disk. 1. Move the cursor to the DVD FULL parameter on the DVD menu by pressing the C or D button. 2. Select the desired display mode by pressing the - Panasonic WJHD500A | WJHD500A User Guide - Page 76
OPERATING PROCEDURES 79 - Panasonic WJHD500A | WJHD500A User Guide - Page 77
selected turns off and the indicator in the button currently selected lights up. 16 3 The indicator in the numeric button lights up and the camera image corresponding to the button appears on the monitor screen. 2. During the sequence, press the SEQUENCE button to pause the sequence that is being - Panasonic WJHD500A | WJHD500A User Guide - Page 78
1. Select an image to be zoomed on the monitor by pressing a numeric button (1 - 16). The indicator in the selected button lights up and the camera image corresponding to the button appears on the monitor screen. q Single Spot (Live) 1. Select the input for all groups by pressing the GROUP SELECT - Panasonic WJHD500A | WJHD500A User Guide - Page 79
4 none: All Inputs 2. Select one of the images by pressing the numeric button (1 - 16). The indicator in the selected button lights and the camera image corresponding to the button appears in the spot mode on the monitor screen. 3. Press the SEQUENCE button to run the assigned sequence forward on - Panasonic WJHD500A | WJHD500A User Guide - Page 80
previously paused by pressing the SEQUENCE button. The indicator in the button changes to a steady light. 6. To return to Spot monitoring, select an assigned camera image to be displayed on the monitor by pressing a numeric button. If you attempt to press any button other than the one assigned to - Panasonic WJHD500A | WJHD500A User Guide - Page 81
56 7 8 9 10 123 456 789 13 14 15 16 (4D) 12 3 45 67 (camera 1 to 5 are assigned to a group) 12 3 45 12 34 12 3 45 123 45 12 34 5 the button lights up. q Multi Sequence (Live) A series of camera images can be displayed in succession on the monitor screen for the specified - Panasonic WJHD500A | WJHD500A User Guide - Page 82
previously paused by pressing the SEQUENCE button. The indicator in the button changes to a steady light. 5. To return to Spot monitoring, select an assigned camera image by pressing one of the numeric buttons that the indicator in the button lights up. If you attempt to press any button other than - Panasonic WJHD500A | WJHD500A User Guide - Page 83
Disk Recorder are activated as shown below. Refer to the ALARM SETUP menu of the WJ-HD500 SETUP menu for further settings. q Front Panel Display When an alarm function is activated, the ALARM indicator and corresponding camera setting, refer to the Operating Instructions of the board. q Monitor - Panasonic WJHD500A | WJHD500A User Guide - Page 84
s Alarm Reset q Manual Reset When the alarm is activated, the ALARM indicator blinks. The of any alarm activated in the ERROR REPORT table. It is used to suspend the alarm link during the Disk Recorder's setup. To suspend the alarm: 1. Press the ALARM RESET and REC PREVIEW buttons at the same - Panasonic WJHD500A | WJHD500A User Guide - Page 85
remaining space of the Hard Disk.) REC 2. To stop recording, press the REC STOP button. REC STOP 88 Timer Recorder Manual Recorder Group 1 Timer REC SETUP menu, and the TIMER parameter is set to INT in the WJ-HD500 SETUP menu. As described before, the received video inputs can be assigned - Panasonic WJHD500A | WJHD500A User Guide - Page 86
Recording. (the alarm log is stored in the ERROR REPORT table.) q Alarm Recording for Manual and Power-on Recording The Disk Recorder records an alarm status based on the setup made in the MANUAL REC SETUP menu of the WJ-HD500 SETUP menu. It records the images as shown below in Time Lapse Recording - Panasonic WJHD500A | WJHD500A User Guide - Page 87
quality and duration, as shown below. The recording pattern varies according to the setting of the Dynamic Recording parameter (DYNAMIC REC). (If the camera inputs 2, 4 and 5 are assigned to a group.) • Set to OFF Records the group input images in sequence starting with the lower number of the - Panasonic WJHD500A | WJHD500A User Guide - Page 88
the CONTROL port on the rear of the Disk Recorder. It records all camera images in Time Lapse Recording mode with the specified recording rate, quality and duration. Refer to EMERGENCY REC SETUP menu for further details. Emergency Recorder Manual - Panasonic WJHD500A | WJHD500A User Guide - Page 89
screen to indicate that playback is selected. BPLAY/ yPAUSE Note: When the ALARM SEARCH button is on, the Disk Recorder plays back for alarm and emergency recordings on the Hard Disk. 3. Pressing the PLAY/PAUSE button during playback will pause playback. The indicator in the button blinks and - Panasonic WJHD500A | WJHD500A User Guide - Page 90
counterclockwise to move to the beginning of the next alarm recording from the record currently selected. After jumping to an alarm recording, the Disk Recorder resumes playback. Notes: • Confirm that the indicator in the ALARM SEARCH button is lit by pressing the button. • The recorded alarm images - Panasonic WJHD500A | WJHD500A User Guide - Page 91
figure. DISPLAY 5. Move the cursor to the position to be edited in the search editing area by pressing the A or B button. 6. Select the desired digit or month by pressing the + or - button. 7. Repeat procedures 5 and 6 to edit the other positions. 8. Press the PLAY/PAUSE button to start the search - Panasonic WJHD500A | WJHD500A User Guide - Page 92
in the selected button lights up and the camera image corresponding to the button appears on the monitor screen. 2 Note: When the ALARM SEARCH button is on, the Disk Recorder plays back for alarm and emergency recording on the Hard Disk. 3. Pressing the MULTISCREEN SELECT button will toggle the - Panasonic WJHD500A | WJHD500A User Guide - Page 93
images can be assigned to playback. The playback image will be displayed in the upper left segment of the multiscreen. 1. Display the live camera images on the multiscreen by pressing the MULTISCREEN SELECT button. MULTISCREEN SELECT 2. Press the REC PREVIEW button. The indicator in the button - Panasonic WJHD500A | WJHD500A User Guide - Page 94
(procured locally) is connected to the COPY port on the rear of the Disk Recorder. • It is recommended to backup the recorded data in case of in the search editing area by pressing the A, or B button. 6. Select the desired digit or month by pressing the + or - button. 7. Repeat procedures 5 and 6 to - Panasonic WJHD500A | WJHD500A User Guide - Page 95
:+- EXE:[SET] ESC:FSTOP Search Editing Area 4. Rotate the JogDial clockwise or counterclockwise to move the cursor to the record to be stored on the disk. Multiple records can be selected for storing as shown below. • Select a record on the table by rotating the JogDial, then press the SET button - Panasonic WJHD500A | WJHD500A User Guide - Page 96
DATA ERASE FUNCTION The Disk Recorder can erase recorded data past due either automatically or manually. s Auto Erase Function 1. Press the SETUP/ESC button for two seconds or more, the WJ-HD500 SETUP menu as shown below appears on the screen of the Multiscreen Monitor. WJ-HD500 SETUP TIMER OFF - Panasonic WJHD500A | WJHD500A User Guide - Page 97
s Manual Erase Function 1. Repeat the procedures until the ERASE menu is displayed on the monitor screen for auto erase. 9-3-2 ERASE AUTO ERASE OFF ERASE DATA or more to close the menu and return to the normal screen. The recorded data before the specified date will be erased from the disk. 100 - Panasonic WJHD500A | WJHD500A User Guide - Page 98
two seconds. The indicator in the button lights to indicate the button locked mode is selected. LOCK 3. Select the ALL or OPERATION password (5-digit) by pressing the Numeric buttons (1 - 10). • To select "0" for numeric input, press the numeric 10 button. • Entering input will automatically verify - Panasonic WJHD500A | WJHD500A User Guide - Page 99
position in the search editing area by pressing the A or B button. 6. Select the desired digit or month by pressing the + or - button. 7. Repeat steps 5 and 6 to playback image appears on the monitor. Caution: To unload the DVD-RAM disk, press the COPY button for two seconds or more when none of the - Panasonic WJHD500A | WJHD500A User Guide - Page 100
notice. STANDARD ACCESSORY AC Power Cord 1 pc. Rack Mounting Bracket 2 pcs. Screw for Rack Mounting Bracket (M4x10 4 pcs. Absorber 4 pcs. Sleeve 4 pcs. Earth Lug 1 pc. Hard Disk Fixing Screw 4 pcs. 103 - Panasonic WJHD500A | WJHD500A User Guide - Page 101
Security and Digital Imaging Company A Division of Matsushita Electric Corporation of America Executive Office: One Panasonic Way 3E-7, Secaucus, New Jersey 07094 Regional Offices: Northeast: One Panasonic Way, Secaucus, NJ 07094 (201) 348-7303 Southern: 1225 Northbrook Parkway, Suite 1-160 - Panasonic WJHD500A | WJHD500A User Guide - Page 102
For Digital Disk Recorder WJ-HD500AV2 The WJ-HD500AV is a package model that is equipped with the following units in the WJ-HD500A Digital Disk Recorder. WJ-HDB501 Motion Detector Board WJ-HDB502 Network Board Software Version 2.1 Therefore, "Installation of the Boards" in the instructions is
-
 1
1 -
 2
2 -
 3
3 -
 4
4 -
 5
5 -
 6
6 -
 7
7 -
8
-
9
-
10
-
11
-
12
-
13
-
14
-
15
-
16
-
17
-
18
-
19
-
20
-
21
-
22
-
23
-
24
-
25
-
26
-
27
-
28
-
29
-
30
-
31
-
32
-
33
-
34
-
35
-
36
-
37
-
38
-
39
-
40
-
41
-
42
-
43
-
44
-
45
-
46
-
47
-
48
-
49
-
50
-
51
-
52
-
53
-
54
-
55
-
56
-
57
-
58
-
59
-
60
-
61
-
62
-
63
-
64
-
65
-
66
-
67
-
68
-
69
-
70
-
71
-
72
-
73
-
74
-
75
-
76
-
77
-
78
-
79
-
80
-
81
-
82
-
83
-
84
-
85
-
86
-
87
-
88
-
89
-
90
-
91
-
92
-
93
-
94
-
95
-
96
-
97
-
98
-
99
-
100
-
101
-
102
 |
 |
Before attempting to connect or operate this product,
please read these instructions carefully and save this manual for future use.
Model No.
WJ-HD500A
Digital Disk Recorder
Operating Instructions
REMOTO
ALARM
GROUP
SELECT
PLAY PPAUSE
REV
FWD
INDEX
ALARM SEARCH
DISPLAY
ALARM
RESET
ALARM
SUSPEND
HDD
FULL
TIMER
OPRATE
Digital Disk
Recorder
WJ-HD
500
A
LOCK
SPOT
MULTISCREEN
MULTISCREEN
SELECT
EL-ZOOM
REC REVIEW
REC STOP
1
2
3
4
5
6
7
8
9
10
11
12
13
14
15
16
SET
+
-
FS
16
ENGLISH
FRANÇAIS