Panasonic WJHD500A WJHD500A User Guide - Page 63
DISPLAY SETUP, Display Setting Multiscreen Monitor, Camera Title Setup
 |
View all Panasonic WJHD500A manuals
Add to My Manuals
Save this manual to your list of manuals |
Page 63 highlights
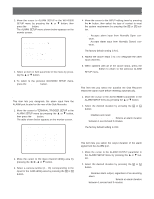
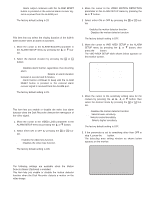
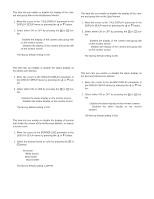
DISPLAY SETUP The procedure described below let you determine the display such as the cameras title editing, display on and off and displays position on the monitors. 1. Move the cursor to DISPLAY SETUP in the WJ-HD500 SETUP menu by pressing the D or C button, then press the SET button. The DISPLAY SETUP menu shown below appears on the monitor screen. 7 DISPLAY SETUP CAMERA TITLE SETUP MULTI OUTPUT CLOCK DISPLAY ON TITLE DISPLAY ON STATUS DISPLAY ON BOADER LINE WHITE SPOT OUTPUT TITLE DISPLAY ON ALARM DISPLAY ON CLOCK&STATUS POSITION L-UPPER TITLE POSITION R-LOWER 2. Select an item or item parameter in the menu by pressing the D or C button. 3. To return to the previous WJ-HD500 SETUP menu, press the SETUP/ESC button. s Camera Title Setup This item lets you edit the camera title to be displayed on the monitor screen. Up to 8 alphanumeric characters can be displayed on the monitor screen. 1. Move the cursor to CAMERA TITLE SETUP in the DISPLAY SETUP menu by pressing the D or C button, then press the SET button. The CAMERA TITLE SETUP menu shown below appears on the monitor screen. 7-1 CAMERA TITLE SETUP CAM TITLE 1 1 2 2 3 3 4 4 5 5 6 6 7 7 8 8 CAM TITLE 9 9 10 10 11 11 12 12 13 13 14 14 15 15 16 16 2. Move the cursor to the camera title editing area you want to edit by pressing the D, C, A or B button. 3. Select a character by pressing the + or - button. The characters shown below can be selected in sequence. Numeral: 0 1 2 3 4 5 6 7 8 9 Alphabet: A to Z, a to z Symbols Space: • 4. Move the cursor to the right in the editing area by pressing the B button, then select a character by pressing the + or - button. 5. Repeat the above steps to select characters until the title for a certain camera is completed. 6. If a wrong character is selected, move the cursor to the character to be replaced by pressing the A or B button. Select a character again by pressing the + or - button. 7. Repeat the above procedures 2 to 6 to edit other camera titles. 8. When satisfied with all of the camera titles, press the SETUP/ESC button to return to the previous DISPLAY SETUP menu. s Display Setting (Multiscreen Monitor) These items let you determine the display mode of the Multiscreen Monitor. q Clock Display This item lets you enable or disable the clock display on the Multiscreen Monitor. 1. Move the cursor to the CLOCK DISPLAY parameter in the DISPLAY SETUP menu by pressing the D or C button. 2. Select either ON or OFF by pressing the + or - button. ON: Enables the clock display on the monitor screen. OFF: Disables the clock display on the monitor screen. The factory default setting is ON. 65
-
 1
1 -
2
-
3
-
4
-
5
-
6
-
7
-
8
-
9
-
10
-
11
-
12
-
13
-
14
-
15
-
16
-
17
-
18
-
19
-
20
-
21
-
22
-
23
-
24
-
25
-
26
-
27
-
28
-
29
-
30
-
31
-
32
-
33
-
34
-
35
-
36
-
37
-
38
-
39
-
40
-
41
-
42
-
43
-
44
-
45
-
46
-
47
-
48
-
49
-
50
-
51
-
52
-
53
-
54
-
55
-
56
-
57
-
 58
58 -
 59
59 -
 60
60 -
 61
61 -
 62
62 -
 63
63 -
 64
64 -
 65
65 -
 66
66 -
 67
67 -
 68
68 -
69
-
70
-
71
-
72
-
73
-
74
-
75
-
76
-
77
-
78
-
79
-
80
-
81
-
82
-
83
-
84
-
85
-
86
-
87
-
88
-
89
-
90
-
91
-
92
-
93
-
94
-
95
-
96
-
97
-
98
-
99
-
100
-
101
-
102
 |
 |