Panasonic WJHD500A WJHD500A User Guide - Page 32
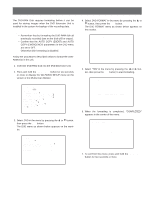
To deactivate the mirror function, appear in the lower-left corner of the menu.
 |
View all Panasonic WJHD500A manuals
Add to My Manuals
Save this manual to your list of manuals |
Page 32 highlights
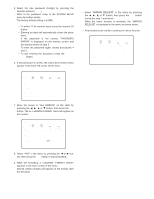
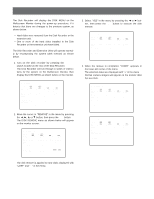
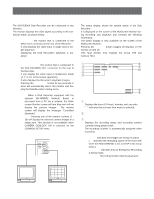
5. Select the ALL password (5-digit) by pressing the Numeric buttons (1 - 10). Refer to the password setup in the SYSTEM SETUP menu for further details. The factory default setting is 12345. • To select "0" for numeric input, press the numeric 10 button. • Entering an input will automatically check the password. If the password is not correct, "PASSWORD ERROR!" is displayed on the monitor screen and the display returns to step 3. To enter the password again, repeat procedures 4 and 5. • To quit entering the password, press the SETUP/ ESC button. 6. If the password is correct, the instructions shown below appear in the lower-left corner of the menu. FORMAT MENU MAIN 1:¢¢GB EXT5 1:¢¢GB EXT4 1:ADD EXT3 1:EXT2 1:EXT1 1:EXT0 1:EXT DVD:- 2:¢¢GB 2:¢¢GB 2:ADD 2:2:2:2:- 3:¢¢GB 3:ADD 3:3:3:3:- 4:¢¢GB 4:ADD 4:4:4:4:- 1DISK ALL ALL MIRROR RESTART SELECT ITEM AND PRESS [SET] KEY To deactivate the mirror function: • Select "MIRROR RELEASE" in the menu by pressing the A, B, D or C button, then press the SET button during the step 7 procedure. When the mirror function is activated, the "MIRROR RELEASE" is displayed in the menu as shown below. • All procedures are similar to setting the mirror function. FORMAT MENU(MIRRORING) MAIN 1:¢¢GB EXT5 1:¢¢GB EXT4 1:* EXT3 1:LOST EXT2 1:LOST EXT1 1:EXT0 1:EXT DVD:OK 2:¢¢GB 2:¢¢GB 2:* 2:LOST 2:LOST 2:2:- 3:¢¢GB 3:ADD 3:LOST 3:LOST 3:3:- 4:¢¢GB 4:ADD 4:LOST 4:LOST 4:4:- 1DISK ALL ALL MIRROR MIRROR RELEASE RESTART SELECT ITEM AND PRESS [SET] KEY 7. Move the cursor to "ALL MIRROR" on the table by pressing the A, B, D or C button, then press the SET button. The ALL MIRROR FORMAT menu will appear on the monitor. ALL MIRROR FORMAT MAIN 1:¢¢GB EXT5 1:¢¢GB EXT4 1:* EXT3 1:LOST EXT2 1:LOST EXT1 1:EXT0 1:EXT DVD:OK 2:¢¢GB 2:¢¢GB 2:* 2:LOST 2:LOST 2:2:- 3:¢¢GB 3:ADD 3:LOST 3:LOST 3:3:- 4:¢¢GB 4:ADD 4:LOST 4:LOST 4:4:- EXECUTE? YES NO SELECT YES/NO AND PRESS [SET] KEY 8. Select "YES" in the menu by pressing the A or B button, then press the SET button to start formatting. 9. When the formatting is completed, "FORMAT DONE!" appears in the lower-center of the menu. Normal camera images will appear on the monitor after five seconds. 33
-
 1
1 -
2
-
3
-
4
-
5
-
6
-
7
-
8
-
9
-
10
-
11
-
12
-
13
-
14
-
15
-
16
-
17
-
18
-
19
-
20
-
21
-
22
-
23
-
24
-
25
-
26
-
 27
27 -
 28
28 -
 29
29 -
 30
30 -
 31
31 -
 32
32 -
 33
33 -
 34
34 -
 35
35 -
 36
36 -
 37
37 -
38
-
39
-
40
-
41
-
42
-
43
-
44
-
45
-
46
-
47
-
48
-
49
-
50
-
51
-
52
-
53
-
54
-
55
-
56
-
57
-
58
-
59
-
60
-
61
-
62
-
63
-
64
-
65
-
66
-
67
-
68
-
69
-
70
-
71
-
72
-
73
-
74
-
75
-
76
-
77
-
78
-
79
-
80
-
81
-
82
-
83
-
84
-
85
-
86
-
87
-
88
-
89
-
90
-
91
-
92
-
93
-
94
-
95
-
96
-
97
-
98
-
99
-
100
-
101
-
102
 |
 |