Panasonic WJHD500A WJHD500A User Guide - Page 49
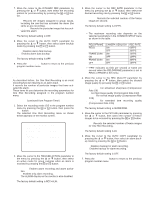
Special Day Timer, The TIMER SPECIAL DAY SETUP table as shown below
 |
View all Panasonic WJHD500A manuals
Add to My Manuals
Save this manual to your list of manuals |
Page 49 highlights
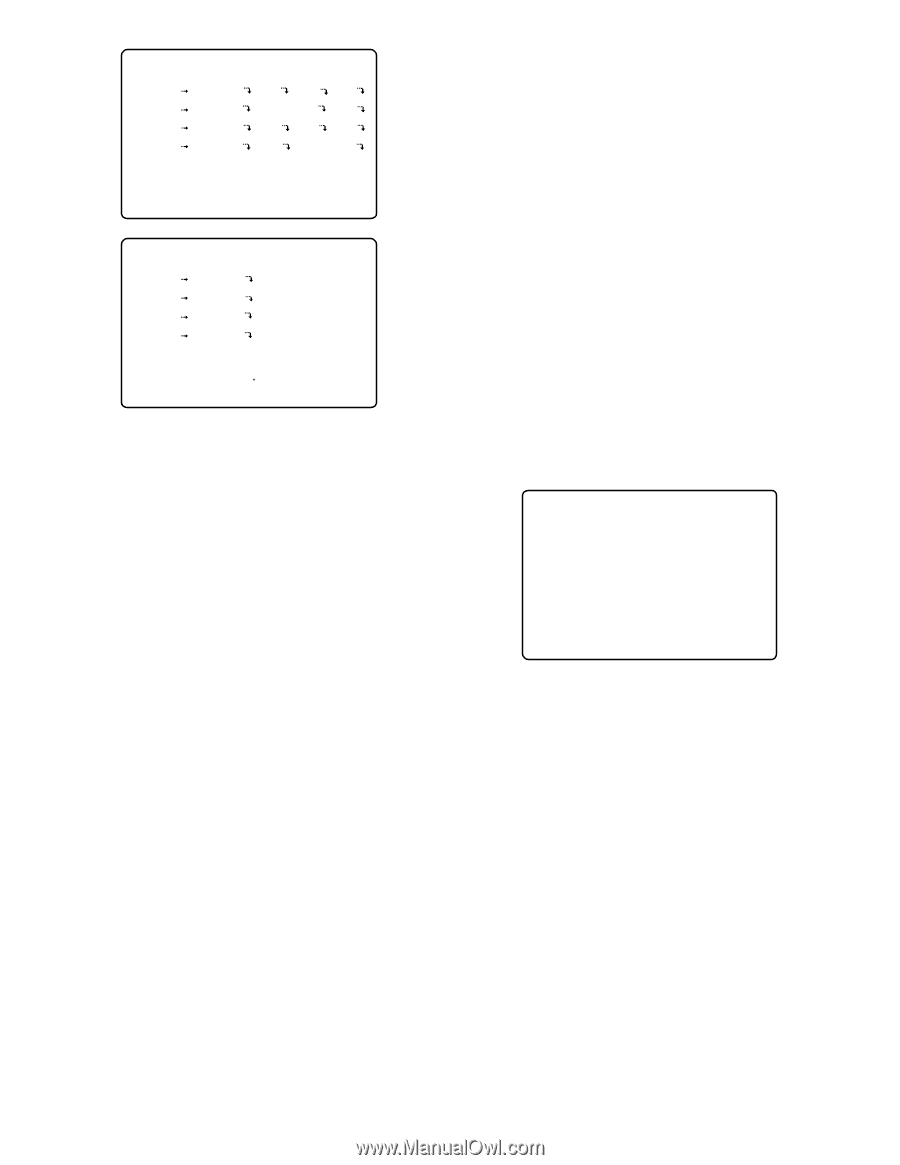
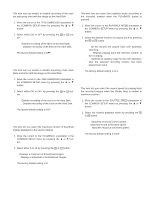
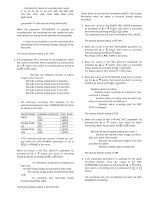
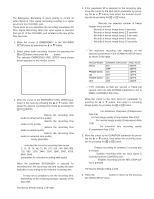
3-1 PROG1(WITHOUT AUDIO) NO START END G1 G2 G3 G4 1 0:00 6:00 T/L T/L T/L T/L RATE 7.5 7.5 1 10 2 6:00 12:00 M/S - O/S O/S RATE 10 5 1 3 12:00 18:00 M/S M/S M/S M/S RATE 5 2 2 5 4 18:00 24:00 O/S M/S - M/S RATE 15 10 10 SET TOTAL REC RATE ON EACH TABLE G1+G2+G3+G4= UNDER 60FPS 3-1 PROG1(WITH AUDIO) NO START END G1 1 0:00 6:00 T/L RATE 7.5 2 6:00 12:00 M/S RATE 10 3 12:00 18:00 M/S RATE 5 4 18:00 24:00 O/S RATE 15 Note: The program number menu (with audio) displays only the Group 1 editing area. 5. Move the cursor to the time editing area (NO. 1) by pressing the D or C button. 6. Move the cursor to the time to start and end the recording by pressing the A or B button, then select the time by pressing the + or - button. Notes: • If the time (No.1) to end the recording is set to 24:00, the editing function for the timers (No. 2 to No. 4) is disabled. • If the time (No.1) to end the recording is set to 12:00, the time (No. 2) to start a recording cannot be set to a time before 12:00. • When programming a timer extended into the next day, divide the timer event into two separate events and program both events separately in the program menu or other program menu. For example, Start End 0:00 7:00 23:00 24:00 7. Move the cursor to the recording editing area for groups by pressing the A or B button, then select the recording mode for groups by pressing the + or button. T/L: Time Lapse Recording M/S: Multi Shot Recording O/S: One Shot Recording -: Disables Recording Note: For further recording settings, refer to the recording mode selected described later. 51 8. Move the cursor to the editing area (NO. 2 to NO. 4) by pressing the D or C button, then repeat the steps 6 and 7 to edit the schedule. 9. When all settings are completed, press the SETUP/ESC button to return to the previous TIMER REC SETUP menu. s Special Day Timer Before programming this table, confirm that the Program Timer is programmed completely. This table allows for up to 30 days to be defined as special days. In this table, 30 specific user defined days are assigned to one day of the week. 1. Move the cursor to TIMER SPECIAL DAY in the TIMER REC SETUP menu by pressing the D or C button, then press the SET button. The TIMER SPECIAL DAY SETUP table as shown below appears on the monitor screen. 3-5 TIMER SPECIAL DAY SETUP DATE ACT DATE ACT DATE ACT 1 JUL 4 SUN 11 ----- --- 21 ----- --2 ----- --- 12 ----- --- 22 ----- --3 ----- --- 13 ----- --- 23 ----- --4 ----- --- 14 ----- --- 24 ----- --5 ----- --- 15 ----- --- 25 ----- --6 ----- --- 16 ----- --- 26 ----- --7 ----- --- 17 ----- --- 27 ----- --8 ----- --- 18 ----- --- 28 ----- --9 ----- --- 19 ----- --- 29 ----- --10 ----- --- 20 ----- --- 30 ----- --- 2. Move the cursor to the DATE editing area by pressing the D or C button. 3. Select a month by pressing the + or - button. Move the cursor to the right by pressing the B button, then select the date by pressing the + or - button. Note: The programmed month and date will be valid for every year. 4. Move the cursor to the ACT editing area by pressing the B button, then select the day of the week by pressing the + or - button. 5. Repeat the above steps 2 to 4 to program the other special days. 6. When satisfied with all special days, press the SETUP/ESC button to return to the previous TIMER REC SETUP menu. Note: To release the programmed special day timer, select "---" in the ACT column.
-
 1
1 -
2
-
3
-
4
-
5
-
6
-
7
-
8
-
9
-
10
-
11
-
12
-
13
-
14
-
15
-
16
-
17
-
18
-
19
-
20
-
21
-
22
-
23
-
24
-
25
-
26
-
27
-
28
-
29
-
30
-
31
-
32
-
33
-
34
-
35
-
36
-
37
-
38
-
39
-
40
-
41
-
42
-
43
-
 44
44 -
 45
45 -
 46
46 -
 47
47 -
 48
48 -
 49
49 -
 50
50 -
 51
51 -
 52
52 -
 53
53 -
 54
54 -
55
-
56
-
57
-
58
-
59
-
60
-
61
-
62
-
63
-
64
-
65
-
66
-
67
-
68
-
69
-
70
-
71
-
72
-
73
-
74
-
75
-
76
-
77
-
78
-
79
-
80
-
81
-
82
-
83
-
84
-
85
-
86
-
87
-
88
-
89
-
90
-
91
-
92
-
93
-
94
-
95
-
96
-
97
-
98
-
99
-
100
-
101
-
102
 |
 |