Panasonic WJHD500A WJHD500A User Guide - Page 33
Disk Remove
 |
View all Panasonic WJHD500A manuals
Add to My Manuals
Save this manual to your list of manuals |
Page 33 highlights
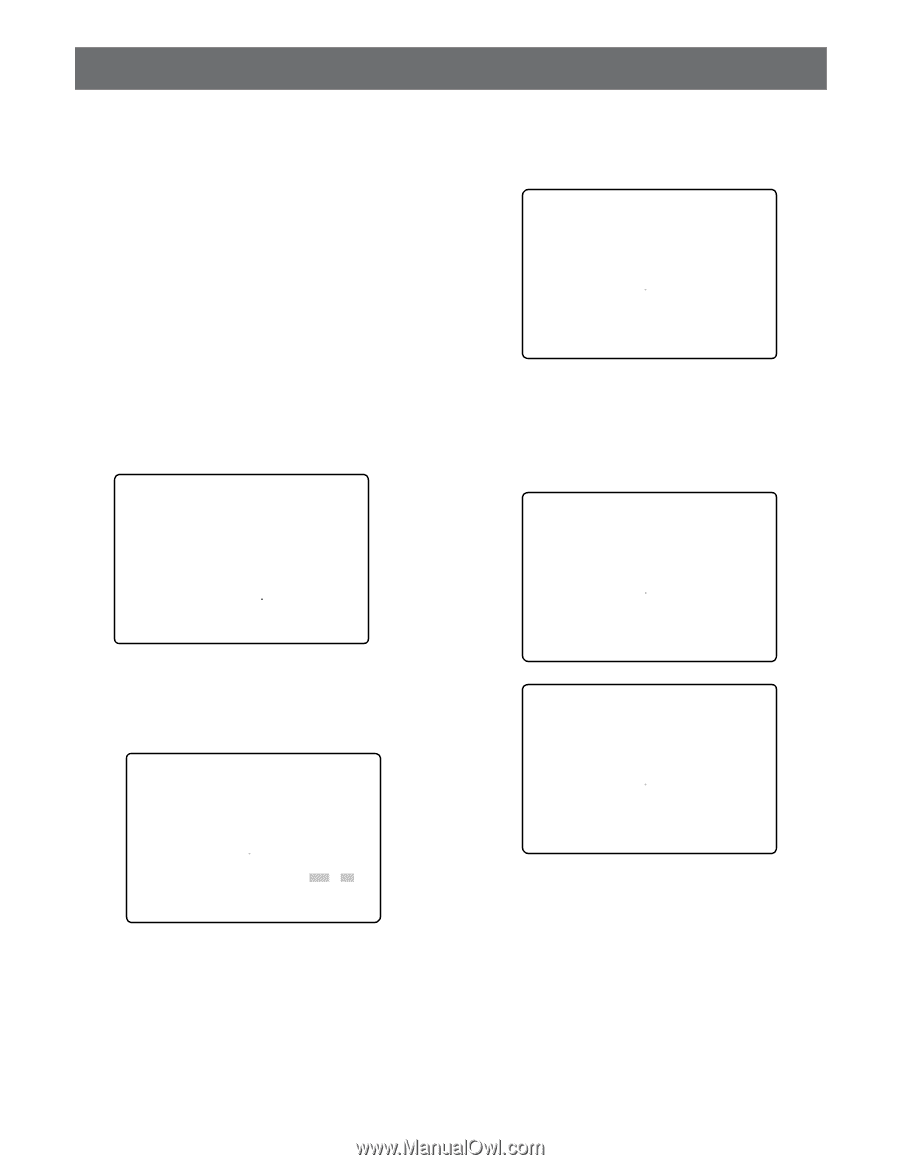
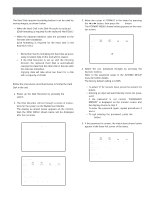
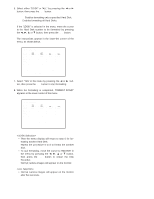
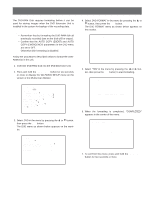
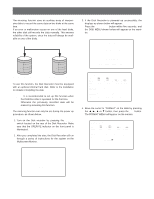
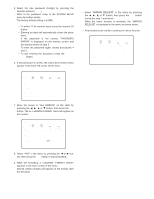
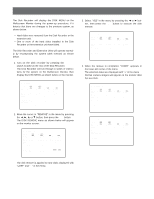
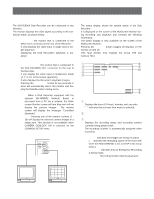
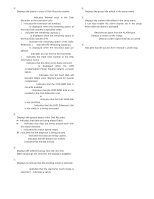
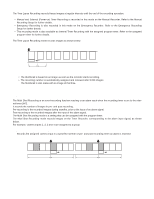
DISK REMOVE The Disk Recorder will display the DISK MENU on the Multiscreen Monitor during the power-up procedure, if it detects that there are changes to the previous system, as shown below. • Hard disks were removed from the Disk Recorder or the extension unit. • One or more of the hard disks installed in the Disk Recorder or the extension unit have failed. The Disk Recorder and Extension Units will operate normally by recomposing the system (disk remove) as shown below. 1. Turn on the Disk recorder by pressing the POWER switch located on the rear of the Disk Recorder. The Disk Recorder will run through a series of instructions for the system on the Multiscreen Monitor, then display the DISK MENU as shown below on the monitor. DISK MENU MAIN 1:¢¢GB EXT5 1:¢¢GB EXT4 1:* EXT3 1:LOST EXT2 1:LOST EXT1 1:EXT0 1:EXT DVD:- 2:¢¢GB 2:¢¢GB 2:* 2:LOST 2:LOST 2:2:- 3:¢¢GB 3:ADD 3:LOST 3:LOST 3:3:- 4:¢¢GB 4:ADD 4:LOST 4:LOST 4:4:- REMOVE FORMAT RESTART SELECT ITEM AND PRESS [SET] KEY 2. Move the cursor to "REMOVE" in the menu by pressing the A, B, D or C button, then press the SET button. The DISK REMOVE menu as shown below will appear on the monitor screen. DISK REMOVE MAIN 1:¢¢GB EXT5 1:¢¢GB EXT4 1:* EXT3 1:LOST EXT2 1:LOST EXT1 1:EXT0 1:EXT DVD:OK 2:¢¢GB 2:¢¢GB 2:* 2:LOST 2:LOST 2:2:- 3:¢¢GB 3:ADD 3:LOST 3:LOST 3:3:- 4:¢¢GB 4:ADD 4:LOST 4:LOST 4:4:- EXECUTE? (FOR "LOST","*" DISK) YES NO 3. Select "YES" in the menu by pressing the A or B button, then press the SET button to execute the disk remove. DISK REMOVE MAIN 1:¢¢GB EXT5 1:¢¢GB EXT4 1:EXT3 1:EXT2 1:LOST EXT1 1:EXT0 1:EXT DVD:OK 2:¢¢GB 2:¢¢GB 2:2:2:LOST 2:2:- 3:¢¢GB 3:ADD 3:LOST 3:LOST 3:3:- 4:¢¢GB 4:ADD 4:LOST 4:LOST 4:4:- NOW EXECUTING. PLEASE WAIT s 4. When the remove is completed, "DONE!" appears in the lower-left corner of the menu. The selected disks are displayed with "-" in the menu Normal camera images will appear on the monitor after five seconds. DISK REMOVE MAIN 1:¢¢GB EXT5 1:¢¢GB EXT4 1:EXT3 1:EXT2 1:EXT1 1:EXT0 1:EXT DVD:OK 2:¢¢GB 2:¢¢GB 2:2:2:2:2:- 3:¢¢GB 3:ADD 3:3:3:3:- 4:¢¢GB 4:ADD 4:4:4:4:- DONE! DISK REMOVE MAIN 1:¢¢GB EXT5 1:¢¢GB EXT4 1:EXT3 1:EXT2 1:EXT1 1:EXT0 1:EXT DVD:OK 2:¢¢GB 2:¢¢GB 2:2:2:2:2:- 3:¢¢GB 3:ADD 3:3:3:3:- 4:¢¢GB 4:ADD 4:4:4:4:- FAILED! The disk remove is applied to hard disks displayed with "LOST" and "✽" in the menu. 34
-
 1
1 -
2
-
3
-
4
-
5
-
6
-
7
-
8
-
9
-
10
-
11
-
12
-
13
-
14
-
15
-
16
-
17
-
18
-
19
-
20
-
21
-
22
-
23
-
24
-
25
-
26
-
27
-
 28
28 -
 29
29 -
 30
30 -
 31
31 -
 32
32 -
 33
33 -
 34
34 -
 35
35 -
 36
36 -
 37
37 -
 38
38 -
39
-
40
-
41
-
42
-
43
-
44
-
45
-
46
-
47
-
48
-
49
-
50
-
51
-
52
-
53
-
54
-
55
-
56
-
57
-
58
-
59
-
60
-
61
-
62
-
63
-
64
-
65
-
66
-
67
-
68
-
69
-
70
-
71
-
72
-
73
-
74
-
75
-
76
-
77
-
78
-
79
-
80
-
81
-
82
-
83
-
84
-
85
-
86
-
87
-
88
-
89
-
90
-
91
-
92
-
93
-
94
-
95
-
96
-
97
-
98
-
99
-
100
-
101
-
102
 |
 |