Panasonic WJHD500A WJHD500A User Guide - Page 61
Alarm Buzzer Setting, Video Loss Alarm Setting, Video Motion Detector Setting, 1S - 30S, 40S, 50S
 |
View all Panasonic WJHD500A manuals
Add to My Manuals
Save this manual to your list of manuals |
Page 61 highlights
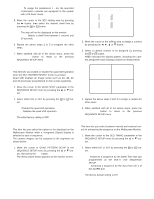
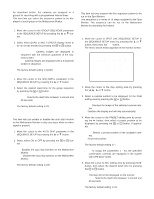
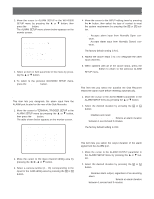
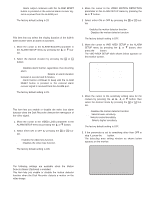
EXT: Alarm output continues until the ALARM RESET button is pressed or the external alarm recover signal is received from the ALARM port. The factory default setting is 2S. s Alarm Buzzer Setting This item lets you select the ringing duration of the built-in alarm buzzer when an alarm is activated. 1. Move the cursor to the ALARM BUZZER parameter in the ALARM SETUP menu by pressing the D or C button. 2. Select the desired duration by pressing the + or button. OFF: Disables alarm buzzer, regardless of an incoming alarm. 1S - 30S, 40S, 50S, 1M - 5M: Selects an alarm duration between 1 second and 5 minutes. EXT: Alarm buzzer continues to beep until the ALARM RESET button is pressed or the external alarm recover signal is received from the ALARM port. The factory default setting is 2S. s Video Loss Alarm Setting This item lets you enable or disable the video loss alarm function when the Disk Recorder detects the interruption of the video signal. 1. Move the cursor to the VIDEO LOSS parameter in the ALARM SETUP menu by pressing the D or C button. 2. Select either ON or OFF by pressing the + or - button. ON: Enables the video loss function. OFF: Disables the video loss function. The factory default setting is ON. 1. Move the cursor to the VIDEO MOTION DETECTION parameter in the ALARM SETUP menu by pressing the D or C button. 2. Select either ON or OFF by pressing the + or - button. ON: Enables the motion detector function. OFF: Disables the motion detector function. The factory default setting is OFF. 3. Move the cursor to VMD AREA SETUP in the ALARM SETUP menu by pressing the D or C button, then press the SET button. The VMD AREA SETUP table shown below appears on the monitor screen. 6-2 VMD AREA SETUP CAM SENSITIVITY 1 *OFF 2 *OFF 3 *OFF 4 *OFF 5 *OFF 6 *OFF 7 *OFF 8 *OFF CAM SENSITIVITY 9 *OFF 10 *OFF 11 *OFF 12 *OFF 13 *OFF 14 *OFF 15 *OFF 16 *OFF 4. Move the cursor to the sensitivity editing area for the camera by pressing the A, B, D or C button, then select the desired mode by pressing the + or - button. OFF: Disables the motion detector function. LOW: Selects lower sensitivity. MID: Selects normal sensitivity. HIGH: Selects higher sensitivity. The factory default setting is OFF. 5. If the parameter is set to something other than OFF in step 4, press the SET button. The detecting area setting window as shown below appears on the monitor. 1 s Video Motion Detector Setting The following settings are available when the Motion Detector Board (Optional) is installed. This item lets you enable or disable the motion detector function when the Disk Recorder detects a motion on the video image. + AREA SET/ERASE:PRESS[SET] AT CORNER 63
-
 1
1 -
2
-
3
-
4
-
5
-
6
-
7
-
8
-
9
-
10
-
11
-
12
-
13
-
14
-
15
-
16
-
17
-
18
-
19
-
20
-
21
-
22
-
23
-
24
-
25
-
26
-
27
-
28
-
29
-
30
-
31
-
32
-
33
-
34
-
35
-
36
-
37
-
38
-
39
-
40
-
41
-
42
-
43
-
44
-
45
-
46
-
47
-
48
-
49
-
50
-
51
-
52
-
53
-
54
-
55
-
 56
56 -
 57
57 -
 58
58 -
 59
59 -
 60
60 -
 61
61 -
 62
62 -
 63
63 -
 64
64 -
 65
65 -
 66
66 -
67
-
68
-
69
-
70
-
71
-
72
-
73
-
74
-
75
-
76
-
77
-
78
-
79
-
80
-
81
-
82
-
83
-
84
-
85
-
86
-
87
-
88
-
89
-
90
-
91
-
92
-
93
-
94
-
95
-
96
-
97
-
98
-
99
-
100
-
101
-
102
 |
 |