Panasonic WJHD500A WJHD500A User Guide - Page 80
Multiscreen Spot Live, GROUP SELECT, MULTISCREEN SELECT, <All Input Display with Quad Shift Off>
 |
View all Panasonic WJHD500A manuals
Add to My Manuals
Save this manual to your list of manuals |
Page 80 highlights
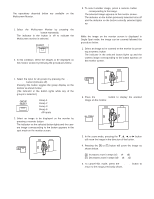
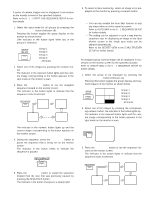
The indicator in the numeric button lights up and the camera image corresponding to the button appears on the monitor screen. 4. During the sequence, press the SEQUENCE button to pause the sequence that is being run on the monitor screen. The indicator in the button blinks to indicate that the sequence is paused. SEQUENCE 5. Press the SEQUENCE button to restart the sequence forward from the step that was previously paused by pressing the SEQUENCE button. The indicator in the button changes to a steady light. 6. To return to Spot monitoring, select an assigned camera image to be displayed on the monitor by pressing a numeric button. If you attempt to press any button other than the one assigned to the group, it will be ignored. Notes: • You can also enable the Auto Skip function to skip any steps when no video signal is present. Refer to the AUTO SKIP in the 5 - 1 SEQUENCE SETUP for further details. • The setting can be adjusted in such a way that the sequence step for displaying an image on the Spot Monitor screen in the single spot mode can be skipped automatically. Refer to the SECRET VIEW in the 5 MULTIPLEXER SETUP for further details. q Multiscreen Spot (Live) The monitor can display the camera images on a 4, 7, 9, 10, 13 and 16 multiscreen shown below. 1. Select the input for all groups (or one group) by pressing the GROUP SELECT button. Pressing this button toggles the group display on the monitor as shown below. GROUP SELECT G1: Group 1 G2: Group 2 G3: Group 3 G4: Group 4 none: All Inputs Note: Select All Inputs for displaying all camera images, otherwise only camera images assigned to a group are displayed on the monitor. 2. Select the screen segments to be displayed on the monitor by pressing the MULTISCREEN SELECT button repeatedly. MULTISCREEN SELECT Each time the MULTISCREEN SELECT button is pressed, the next group of 6 multiscreens available is displayed as follows. The display pattern varies according to the selected input and setting; shown below is an example of a monitor display. 12 34 56 78 9 10 11 12 13 14 15 16 1 2 3 4 1 2 3 45 67 1 23 45 67 89 10 11 12 13 1 2 34 56 7 8 9 10 123 456 789 83
-
 1
1 -
2
-
3
-
4
-
5
-
6
-
7
-
8
-
9
-
10
-
11
-
12
-
13
-
14
-
15
-
16
-
17
-
18
-
19
-
20
-
21
-
22
-
23
-
24
-
25
-
26
-
27
-
28
-
29
-
30
-
31
-
32
-
33
-
34
-
35
-
36
-
37
-
38
-
39
-
40
-
41
-
42
-
43
-
44
-
45
-
46
-
47
-
48
-
49
-
50
-
51
-
52
-
53
-
54
-
55
-
56
-
57
-
58
-
59
-
60
-
61
-
62
-
63
-
64
-
65
-
66
-
67
-
68
-
69
-
70
-
71
-
72
-
73
-
74
-
 75
75 -
 76
76 -
 77
77 -
 78
78 -
 79
79 -
 80
80 -
 81
81 -
 82
82 -
 83
83 -
 84
84 -
 85
85 -
86
-
87
-
88
-
89
-
90
-
91
-
92
-
93
-
94
-
95
-
96
-
97
-
98
-
99
-
100
-
101
-
102
 |
 |