Pioneer AVIC-9DVD Owner's Manual - Page 26
BACK button, Mode switch, VOL dial, MENU button, DETOUR button, CANCEL ROUTE button, GUIDE button - installation
 |
View all Pioneer AVIC-9DVD manuals
Add to My Manuals
Save this manual to your list of manuals |
Page 26 highlights
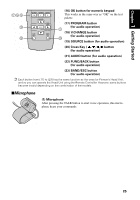
(5) BACK button While using a menu, pressing this button cancels the present operation and returns you to the previously displayed menu or list. (6) Mode switch Using the Remote Controller, you can switch to operate either the Navigation System or the DVD/CD. If switching the operation mode, the function of each button on the Remote Controller is also switched (see "How to Listen to a CD" on page 110 and "How to Watch DVD" on page 113). (7) VOL dial When you turn the dial downwards, the volume decreases. Turning it upwards increases the volume. • When the Dipswitch 2 is OFF, volume of the voice guidance of the Navigation System is adjusted. • When the Dipswitch 2 is ON, the volume of Pioneer Head Unit is adjusted. If the dial is pressed, the volume is reduced to around 1/10th of the volume (ATT function). When pressed again, the volume returns to its previous level. (8) NAVI button You press the NAVI button to view the map or return to guidance. Also, when the map is scrolled, pressing this button returns to the display of the map of your surroundings. (9) MENU button Pressing the MENU button displays a menu of options. (10) DETOUR button Press this button to restart route calculation, such as calculating a detour. If this button is pressed for more than two seconds, you can see the information (passing roads and driving distance, and so on) of the route down which you are currently being guided (see Chapter 4 "Guidance to Your Destination"). (11) CANCEL ROUTE button Press this button to cancel the route guidance. When pressed for more than two seconds, the next way point is recognized as already being passed, and a new route calculation starts (see Chapter 4 "Guidance to Your Destination"). (12) GUIDE button Press this button if you did not hear the voice guidance properly. If this button is pressed for more than two seconds, you can listen to traffic information (where available.). (13) Numeric keypad You use this pad for entering characters or numbers. • (14) (AUDIO) button Use this button when the Navigation System is combined with another manufacturer's display. This button is used only when the navigation image (RGB image) is output from RCA Video output (yellow) of the Hide-away Unit of this product. (For details, see the installation manual.) ➲ When combined with CD-TS36, sound is output from the Voice Guidance Speaker with infrared sensor. (15) DELETE button Press to delete the character you just entered. If you press this button for more than two seconds, all the characters entered will be deleted. 24
-
 1
1 -
2
-
3
-
4
-
5
-
6
-
7
-
8
-
9
-
10
-
11
-
12
-
13
-
14
-
15
-
16
-
17
-
18
-
19
-
20
-
 21
21 -
 22
22 -
 23
23 -
 24
24 -
 25
25 -
 26
26 -
 27
27 -
 28
28 -
 29
29 -
 30
30 -
 31
31 -
32
-
33
-
34
-
35
-
36
-
37
-
38
-
39
-
40
-
41
-
42
-
43
-
44
-
45
-
46
-
47
-
48
-
49
-
50
-
51
-
52
-
53
-
54
-
55
-
56
-
57
-
58
-
59
-
60
-
61
-
62
-
63
-
64
-
65
-
66
-
67
-
68
-
69
-
70
-
71
-
72
-
73
-
74
-
75
-
76
-
77
-
78
-
79
-
80
-
81
-
82
-
83
-
84
-
85
-
86
-
87
-
88
-
89
-
90
-
91
-
92
-
93
-
94
-
95
-
96
-
97
-
98
-
99
-
100
-
101
-
102
-
103
-
104
-
105
-
106
-
107
-
108
-
109
-
110
-
111
-
112
-
113
-
114
-
115
-
116
-
117
-
118
-
119
-
120
-
121
-
122
-
123
-
124
-
125
-
126
-
127
-
128
-
129
-
130
-
131
-
132
-
133
-
134
-
135
-
136
-
137
-
138
-
139
-
140
-
141
-
142
-
143
-
144
-
145
-
146
-
147
-
148
-
149
-
150
-
151
-
152
-
153
-
154
-
155
-
156
-
157
-
158
-
159
-
160
 |
 |
