Samsung CLX-3185FN User Manual (user Manual) (ver.2.00) (English) - Page 91
Sending a fax in your machine, Setting the fax header, Sending a fax, Sending a fax manually - clx 3185fw manual pdf
 |
View all Samsung CLX-3185FN manuals
Add to My Manuals
Save this manual to your list of manuals |
Page 91 highlights
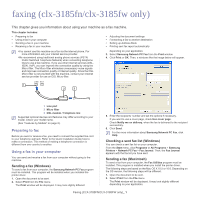
In case of Mac OS X 10.3 or 10.4, select PDF and Fax PDF. 3. Select CLX-3180 Series fax-USB from the drop-down list in Printer. 4. Choose the number of copies you want and indicate which pages you want to fax. 5. Choose your paper size, orientation, and scale. 6. Enter the recipients' fax number into To's input area. You can also use Addresses pressing button, if you have stored frequently used fax numbers. 7. If necessary, enter the access code in Dialing Prefix input area. 8. If necessary, you can send the fax with cover page, check Use Cover Page. Enter the subject and message of the fax job. You can set more detailed options for cover page option in Samsung Fax Cover Page. Select Samsung Fax Cover Page from the drop-down list under Orientation. 9. Click Fax. 10. The Fax Journal icon appears on your Macintosh dock. Click the icon. You can see the status of the fax job. You can also delete, hold, resume, and pause the fax job. Sending a fax in your machine This part explains how to send a fax and the special methods of transmission. When you place the originals, you can use either the document feeder or the scanner glass (See "Loading originals" on page 1). If the originals are placed on both the document feeder and the scanner glass, the machine will read the originals on the document feeder first, which has higher priority in scanning. Setting the fax header In some countries, you are required by law to indicate your fax number on any fax you send. 1. Press Menu on the control panel. 2. Press the left/right arrow until System Setup appears and press OK. 3. Press the left/right arrow until Machine Setup appears and press OK. 4. Press the left/right arrow until Machine ID appears and press OK. 5. Enter your name or the company name using the number keypad. You can enter alphanumeric characters using the number keypad, and include special symbols by pressing the 1 button. For details on how to enter alphanumeric characters, see "Entering characters using the number keypad (CLX-3185FN/CLX-3185FW only)" on page 2. 6. Press OK to save the ID. 7. Press the left/right arrow until Machine Fax No. appears and press OK. 8. Enter your fax number using the number keypad and press OK. 9. Press Stop/Clear to return to ready mode. Sending a fax 1. Press (Fax) on the control panel. 2. Load originals face up into the document feeder, or place a single original face down on the scanner glass. (See "On the scanner glass" on page 1 or "In the document feeder (CLX-3185FN/CLX-3185FW only)" on page 1). 3. Adjust the resolution and the darkness to suit your fax needs (See "Adjusting the document settings" on page 5). 4. Enter the receiving fax machine's number. You can use speed dial numbers, or group dial numbers. For details about storing and searching for a number, see "Setting up Address Book" on page 6. 5. Press Color Start or Black Start on the control panel. The machine starts to scan and send a fax to destinations. •If you want to send fax directly from your computer, use Samsung Network PC Fax (See "Sending a fax (Windows)" on page 1). •When you want to cancel a fax job, press Stop/Clear before the machine start transmission. •If you used the scanner glass, the machine shows the message asking to place another page. Sending a fax manually This method is sending a fax using On Hook Dial on the control panel. 1. Press (Fax) on the control panel. 2. Load originals face up into the document feeder, or place a single original face down on the scanner glass. 3. Adjust the resolution and the darkness to suit your fax needs (See "Adjusting the document settings" on page 5). 4. Press On Hook Dial on the control panel or lift the handset. 5. Enter a fax number using the number keypad on the control panel. 6. Press Color Start or Black Start when you hear a high-pitched fax signal from the remote fax machine. When you want to cancel a fax job, press Stop/Clear at any time while sending. Confirming a transmission When the last page of your original has been sent successfully, the machine beeps and returns to ready mode. When something goes wrong while sending your fax, an error message appears on the display. You must treat the malfunction according to the error messages on the display (See "Understanding display messages" on page 5 for a list of error messages and their meanings. If you receive an error message, press Stop/Clear to clear the message and try to send the fax again. You can set your machine to print a confirmation report automatically each time sending a fax is completed (See "Printing sent fax report automatically" on page 8). Automatic redialing When the number you have dialed is busy or there is no answer when you send a fax, the machine automatically redials the number every three minutes, up to seven times according to the factory default settings. When the display shows Retry Redial?, press OK to redial the number without waiting. To cancel the automatic redialing, press Stop/Clear. To change the time interval between redials and the number of redial attempts (See "Changing the fax setup options" on page 1). Redialing the last number To redial the number you called last 1. Press Redial/Pause on the control panel. 2. When an original is loaded in the document feeder, the machine automatically begins to send. If an original is placed on the scanner glass, select Yes to add another page. Load another original and press OK. When you have finished, select No at the Another Page? prompt. Faxing (CLX-3185FN/CLX-3185FW only)_ 2
-
 1
1 -
2
-
3
-
4
-
5
-
6
-
7
-
8
-
9
-
10
-
11
-
12
-
13
-
14
-
15
-
16
-
17
-
18
-
19
-
20
-
21
-
22
-
23
-
24
-
25
-
26
-
27
-
28
-
29
-
30
-
31
-
32
-
33
-
34
-
35
-
36
-
37
-
38
-
39
-
40
-
41
-
42
-
43
-
44
-
45
-
46
-
47
-
48
-
49
-
50
-
51
-
52
-
53
-
54
-
55
-
56
-
57
-
58
-
59
-
60
-
61
-
62
-
63
-
64
-
65
-
66
-
67
-
68
-
69
-
70
-
71
-
72
-
73
-
74
-
75
-
76
-
77
-
78
-
79
-
80
-
81
-
82
-
83
-
84
-
85
-
 86
86 -
 87
87 -
 88
88 -
 89
89 -
 90
90 -
 91
91 -
 92
92 -
 93
93 -
 94
94 -
 95
95 -
 96
96 -
97
-
98
-
99
-
100
-
101
-
102
-
103
-
104
-
105
-
106
-
107
-
108
-
109
-
110
-
111
-
112
-
113
-
114
-
115
-
116
-
117
-
118
-
119
-
120
-
121
-
122
-
123
-
124
-
125
-
126
-
127
-
128
-
129
-
130
-
131
-
132
-
133
-
134
-
135
-
136
-
137
-
138
-
139
-
140
-
141
-
142
-
143
-
144
-
145
-
146
-
147
-
148
-
149
-
150
-
151
 |
 |