Samsung SCH-I405 User Manual (user Manual) (ver.f8) (English(north America)) - Page 48
Contacts and Accounts, Accounts, Menu Key, Settings, Accounts & sync, Background data - manuals
 |
View all Samsung SCH-I405 manuals
Add to My Manuals
Save this manual to your list of manuals |
Page 48 highlights
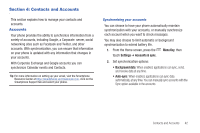
Section 4: Contacts and Accounts This section explains how to manage your contacts and accounts. Accounts Your phone provides the ability to synchronize information from a variety of accounts, including Google, a Corporate server, social networking sites such as Facebook and Twitter, and other accounts. With synchronization, you can ensure that information on your phone is updated with any information that changes in your accounts. With Corporate Exchange and Google accounts you can synchronize Calendar events and Contacts. Tip: For more information on setting up your email, visit the Smartphone Resource Center at https://smartphones.verizonwireless.com, click on the Smartphone Support tab and select your phone. Synchronizing your accounts You can choose to have your phone automatically maintain synchronization with your accounts, or manually synchronize each account when you want to check messages. You may also choose to limit automatic or background synchronization to extend battery life. 1. From the Home screen, press the Menu Key, then touch Settings ➔ Accounts & sync. 2. Set synchronization options: • Background data: When enabled, applications can sync, send, and receive data at any time. • Auto-sync: When enabled, applications can sync data automatically, at any time. You can manually sync accounts with the Sync option available in the accounts. Contacts and Accounts 42
-
 1
1 -
2
-
3
-
4
-
5
-
6
-
7
-
8
-
9
-
10
-
11
-
12
-
13
-
14
-
15
-
16
-
17
-
18
-
19
-
20
-
21
-
22
-
23
-
24
-
25
-
26
-
27
-
28
-
29
-
30
-
31
-
32
-
33
-
34
-
35
-
36
-
37
-
38
-
39
-
40
-
41
-
42
-
 43
43 -
 44
44 -
 45
45 -
 46
46 -
 47
47 -
 48
48 -
 49
49 -
 50
50 -
 51
51 -
 52
52 -
 53
53 -
54
-
55
-
56
-
57
-
58
-
59
-
60
-
61
-
62
-
63
-
64
-
65
-
66
-
67
-
68
-
69
-
70
-
71
-
72
-
73
-
74
-
75
-
76
-
77
-
78
-
79
-
80
-
81
-
82
-
83
-
84
-
85
-
86
-
87
-
88
-
89
-
90
-
91
-
92
-
93
-
94
-
95
-
96
-
97
-
98
-
99
-
100
-
101
-
102
-
103
-
104
-
105
-
106
-
107
-
108
-
109
-
110
-
111
-
112
-
113
-
114
-
115
-
116
-
117
-
118
-
119
-
120
-
121
-
122
-
123
-
124
-
125
-
126
-
127
-
128
-
129
-
130
-
131
-
132
-
133
-
134
-
135
-
136
-
137
-
138
-
139
-
140
-
141
-
142
-
143
-
144
-
145
-
146
-
147
-
148
-
149
-
150
-
151
-
152
-
153
-
154
-
155
-
156
-
157
-
158
-
159
-
160
-
161
-
162
-
163
-
164
-
165
-
166
-
167
-
168
-
169
-
170
-
171
-
172
-
173
-
174
-
175
-
176
-
177
-
178
-
179
-
180
-
181
-
182
-
183
-
184
-
185
-
186
 |
 |