Samsung SCH-M828C User Manual (user Manual) (ver.f6) (English(north America)) - Page 83
Sending Contacts, Assigning a Picture to an Entry, Deleting Entries
 |
View all Samsung SCH-M828C manuals
Add to My Manuals
Save this manual to your list of manuals |
Page 83 highlights
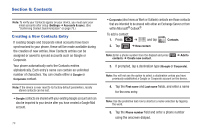
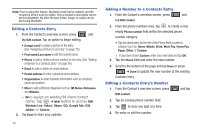
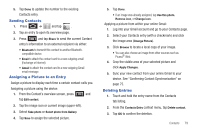
5. Tap Done to update the number to the existing Contacts entry. Sending Contacts 1. Press ➔ and tap . 2. Tap an entry to open its overview page. 3. Press and tap Share to send the current Contact entry's information to an external recipient via either: • Bluetooth to transmit this contact to another Bluetoothcompatible device. • Email to attach the contact card to a new outgoing email (Exchange or Internet). • Gmail to attach the contact card to a new outgoing Gmail email message. Assigning a Picture to an Entry Assign a picture to display each time a certain contact calls you. Assigning a picture using the device: 1. From the Contact's overview screen, press and tap Edit contact. 2. Tap the image icon or current image (upper-left). 3. Select Take photo or Select photo from Gallery. 4. Tap Save to assign the selected picture. 5. Tap Done. • If an image was already assigned, tap Use this photo, Remove icon, or Change icon. Applying a picture from within your online Gmail: 1. Log into your Gmail account and go to your Contacts page. 2. Select your Contacts entry (with a checkmark) and click the image area (Change Picture). 3. Click Browse to locate a local copy of your image. • You can also choose an image from other sources such as Picasa® Web. 4. Crop the visible area of your selected picture and click Apply Changes. 5. Sync your new contact from your online Gmail to your device. See "Confirming Contact Synchronization" on page 75. Deleting Entries 1. Touch and hold the entry name from the Contacts tab listing. 2. From the Contacts Entry context menu, tap Delete contact. 3. Tap OK to confirm the deletion. Contacts 79
-
 1
1 -
2
-
3
-
4
-
5
-
6
-
7
-
8
-
9
-
10
-
11
-
12
-
13
-
14
-
15
-
16
-
17
-
18
-
19
-
20
-
21
-
22
-
23
-
24
-
25
-
26
-
27
-
28
-
29
-
30
-
31
-
32
-
33
-
34
-
35
-
36
-
37
-
38
-
39
-
40
-
41
-
42
-
43
-
44
-
45
-
46
-
47
-
48
-
49
-
50
-
51
-
52
-
53
-
54
-
55
-
56
-
57
-
58
-
59
-
60
-
61
-
62
-
63
-
64
-
65
-
66
-
67
-
68
-
69
-
70
-
71
-
72
-
73
-
74
-
75
-
76
-
77
-
 78
78 -
 79
79 -
 80
80 -
 81
81 -
 82
82 -
 83
83 -
 84
84 -
 85
85 -
 86
86 -
 87
87 -
 88
88 -
89
-
90
-
91
-
92
-
93
-
94
-
95
-
96
-
97
-
98
-
99
-
100
-
101
-
102
-
103
-
104
-
105
-
106
-
107
-
108
-
109
-
110
-
111
-
112
-
113
-
114
-
115
-
116
-
117
-
118
-
119
-
120
-
121
-
122
-
123
-
124
-
125
-
126
-
127
-
128
-
129
-
130
-
131
-
132
-
133
-
134
-
135
-
136
-
137
-
138
-
139
-
140
-
141
-
142
-
143
-
144
-
145
-
146
-
147
-
148
-
149
 |
 |
