Sharp AJ-6010 AJ6010 Operation Manual - Page 41
Professional Scan Preferences Main Tab part 1
 |
View all Sharp AJ-6010 manuals
Add to My Manuals
Save this manual to your list of manuals |
Page 41 highlights
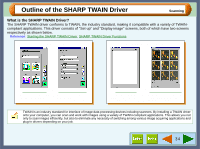
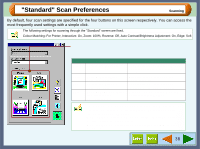
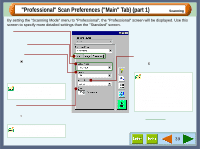
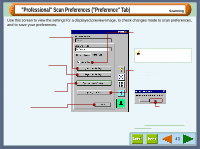
"Professional" Scan Preferences ("Main" Tab) (part 1) Scanning By setting the "Scanning Mode" menu to "Professional", the "Professional" screen will be displayed. Use this screen to specify more detailed settings than the "Standard" screen. Tab Index which allows you to switch between the three setup screens. Colour Mode Use to set the colour mode for scanning. Resolution Use to set the scan resolution. Click the ( ) button, and select from "75", "150", "300", "600", or input the required figure into the box. (50dpi - 9600dpi) The available values vary depending on the size of the scanning area. If you want to scan with high resolution, set the scanning area as small as possible. When you change the value for "Resolution" while "Zoom" is specified to other than 100%, a warning message will appear. Zoom Maximize/Minimize the image to be scanned without changing the resolution setting. Click the ( ) button to increase or decrease the setting figure, or input the required figure into the box provided. On the above screen, click on options shown in the green boxes to make additional changes. Image Area Use to specify the scanning area. Click the ( ) button, and select the size from "A4", "B5", "Letter", "Post card" and "Custom". • When you select "Custom", specify the scanning area by dragging the preferred area. (Up to 21.6cm x 29.8cm) • The available values vary depending on the setting for "Resolution" and "Zoom". Example: With "Resolution":9600dpi, "Zoom":100%, the maximum scanning area is 4.9cm x 4.9cm. Reference: Refer to Preview Screen for more information on setting the scanning area. The available values vary depending on the specified value for "Resolution" and the size of the scanning area. 39
-
 1
1 -
2
-
3
-
4
-
5
-
6
-
7
-
8
-
9
-
10
-
11
-
12
-
13
-
14
-
15
-
16
-
17
-
18
-
19
-
20
-
21
-
22
-
23
-
24
-
25
-
26
-
27
-
28
-
29
-
30
-
31
-
32
-
33
-
34
-
35
-
 36
36 -
 37
37 -
 38
38 -
 39
39 -
 40
40 -
 41
41 -
 42
42 -
 43
43 -
 44
44 -
 45
45 -
 46
46 -
47
-
48
-
49
-
50
-
51
-
52
-
53
-
54
-
55
-
56
-
57
-
58
-
59
-
60
-
61
-
62
-
63
-
64
-
65
-
66
-
67
-
68
-
69
-
70
-
71
-
72
-
73
-
74
-
75
-
76
-
77
-
78
-
79
-
80
-
81
-
82
-
83
-
84
-
85
-
86
-
87
-
88
-
89
-
90
-
91
-
92
-
93
 |
 |
