Sharp AJ-6010 AJ6010 Operation Manual - Page 76
Changing the Print Head part 3
 |
View all Sharp AJ-6010 manuals
Add to My Manuals
Save this manual to your list of manuals |
Page 76 highlights
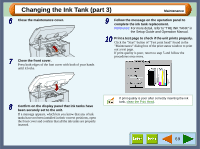
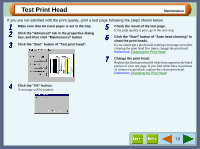
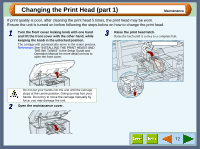
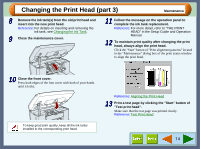
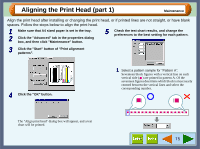
Changing the Print Head (part 3) Maintenance 8 Remove the ink tank(s) from the old print head and insert into the new print head. Reference: For details on inserting and removing the ink tank, see Changing the Ink Tank. 9 Close the maintenance cover. 11 Follow the message on the operation panel to complete the ink tank replacement. Reference: For more detail, refer to "THE PRINT HEAD" in the Setup Guide and Operation Manual. 12 To maintain print quality after changing the print head, always align the print head. Click the "Start" button of "Print alignment patterns" located in the "Maintenance" dialog box of the print status window to align the print head. 10 Close the front cover. Press both edges of the font cover with both of your hands until it locks. To keep good print quality, keep all the ink tanks installed to the corresponding print head. Reference: Aligning the Print Head 13 Print a test page by clicking the "Start" button of "Test print head". Make sure that the test page was printed clearly. Reference: Test Print Head 74
-
 1
1 -
2
-
3
-
4
-
5
-
6
-
7
-
8
-
9
-
10
-
11
-
12
-
13
-
14
-
15
-
16
-
17
-
18
-
19
-
20
-
21
-
22
-
23
-
24
-
25
-
26
-
27
-
28
-
29
-
30
-
31
-
32
-
33
-
34
-
35
-
36
-
37
-
38
-
39
-
40
-
41
-
42
-
43
-
44
-
45
-
46
-
47
-
48
-
49
-
50
-
51
-
52
-
53
-
54
-
55
-
56
-
57
-
58
-
59
-
60
-
61
-
62
-
63
-
64
-
65
-
66
-
67
-
68
-
69
-
70
-
 71
71 -
 72
72 -
 73
73 -
 74
74 -
 75
75 -
 76
76 -
 77
77 -
 78
78 -
 79
79 -
 80
80 -
 81
81 -
82
-
83
-
84
-
85
-
86
-
87
-
88
-
89
-
90
-
91
-
92
-
93
 |
 |
