Sharp AJ-6010 AJ6010 Operation Manual - Page 85
Faint, Uneven or Smeared Print Output
 |
View all Sharp AJ-6010 manuals
Add to My Manuals
Save this manual to your list of manuals |
Page 85 highlights
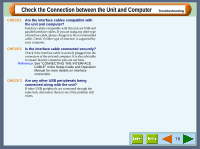
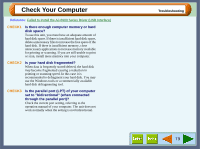
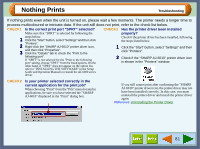
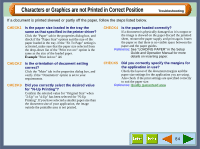
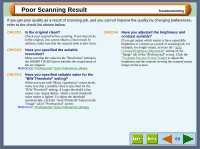
Faint, Uneven or Smeared Print Output Troubleshooting If the print output is faint or uneven If print output is faint or uneven, refer to checks 1 to 3 below for possible remedies. CHECK1 Has the paper been inserted into the printer with the print side facing the right way? Some types of paper have only one printable side. Print quality will suffer if paper is loaded in the tray with the print side facing the wrong way. CHECK2 Has the printer driver been specified to suit both paper and the print job? Open the properties dialog box, and follow the steps listed below. 1 Is the paper specified in the properties dialog box the same as that loaded in the tray? Click the "Advanced" tab, and check if the "Media Type" 2 setting matches the paper inserted in the tray. Is the print quality setting in the properties dialog box set to "Draft"? If the "Print Quality" setting in the "Advanced" tab is set to "Draft", you can print at higher speed but print quality may suffer as a result. Specify another setting, and then print again. CHECK3 Did you get a clear result for your test page? Print a test page to check the print quality. To print a test page, click the "Start" button of "Test print head" on the "Maintenance" tab of the print status window. Reference: Test Print Head If the print output is smeared First turn the paper knob to the ( ) direction and print again. If the print output is still smeared, CHECK1 Is the paper curled? If the paper is curled, straighten it up and set it to the unit again. CHECK2 Is the paper too thick or too thin? Only paper weighing from 60g/m2 to 200g/m2 (16 lbs. to 110 lbs. index) can be used for printing. CHECK3 Did you set sufficient margins in the paper settings of your application? If the margins are set outside of the quality guaranteed area, smudges or smears may appear at the upper and lower edges of the paper. Set margins from your application to fit within the quality guaranteed area. Reference: Quality guaranteed area 83
-
 1
1 -
2
-
3
-
4
-
5
-
6
-
7
-
8
-
9
-
10
-
11
-
12
-
13
-
14
-
15
-
16
-
17
-
18
-
19
-
20
-
21
-
22
-
23
-
24
-
25
-
26
-
27
-
28
-
29
-
30
-
31
-
32
-
33
-
34
-
35
-
36
-
37
-
38
-
39
-
40
-
41
-
42
-
43
-
44
-
45
-
46
-
47
-
48
-
49
-
50
-
51
-
52
-
53
-
54
-
55
-
56
-
57
-
58
-
59
-
60
-
61
-
62
-
63
-
64
-
65
-
66
-
67
-
68
-
69
-
70
-
71
-
72
-
73
-
74
-
75
-
76
-
77
-
78
-
79
-
 80
80 -
 81
81 -
 82
82 -
 83
83 -
 84
84 -
 85
85 -
 86
86 -
 87
87 -
 88
88 -
 89
89 -
 90
90 -
91
-
92
-
93
 |
 |
