Sharp AJ-6010 AJ6010 Operation Manual - Page 52
How to Print part 1
 |
View all Sharp AJ-6010 manuals
Add to My Manuals
Save this manual to your list of manuals |
Page 52 highlights
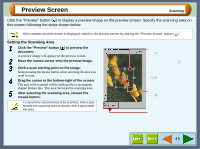
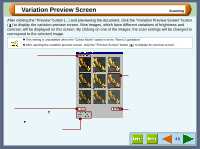
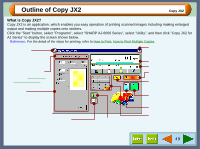
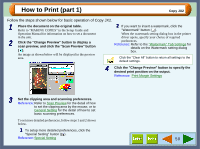
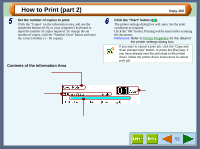
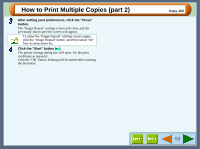
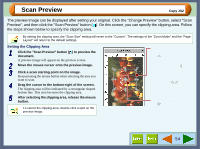
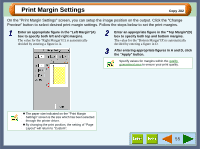
How to Print (part 1) Copy JX2 Follow the steps shown below for basic operation of Copy JX2. 1 Place the document on the original table. Refer to "MAKING COPIES" in the Setup Guide and Operation Manual for information on how to set a document in the unit. 2 Click the "Change Preview" button to display a scan preview, and click the "Scan Preview" button ( ). An image as shown below will be displayed in the preview area. 2 If you want to insert a watermark, click the "Watermark" button ( ). When the watermark setting dialog box in the printer driver opens, specify your choice of required preferences. Reference: Refer to the "Watermark" Tab Settings for details on the Watermark setting dialog box. Click the "Clear All" button to return all settings to the default settings. 4 Click the "Change Preview" button to specify the desired print position on the output. Reference: Print Margin Settings 3 Set the clipping area and scanning preferences. Reference: Refer to Scan Preview for the detail of how to set the clipping area by the mouse, or to General Setting for the detail of how to set basic scanning preferences. To set more detailed preferences, follow steps 1 and 2 shown below. 1 To setup more detailed preferences, click the "Special Setting" button ( ). Reference: Special Setting 50
-
 1
1 -
2
-
3
-
4
-
5
-
6
-
7
-
8
-
9
-
10
-
11
-
12
-
13
-
14
-
15
-
16
-
17
-
18
-
19
-
20
-
21
-
22
-
23
-
24
-
25
-
26
-
27
-
28
-
29
-
30
-
31
-
32
-
33
-
34
-
35
-
36
-
37
-
38
-
39
-
40
-
41
-
42
-
43
-
44
-
45
-
46
-
 47
47 -
 48
48 -
 49
49 -
 50
50 -
 51
51 -
 52
52 -
 53
53 -
 54
54 -
 55
55 -
 56
56 -
 57
57 -
58
-
59
-
60
-
61
-
62
-
63
-
64
-
65
-
66
-
67
-
68
-
69
-
70
-
71
-
72
-
73
-
74
-
75
-
76
-
77
-
78
-
79
-
80
-
81
-
82
-
83
-
84
-
85
-
86
-
87
-
88
-
89
-
90
-
91
-
92
-
93
 |
 |
