Sharp AJ-6010 AJ6010 Operation Manual - Page 47
Preview Screen
 |
View all Sharp AJ-6010 manuals
Add to My Manuals
Save this manual to your list of manuals |
Page 47 highlights
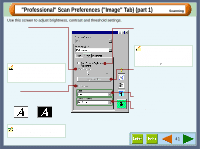
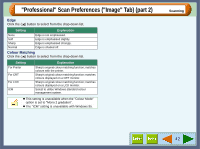
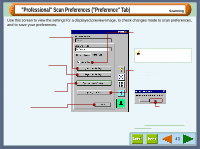
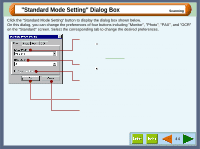
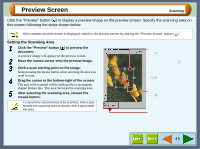
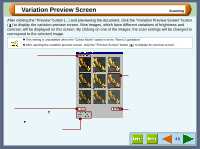
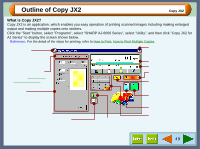
Preview Screen Scanning Click the "Preview" button ( ) to display a preview image on the preview screen. Specify the scanning area on this screen following the steps shown below. If the variation preview screen is displayed, switch to the preview screen by clicking the "Preview Screen" button ( ). Setting the Scanning Area 1 Click the "Preview" button ( ) to preview the document. A preview image will appear on the preview screen. 2 Move the mouse cursor onto the preview image. 3 Click a scan starting point on the image. Keep pressing the mouse button when selecting the area you want to scan. 4 Drag the cursor to the bottom-right of the screen. The area to be scanned will be indicated by a rectangular shaped broken line. This area becomes the scanning area. 5 After selecting the scanning area, release the mouse button. To cancel the selected area to be scanned, click a spot outside the scanning area or double-click a spot inside the area. Altering the scanning area The ( ) symbol will appear when the cursor is placed on the left or right border of the scanning area. On the other hand, the ( ) symbol will appear when the cursor is placed on the top or bottom border of the scanning area. By dragging any of the four corners of the image, a ( , ) symbol will appear. The size of the image will be maximized or minimized according to the direction in which the symbol is moved. Moving the scanning area The ( ) symbol will appear when the cursor is placed within the scanning area after the area being specified by dragging. Move the image to adjust the scanning area. Displays the colour mode, resolution, and size of the data. 45
-
 1
1 -
2
-
3
-
4
-
5
-
6
-
7
-
8
-
9
-
10
-
11
-
12
-
13
-
14
-
15
-
16
-
17
-
18
-
19
-
20
-
21
-
22
-
23
-
24
-
25
-
26
-
27
-
28
-
29
-
30
-
31
-
32
-
33
-
34
-
35
-
36
-
37
-
38
-
39
-
40
-
41
-
 42
42 -
 43
43 -
 44
44 -
 45
45 -
 46
46 -
 47
47 -
 48
48 -
 49
49 -
 50
50 -
 51
51 -
 52
52 -
53
-
54
-
55
-
56
-
57
-
58
-
59
-
60
-
61
-
62
-
63
-
64
-
65
-
66
-
67
-
68
-
69
-
70
-
71
-
72
-
73
-
74
-
75
-
76
-
77
-
78
-
79
-
80
-
81
-
82
-
83
-
84
-
85
-
86
-
87
-
88
-
89
-
90
-
91
-
92
-
93
 |
 |
