Canon CanoScan FS2700F User Manual - Page 115
exposure negative film, when negative films are scanned.
 |
View all Canon CanoScan FS2700F manuals
Add to My Manuals
Save this manual to your list of manuals |
Page 115 highlights
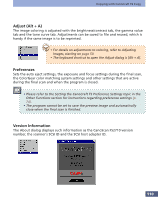
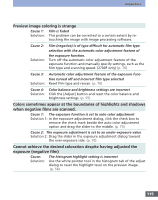
Appendices Preview image coloring is strange Cause 1: Film is faded Solution: This problem can be corrected to a certain extent by re- touching the image with image processing software. Cause 2: Solution: Film (negative) is of type difficult for automatic film type selection with the automatic color adjustment feature of the exposure function. Turn off the automatic color adjustment feature of the exposure function and manually specify settings, such as the film type and scanning speed. (2700F only) (p. 70) Cause 3: Automatic color adjustment feature of the exposure function turned off and incorrect film type selected Solution: Reset film type and rescan. (p. 70) Cause 4: Color balance and brightness settings are incorrect Solution: Click the [Adjust] button and reset the color balance and brightness settings. (p. 55) Colors sometimes appear at the boundaries of highlights and shadows when negative films are scanned. Cause 1: The exposure function is set to auto color adjustment Solution 1: In the exposure adjustment dialog, click the check box to remove the check mark beside the auto color adjustment option and drag the slider to the middle. (p. 70) Cause 2: The exposure adjustment is set to an under-exposure value Solution 2: Drag the slider in the exposure adjustment dialog toward the over-exposure side. (p. 70) Cannot achieve the desired coloration despite having adjusted the exposure (negative film) Cause: The histogram highlight setting is incorrect Solution: Use the white pointer tool in the histogram tab of the adjust dialog to reset the highlight level on the preview image. (p. 58) 115
-
 1
1 -
2
-
3
-
4
-
5
-
6
-
7
-
8
-
9
-
10
-
11
-
12
-
13
-
14
-
15
-
16
-
17
-
18
-
19
-
20
-
21
-
22
-
23
-
24
-
25
-
26
-
27
-
28
-
29
-
30
-
31
-
32
-
33
-
34
-
35
-
36
-
37
-
38
-
39
-
40
-
41
-
42
-
43
-
44
-
45
-
46
-
47
-
48
-
49
-
50
-
51
-
52
-
53
-
54
-
55
-
56
-
57
-
58
-
59
-
60
-
61
-
62
-
63
-
64
-
65
-
66
-
67
-
68
-
69
-
70
-
71
-
72
-
73
-
74
-
75
-
76
-
77
-
78
-
79
-
80
-
81
-
82
-
83
-
84
-
85
-
86
-
87
-
88
-
89
-
90
-
91
-
92
-
93
-
94
-
95
-
96
-
97
-
98
-
99
-
100
-
101
-
102
-
103
-
104
-
105
-
106
-
107
-
108
-
109
-
 110
110 -
 111
111 -
 112
112 -
 113
113 -
 114
114 -
 115
115 -
 116
116 -
 117
117 -
 118
118 -
 119
119 -
 120
120 -
121
-
122
-
123
-
124
-
125
-
126
-
127
-
128
-
129
-
130
-
131
-
132
-
133
-
134
-
135
 |
 |
