Canon CanoScan FS2700F User Manual - Page 116
Image Quality Problems, Scanning is taking a long time
 |
View all Canon CanoScan FS2700F manuals
Add to My Manuals
Save this manual to your list of manuals |
Page 116 highlights
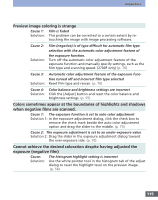
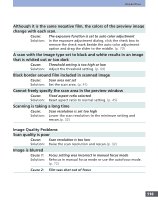
Appendices Although it is the same negative film, the colors of the preview image change with each scan. Cause: The exposure function is set to auto color adjustment Solution: In the exposure adjustment dialog, click the check box to remove the check mark beside the auto color adjustment option and drag the slider to the middle. (p. 70) A scan with the image type set to black and white results in an image that is whited out or too dark Cause: Threshold setting is too high or low Solution: Adjust the threshold setting. (p. 69) Black border around film included in scanned image Cause: Scan area not set Solution: Set the scan area. (p. 41) Cannot freely specify the scan area in the preview window Cause: Fixed aspect ratio selected Solution: Reset aspect ratio to normal setting. (p. 45) Scanning is taking a long time Cause: Scan resolution is set too high Solution: Lower the scan resolution to the minimum setting and rescan.(p. 32) Image Quality Problems Scan quality is poor Cause: Scan resolution is too low Solution: Raise the scan resolution and rescan.(p. 32) Image is blurred Cause 1: Solution: Focus setting was incorrect in manual focus mode Refocus in manual focus mode or use the autofocus mode. (p. 72) Cause 2: Film was shot out of focus 116
-
 1
1 -
2
-
3
-
4
-
5
-
6
-
7
-
8
-
9
-
10
-
11
-
12
-
13
-
14
-
15
-
16
-
17
-
18
-
19
-
20
-
21
-
22
-
23
-
24
-
25
-
26
-
27
-
28
-
29
-
30
-
31
-
32
-
33
-
34
-
35
-
36
-
37
-
38
-
39
-
40
-
41
-
42
-
43
-
44
-
45
-
46
-
47
-
48
-
49
-
50
-
51
-
52
-
53
-
54
-
55
-
56
-
57
-
58
-
59
-
60
-
61
-
62
-
63
-
64
-
65
-
66
-
67
-
68
-
69
-
70
-
71
-
72
-
73
-
74
-
75
-
76
-
77
-
78
-
79
-
80
-
81
-
82
-
83
-
84
-
85
-
86
-
87
-
88
-
89
-
90
-
91
-
92
-
93
-
94
-
95
-
96
-
97
-
98
-
99
-
100
-
101
-
102
-
103
-
104
-
105
-
106
-
107
-
108
-
109
-
110
-
 111
111 -
 112
112 -
 113
113 -
 114
114 -
 115
115 -
 116
116 -
 117
117 -
 118
118 -
 119
119 -
 120
120 -
 121
121 -
122
-
123
-
124
-
125
-
126
-
127
-
128
-
129
-
130
-
131
-
132
-
133
-
134
-
135
 |
 |
