Canon CanoScan FS2700F User Manual - Page 32
Selecting Resolution and Magnification Settings, About Resolution and Magnification
 |
View all Canon CanoScan FS2700F manuals
Add to My Manuals
Save this manual to your list of manuals |
Page 32 highlights
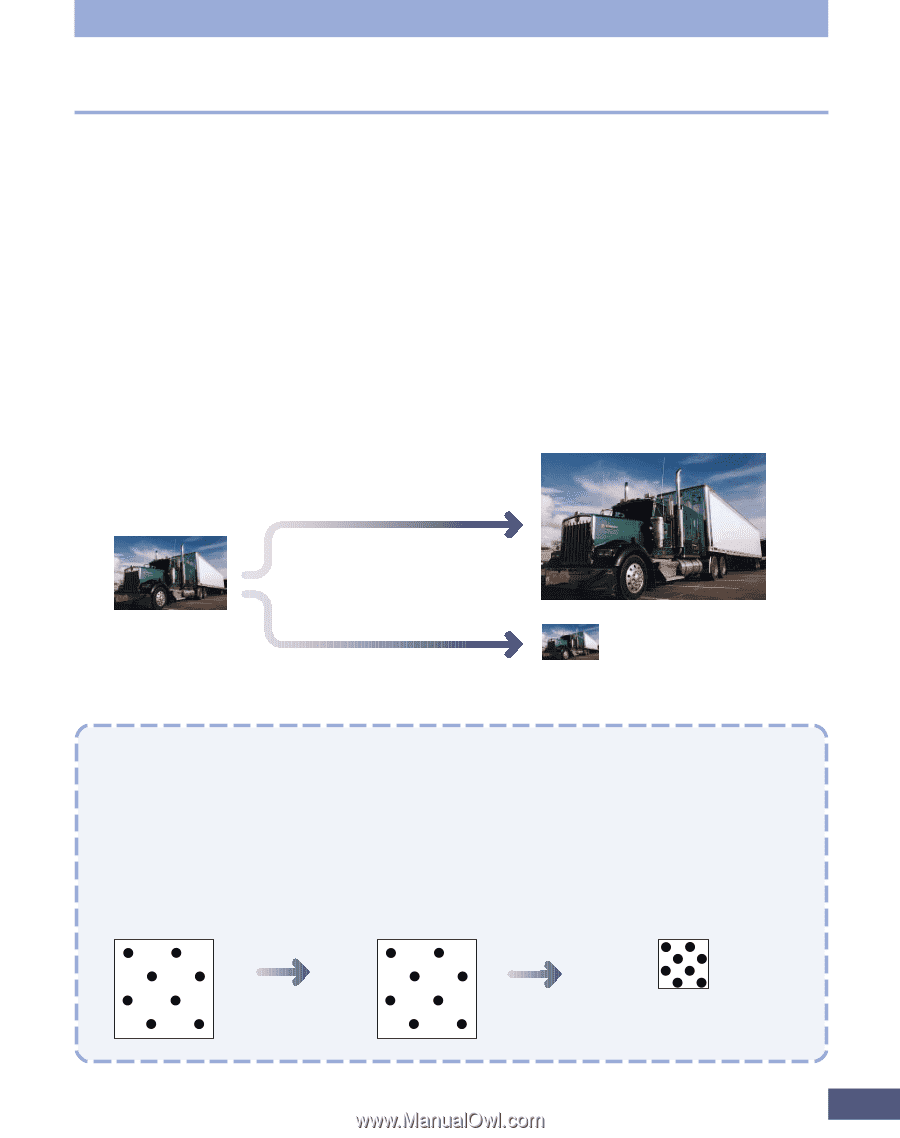
Step 2 • Scanning Selecting Resolution and Magnification Settings About Resolution and Magnification The scanner reads the images on a film as a collection of dots that are assigned values for brightness and tone. The density of these dots is referred to as the resolution, and the resolution at which a film is scanned is called the scan resolution. The scan resolution should not be confused with the output resolution, which determines the appearance of an image on a monitor or when output to a printer. The ratio of the scan resolution to the output resolution is called the output magnification. When both the scan and output resolution are the same, the scanned image size and the output are the same size. When the output resolution is lower than the scan resolution, the image is magnified, and when it is higher, the image is reduced. 12" Output Resolution = 180 dpi Output Magnification = 200% 6" 8" 4" Scan Resolution = 360 dpi Output Resolution = 720 dpi Output Magnification = 50% 3" 2" Why does the image size change with the magnification? Let us answer with an example having the output resolution set to printer (720 dpi). If you set the scan resolution to 360 dpi (a magnification factor of 50%), the image will shrink because only 360 dots are scanned per inch while 720 are required to match the specification for the output resolution. The image size changes because the density has been increased without a corresponding increase in the number of scanned dots. Image size = 10" x 10" Image size = 5" x 5" Scanned at 360 dpi Output resolution changed to 720 dpi Output magnification = 50% 32
-
 1
1 -
2
-
3
-
4
-
5
-
6
-
7
-
8
-
9
-
10
-
11
-
12
-
13
-
14
-
15
-
16
-
17
-
18
-
19
-
20
-
21
-
22
-
23
-
24
-
25
-
26
-
 27
27 -
 28
28 -
 29
29 -
 30
30 -
 31
31 -
 32
32 -
 33
33 -
 34
34 -
 35
35 -
 36
36 -
 37
37 -
38
-
39
-
40
-
41
-
42
-
43
-
44
-
45
-
46
-
47
-
48
-
49
-
50
-
51
-
52
-
53
-
54
-
55
-
56
-
57
-
58
-
59
-
60
-
61
-
62
-
63
-
64
-
65
-
66
-
67
-
68
-
69
-
70
-
71
-
72
-
73
-
74
-
75
-
76
-
77
-
78
-
79
-
80
-
81
-
82
-
83
-
84
-
85
-
86
-
87
-
88
-
89
-
90
-
91
-
92
-
93
-
94
-
95
-
96
-
97
-
98
-
99
-
100
-
101
-
102
-
103
-
104
-
105
-
106
-
107
-
108
-
109
-
110
-
111
-
112
-
113
-
114
-
115
-
116
-
117
-
118
-
119
-
120
-
121
-
122
-
123
-
124
-
125
-
126
-
127
-
128
-
129
-
130
-
131
-
132
-
133
-
134
-
135
 |
 |