Canon CanoScan FS2700F User Manual - Page 13
Specify the Scan Area, Scan and Save, Print, Click the [Save]
 |
View all Canon CanoScan FS2700F manuals
Add to My Manuals
Save this manual to your list of manuals |
Page 13 highlights
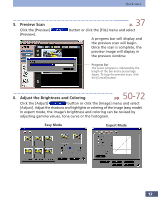
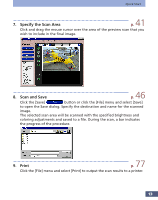
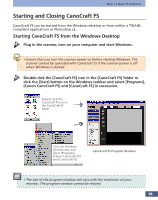
Quick Start 7. Specify the Scan Area p. 41 Click and drag the mouse cursor over the area of the preview scan that you wish to include in the final image. 8. Scan and Save p. 46 Click the [Save] button or click the [File] menu and select [Save] to open the Save dialog. Specify the destination and name for the scanned image. The selected scan area will be scanned with the specified brightness and coloring adjustments and saved to a file. During the scan, a bar indicates the progress of the procedure. 9. Print p. 77 Click the [File] menu and select [Print] to output the scan results to a printer. 13
-
 1
1 -
2
-
3
-
4
-
5
-
6
-
7
-
 8
8 -
 9
9 -
 10
10 -
 11
11 -
 12
12 -
 13
13 -
 14
14 -
 15
15 -
 16
16 -
 17
17 -
 18
18 -
19
-
20
-
21
-
22
-
23
-
24
-
25
-
26
-
27
-
28
-
29
-
30
-
31
-
32
-
33
-
34
-
35
-
36
-
37
-
38
-
39
-
40
-
41
-
42
-
43
-
44
-
45
-
46
-
47
-
48
-
49
-
50
-
51
-
52
-
53
-
54
-
55
-
56
-
57
-
58
-
59
-
60
-
61
-
62
-
63
-
64
-
65
-
66
-
67
-
68
-
69
-
70
-
71
-
72
-
73
-
74
-
75
-
76
-
77
-
78
-
79
-
80
-
81
-
82
-
83
-
84
-
85
-
86
-
87
-
88
-
89
-
90
-
91
-
92
-
93
-
94
-
95
-
96
-
97
-
98
-
99
-
100
-
101
-
102
-
103
-
104
-
105
-
106
-
107
-
108
-
109
-
110
-
111
-
112
-
113
-
114
-
115
-
116
-
117
-
118
-
119
-
120
-
121
-
122
-
123
-
124
-
125
-
126
-
127
-
128
-
129
-
130
-
131
-
132
-
133
-
134
-
135
 |
 |

13
7.
Specify the Scan Area
p.
41
Click and drag the mouse cursor over the area of the preview scan that you
wish to include in the final image.
8.
Scan and Save
p.
46
Click the [Save]
button or click the [File] menu and select [Save]
to open the Save dialog. Specify the destination and name for the scanned
image.
The selected scan area will be scanned with the specified brightness and
coloring adjustments and saved to a file. During the scan, a bar indicates
the progress of the procedure.
9.
Print
p.
77
Click the [File] menu and select [Print] to output the scan results to a printer.
Quick Start