Canon CanoScan FS2700F User Manual - Page 65
Adjusting a Tone Curve (Expert Mode
 |
View all Canon CanoScan FS2700F manuals
Add to My Manuals
Save this manual to your list of manuals |
Page 65 highlights
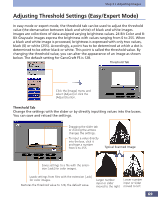
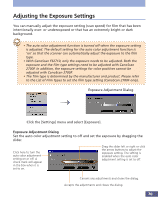
Step 3 • Adjusting Images Adjusting a Tone Curve (Expert Mode) In expert mode, you can balance the input and output data by editing the tone curve, a graphical depiction of the relationship of highlights and shadows in 24-Bit Color, 36-Bit Color, 8-Bit Grayscale and 12-Bit Grayscale images. You can edit the master tone curve or the individual tone curves for each RGB channel. This method of brightness adjustment is particularly suited to making fine changes to specific areas of an image. Tone Curve Tab Click the [Image] menu and select [Adjust] or click the [Adjust] button. Click the Tone Curve Tab and adjust the tone Curve. Tone Curve Tab Adjust the tone curve by dragging the mouse cursor on the graph to change the shape of the curve. You can save and reload the settings. Select the channel to be edited. Each channel can be set independently. Click on the tone curve to display the control points, then drag one to change the curve shape. You can set a multiple number of control points. Loads settings from files with the extension [.adc] for color images or [.adg] for grayscale images. Displays the current input and output levels between 0 (dark) and 255 (light) corresponding to the position of the mouse cursor. The larger the output level in relation to the input level, the brighter the reproduction of the image. Saves settings to a file with the extension [.adc] for color images or [.adg] for grayscale images. Cancels the settings and closes the dialog. Accepts the settings and closes the dialog. Resets all the settings to the initial values. Restores the tone curve to its initial settings. 65
-
 1
1 -
2
-
3
-
4
-
5
-
6
-
7
-
8
-
9
-
10
-
11
-
12
-
13
-
14
-
15
-
16
-
17
-
18
-
19
-
20
-
21
-
22
-
23
-
24
-
25
-
26
-
27
-
28
-
29
-
30
-
31
-
32
-
33
-
34
-
35
-
36
-
37
-
38
-
39
-
40
-
41
-
42
-
43
-
44
-
45
-
46
-
47
-
48
-
49
-
50
-
51
-
52
-
53
-
54
-
55
-
56
-
57
-
58
-
59
-
 60
60 -
 61
61 -
 62
62 -
 63
63 -
 64
64 -
 65
65 -
 66
66 -
 67
67 -
 68
68 -
 69
69 -
 70
70 -
71
-
72
-
73
-
74
-
75
-
76
-
77
-
78
-
79
-
80
-
81
-
82
-
83
-
84
-
85
-
86
-
87
-
88
-
89
-
90
-
91
-
92
-
93
-
94
-
95
-
96
-
97
-
98
-
99
-
100
-
101
-
102
-
103
-
104
-
105
-
106
-
107
-
108
-
109
-
110
-
111
-
112
-
113
-
114
-
115
-
116
-
117
-
118
-
119
-
120
-
121
-
122
-
123
-
124
-
125
-
126
-
127
-
128
-
129
-
130
-
131
-
132
-
133
-
134
-
135
 |
 |
