Canon S820D S820D Quick Start Guide - Page 16
To load Glossy Photo Paper, To load Photo Paper Pro 4 x 6 or Glossy Photo Cards
 |
View all Canon S820D manuals
Add to My Manuals
Save this manual to your list of manuals |
Page 16 highlights
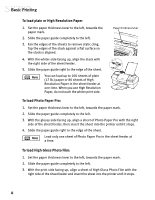
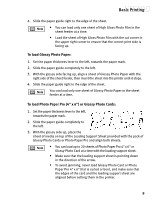
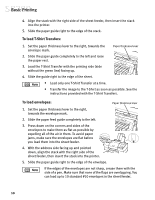
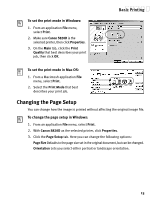
Basic Printing 4. Slide the paper guide right to the edge of the sheet. • You can load only one sheet of High Gloss Photo Film in the sheet feeder at a time. • Load the sheet of High Gloss Photo Film with the cut corner in the upper right corner to ensure that the correct print side is facing up. To load Glossy Photo Paper: 1. Set the paper thickness lever to the left, towards the paper mark. 2. Slide the paper guide completely to the left. 3. With the glossy side facing up, align a sheet of Glossy Photo Paper with the right side of the sheet feeder, then insert the sheet into the printer until it stops. 4. Slide the paper guide right to the edge of the sheet. You can load only one sheet of Glossy Photo Paper in the sheet feeder at a time. To load Photo Paper Pro (4" x 6") or Glossy Photo Cards: 1. Set the paper thickness lever to the left, towards the paper mark. 2. Slide the paper guide completely to the left. 3. With the glossy side up, place the sheet of media on top of the Loading Support Sheet provided with the pack of Glossy Photo Cards or Photo Paper Pro and align both sheets. • You can load up to 20 sheets of Photo Paper Pro 4" x 6" or Glossy Photo Card at a time with the loading support sheet. • Make sure that the loading support sheet is pointing down in the direction of the arrow. • To avoid jamming, never load Glossy Photo Card or Photo Paper Pro 4" x 6" that is curled or bent, and make sure that the edges of the card and the loading support sheet are aligned before setting them in the printer. 9
-
 1
1 -
2
-
3
-
4
-
5
-
6
-
7
-
8
-
9
-
10
-
 11
11 -
 12
12 -
 13
13 -
 14
14 -
 15
15 -
 16
16 -
 17
17 -
 18
18 -
 19
19 -
 20
20 -
 21
21 -
22
-
23
-
24
-
25
-
26
-
27
-
28
-
29
-
30
-
31
-
32
-
33
-
34
-
35
-
36
-
37
-
38
-
39
-
40
-
41
-
42
-
43
-
44
-
45
-
46
-
47
-
48
-
49
-
50
-
51
-
52
-
53
-
54
-
55
-
56
-
57
-
58
-
59
-
60
-
61
-
62
-
63
-
64
-
65
-
66
-
67
-
68
-
69
-
70
-
71
-
72
-
73
-
74
-
75
-
76
-
77
-
78
-
79
-
80
-
81
-
82
-
83
-
84
-
85
-
86
-
87
-
88
-
89
-
90
-
91
-
92
-
93
-
94
-
95
-
96
-
97
-
98
-
99
-
100
-
101
-
102
-
103
 |
 |
