Casio EX-Z12 Owners Manual - Page 103
Turning on Anti Shake Using the Panel, Operation Panel, In the REC mode, press [SET].
 |
View all Casio EX-Z12 manuals
Add to My Manuals
Save this manual to your list of manuals |
Page 103 highlights
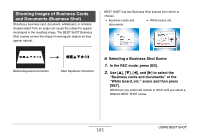
■ Turning on Anti Shake Using the Panel (Operation Panel) 1. In the REC mode, press [SET]. 2. Use [S] and [T] to select the fourth option from the top in the operation panel (Anti Shake). 3. Use [W] and [X] to select "Auto" and then press [SET]. • This turns on Anti Shake and displays " " on the monitor screen. • In this case, Anti Shake will remain on until you turn it off on the Panel. IMPORTANT! • Anti Shake will not work unless the ISO setting (page 129) is set to "Auto". • Though " " (Anti Shake) is displayed on the monitor screen following an automatic flash operation using the "Auto Flash" or "Red Eye Reduction" setting, or while the flash setting is "Flash On" or "Soft Flash", Anti Shake is disabled. • Shooting with Anti Shake can cause an image to appear somewhat coarser than normal and can cause slight deterioration of image resolution. • Anti Shake may not be able to eliminate the effects of hand or subject movement when movement is severe. • You can also use Anti Shake to reduce the effects of hand movement only while recording a movie. The effects of subject movement are not limited (page 92). • Anti Shake may not work with a very low shutter speed. If this happens, use a tripod to stabilize the camera. • The camera sometimes performs an automatic noise reduction operation to reduce digital noise in images recorded under certain lighting conditions. This operation causes the camera to take longer than normal to store the image and be ready for the next shot. B 103 USING BEST SHOT
-
 1
1 -
2
-
3
-
4
-
5
-
6
-
7
-
8
-
9
-
10
-
11
-
12
-
13
-
14
-
15
-
16
-
17
-
18
-
19
-
20
-
21
-
22
-
23
-
24
-
25
-
26
-
27
-
28
-
29
-
30
-
31
-
32
-
33
-
34
-
35
-
36
-
37
-
38
-
39
-
40
-
41
-
42
-
43
-
44
-
45
-
46
-
47
-
48
-
49
-
50
-
51
-
52
-
53
-
54
-
55
-
56
-
57
-
58
-
59
-
60
-
61
-
62
-
63
-
64
-
65
-
66
-
67
-
68
-
69
-
70
-
71
-
72
-
73
-
74
-
75
-
76
-
77
-
78
-
79
-
80
-
81
-
82
-
83
-
84
-
85
-
86
-
87
-
88
-
89
-
90
-
91
-
92
-
93
-
94
-
95
-
96
-
97
-
 98
98 -
 99
99 -
 100
100 -
 101
101 -
 102
102 -
 103
103 -
 104
104 -
 105
105 -
 106
106 -
 107
107 -
 108
108 -
109
-
110
-
111
-
112
-
113
-
114
-
115
-
116
-
117
-
118
-
119
-
120
-
121
-
122
-
123
-
124
-
125
-
126
-
127
-
128
-
129
-
130
-
131
-
132
-
133
-
134
-
135
-
136
-
137
-
138
-
139
-
140
-
141
-
142
-
143
-
144
-
145
-
146
-
147
-
148
-
149
-
150
-
151
-
152
-
153
-
154
-
155
-
156
-
157
-
158
-
159
-
160
-
161
-
162
-
163
-
164
-
165
-
166
-
167
-
168
-
169
-
170
-
171
-
172
-
173
-
174
-
175
-
176
-
177
-
178
-
179
-
180
-
181
-
182
-
183
-
184
-
185
-
186
-
187
-
188
-
189
-
190
-
191
-
192
-
193
-
194
-
195
-
196
-
197
-
198
-
199
-
200
-
201
-
202
-
203
-
204
-
205
-
206
-
207
-
208
-
209
-
210
-
211
-
212
-
213
-
214
-
215
-
216
-
217
-
218
-
219
-
220
-
221
-
222
-
223
-
224
-
225
-
226
-
227
-
228
-
229
-
230
-
231
-
232
-
233
-
234
-
235
-
236
-
237
-
238
-
239
-
240
-
241
-
242
-
243
-
244
-
245
-
246
-
247
-
248
-
249
-
250
-
251
-
252
-
253
-
254
-
255
-
256
-
257
-
258
-
259
-
260
-
261
-
262
-
263
-
264
-
265
 |
 |