Casio EX-Z12 Owners Manual - Page 107
Shooting ID Photographs, Selecting the ID Photo Scene
 |
View all Casio EX-Z12 manuals
Add to My Manuals
Save this manual to your list of manuals |
Page 107 highlights
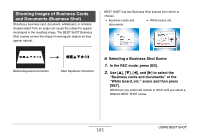
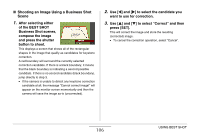
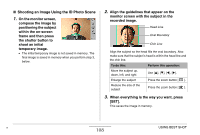
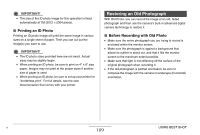
IMPORTANT! • Make sure the entire object you are trying to shoot (correct) is enclosed within the monitor screen. The camera will not be able to detect the shape of the object correctly unless it is enclosed entirely within the monitor screen. • Correction will not be possible if the subject is the same color as its background. Make sure the object is against a background that allows its outline to stand out. • Digital zoom is disabled while shooting with a Business Shot scene. However, you can use optical zoom. • The maximum Business Shot image size is 2M (1600 × 1200 pixels), even if the camera is configured for a larger image size. When the camera is configured to record images smaller than 2M (1600 × 1200 pixels), Business Shot scenes will produce images in accordance with the currently specified image size. Shooting ID Photographs You can use this procedure to shoot a portrait and then print it out in a variety of different standard ID photo sizes. The following are the ID photo sizes that are included on the printout. 30 × 24mm, 40 × 30mm, 45 × 35mm, 50 × 40mm, 55 × 45mm ■ Selecting the ID Photo Scene 1. In the REC mode, press [BS]. 2. Use [S], [T], [W], and [X] to select the "ID Photo" scene and then press [SET]. ID Photo will remain selected until you select a different BEST SHOT scene. 107 USING BEST SHOT
-
 1
1 -
2
-
3
-
4
-
5
-
6
-
7
-
8
-
9
-
10
-
11
-
12
-
13
-
14
-
15
-
16
-
17
-
18
-
19
-
20
-
21
-
22
-
23
-
24
-
25
-
26
-
27
-
28
-
29
-
30
-
31
-
32
-
33
-
34
-
35
-
36
-
37
-
38
-
39
-
40
-
41
-
42
-
43
-
44
-
45
-
46
-
47
-
48
-
49
-
50
-
51
-
52
-
53
-
54
-
55
-
56
-
57
-
58
-
59
-
60
-
61
-
62
-
63
-
64
-
65
-
66
-
67
-
68
-
69
-
70
-
71
-
72
-
73
-
74
-
75
-
76
-
77
-
78
-
79
-
80
-
81
-
82
-
83
-
84
-
85
-
86
-
87
-
88
-
89
-
90
-
91
-
92
-
93
-
94
-
95
-
96
-
97
-
98
-
99
-
100
-
101
-
 102
102 -
 103
103 -
 104
104 -
 105
105 -
 106
106 -
 107
107 -
 108
108 -
 109
109 -
 110
110 -
 111
111 -
 112
112 -
113
-
114
-
115
-
116
-
117
-
118
-
119
-
120
-
121
-
122
-
123
-
124
-
125
-
126
-
127
-
128
-
129
-
130
-
131
-
132
-
133
-
134
-
135
-
136
-
137
-
138
-
139
-
140
-
141
-
142
-
143
-
144
-
145
-
146
-
147
-
148
-
149
-
150
-
151
-
152
-
153
-
154
-
155
-
156
-
157
-
158
-
159
-
160
-
161
-
162
-
163
-
164
-
165
-
166
-
167
-
168
-
169
-
170
-
171
-
172
-
173
-
174
-
175
-
176
-
177
-
178
-
179
-
180
-
181
-
182
-
183
-
184
-
185
-
186
-
187
-
188
-
189
-
190
-
191
-
192
-
193
-
194
-
195
-
196
-
197
-
198
-
199
-
200
-
201
-
202
-
203
-
204
-
205
-
206
-
207
-
208
-
209
-
210
-
211
-
212
-
213
-
214
-
215
-
216
-
217
-
218
-
219
-
220
-
221
-
222
-
223
-
224
-
225
-
226
-
227
-
228
-
229
-
230
-
231
-
232
-
233
-
234
-
235
-
236
-
237
-
238
-
239
-
240
-
241
-
242
-
243
-
244
-
245
-
246
-
247
-
248
-
249
-
250
-
251
-
252
-
253
-
254
-
255
-
256
-
257
-
258
-
259
-
260
-
261
-
262
-
263
-
264
-
265
 |
 |
