Casio EX-Z12 Owners Manual - Page 162
Using Color Restoration to Correct the Color of an Old Photograph, On the PLAY tab
 |
View all Casio EX-Z12 manuals
Add to My Manuals
Save this manual to your list of manuals |
Page 162 highlights
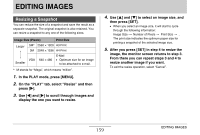
4. Use [W] and [X] to select the candidate you want to correct. 5. Use [S] and [T] to select "Correct" and then press [SET]. • Select "Cancel" to exit the procedure without performing keystone correction. IMPORTANT! • If the original image is smaller than 2M (1600 × 1200 pixels) size, the new (corrected) version will be the same size as the original one. • When you display a corrected image on the camera's monitor screen, the date and time indicate when the image was originally recorded, not when the image was corrected. Using Color Restoration to Correct the Color of an Old Photograph Color restoration let you correct the old color of a photograph shot with a digital camera. This function is useful for correcting existing old photographs, posters, etc. • Performing color restoration on an image causes a new (restored) 2M (1600 × 1200 pixels) size image to be stored as a separate file. 1. In the PLAY mode, use [W] and [X] to scroll through images and display the snapshot you want to correct. 2. Press [MENU]. 3. On the "PLAY" tab, select "Color Correction" and then press [X]. 4. Use [W] and [X] to select the photograph candidate you want. 5. Use [S] and [T] to select "Trim", and then press [SET]. This displays a cropping boundary on the monitor screen. • To exit color restoration without storing anything, select "Cancel". 162 EDITING IMAGES
-
 1
1 -
2
-
3
-
4
-
5
-
6
-
7
-
8
-
9
-
10
-
11
-
12
-
13
-
14
-
15
-
16
-
17
-
18
-
19
-
20
-
21
-
22
-
23
-
24
-
25
-
26
-
27
-
28
-
29
-
30
-
31
-
32
-
33
-
34
-
35
-
36
-
37
-
38
-
39
-
40
-
41
-
42
-
43
-
44
-
45
-
46
-
47
-
48
-
49
-
50
-
51
-
52
-
53
-
54
-
55
-
56
-
57
-
58
-
59
-
60
-
61
-
62
-
63
-
64
-
65
-
66
-
67
-
68
-
69
-
70
-
71
-
72
-
73
-
74
-
75
-
76
-
77
-
78
-
79
-
80
-
81
-
82
-
83
-
84
-
85
-
86
-
87
-
88
-
89
-
90
-
91
-
92
-
93
-
94
-
95
-
96
-
97
-
98
-
99
-
100
-
101
-
102
-
103
-
104
-
105
-
106
-
107
-
108
-
109
-
110
-
111
-
112
-
113
-
114
-
115
-
116
-
117
-
118
-
119
-
120
-
121
-
122
-
123
-
124
-
125
-
126
-
127
-
128
-
129
-
130
-
131
-
132
-
133
-
134
-
135
-
136
-
137
-
138
-
139
-
140
-
141
-
142
-
143
-
144
-
145
-
146
-
147
-
148
-
149
-
150
-
151
-
152
-
153
-
154
-
155
-
156
-
 157
157 -
 158
158 -
 159
159 -
 160
160 -
 161
161 -
 162
162 -
 163
163 -
 164
164 -
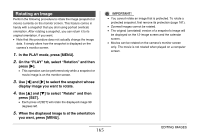 165
165 -
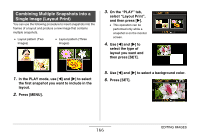 166
166 -
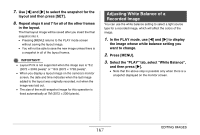 167
167 -
168
-
169
-
170
-
171
-
172
-
173
-
174
-
175
-
176
-
177
-
178
-
179
-
180
-
181
-
182
-
183
-
184
-
185
-
186
-
187
-
188
-
189
-
190
-
191
-
192
-
193
-
194
-
195
-
196
-
197
-
198
-
199
-
200
-
201
-
202
-
203
-
204
-
205
-
206
-
207
-
208
-
209
-
210
-
211
-
212
-
213
-
214
-
215
-
216
-
217
-
218
-
219
-
220
-
221
-
222
-
223
-
224
-
225
-
226
-
227
-
228
-
229
-
230
-
231
-
232
-
233
-
234
-
235
-
236
-
237
-
238
-
239
-
240
-
241
-
242
-
243
-
244
-
245
-
246
-
247
-
248
-
249
-
250
-
251
-
252
-
253
-
254
-
255
-
256
-
257
-
258
-
259
-
260
-
261
-
262
-
263
-
264
-
265
 |
 |