Casio EX-Z12 Owners Manual - Page 138
Other Useful Recording Functions, Using Key Customize to Assign Functions [<] and [>]
 |
View all Casio EX-Z12 manuals
Add to My Manuals
Save this manual to your list of manuals |
Page 138 highlights
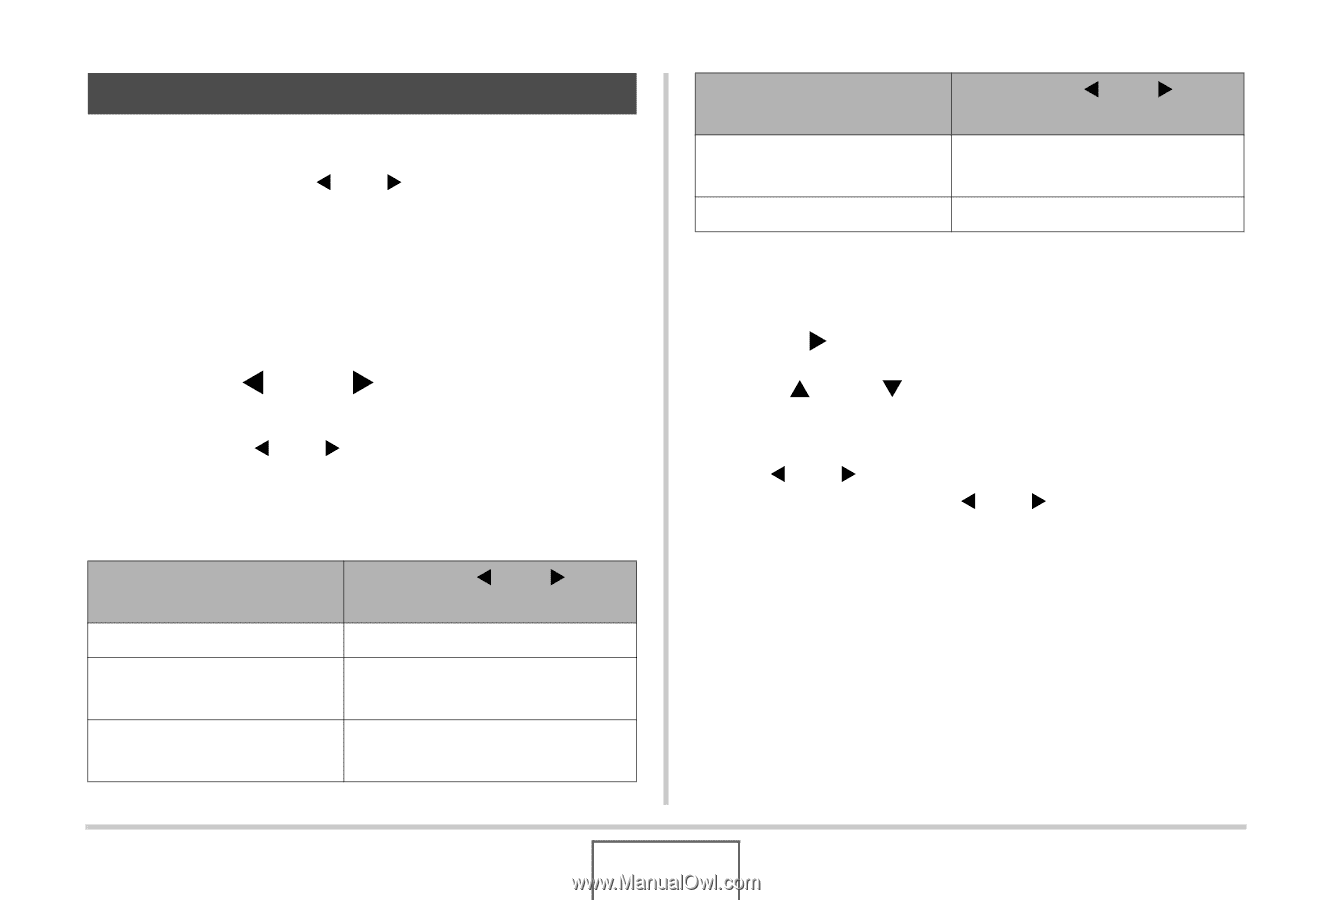
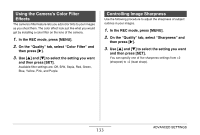
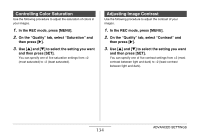
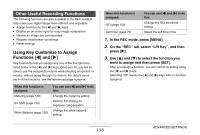
Other Useful Recording Functions The following functions are also available in the REC mode to help make your digital image more efficient and enjoyable. • Assign functions to the [W] and [X] keys • Display an on-screen grid for easy image composition • Review an image you just recorded • Register initial power up settings • Reset settings Using Key Customize to Assign Functions [W] and [X] Key Customize lets you assign any one of the five functions listed below to the [W] and [X] keys. Once you do, you will be able to use the assigned functions while shooting snapshots or movies, without going through the menus. For details about each of the functions, see the referenced page numbers. When this function is assigned: Metering (page 130) EV Shift (page 125) White Balance (page 126) You can use [W] and [X] to do this: Change the metering setting Perform EV shifting for exposure compensation Change the white balance setting When this function is assigned: ISO (page 129) Self-timer (page 76) You can use [W] and [X] to do this: Change the ISO sensitivity setting Select the self-timer time 1. In the REC mode, press [MENU]. 2. On the "REC" tab, select "L/R Key", and then press [X]. 3. Use [S] and [T] to select the function you want to assign and then press [SET]. After you assign a function, you can control its setting using the [W] and [X] keys. Selecting "Off" leaves the [W] and [X] keys with no function assigned. 138 ADVANCED SETTINGS
-
 1
1 -
2
-
3
-
4
-
5
-
6
-
7
-
8
-
9
-
10
-
11
-
12
-
13
-
14
-
15
-
16
-
17
-
18
-
19
-
20
-
21
-
22
-
23
-
24
-
25
-
26
-
27
-
28
-
29
-
30
-
31
-
32
-
33
-
34
-
35
-
36
-
37
-
38
-
39
-
40
-
41
-
42
-
43
-
44
-
45
-
46
-
47
-
48
-
49
-
50
-
51
-
52
-
53
-
54
-
55
-
56
-
57
-
58
-
59
-
60
-
61
-
62
-
63
-
64
-
65
-
66
-
67
-
68
-
69
-
70
-
71
-
72
-
73
-
74
-
75
-
76
-
77
-
78
-
79
-
80
-
81
-
82
-
83
-
84
-
85
-
86
-
87
-
88
-
89
-
90
-
91
-
92
-
93
-
94
-
95
-
96
-
97
-
98
-
99
-
100
-
101
-
102
-
103
-
104
-
105
-
106
-
107
-
108
-
109
-
110
-
111
-
112
-
113
-
114
-
115
-
116
-
117
-
118
-
119
-
120
-
121
-
122
-
123
-
124
-
125
-
126
-
127
-
128
-
129
-
130
-
131
-
132
-
 133
133 -
 134
134 -
 135
135 -
 136
136 -
 137
137 -
 138
138 -
 139
139 -
 140
140 -
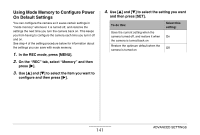 141
141 -
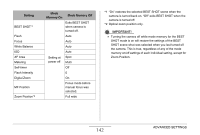 142
142 -
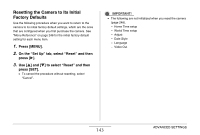 143
143 -
144
-
145
-
146
-
147
-
148
-
149
-
150
-
151
-
152
-
153
-
154
-
155
-
156
-
157
-
158
-
159
-
160
-
161
-
162
-
163
-
164
-
165
-
166
-
167
-
168
-
169
-
170
-
171
-
172
-
173
-
174
-
175
-
176
-
177
-
178
-
179
-
180
-
181
-
182
-
183
-
184
-
185
-
186
-
187
-
188
-
189
-
190
-
191
-
192
-
193
-
194
-
195
-
196
-
197
-
198
-
199
-
200
-
201
-
202
-
203
-
204
-
205
-
206
-
207
-
208
-
209
-
210
-
211
-
212
-
213
-
214
-
215
-
216
-
217
-
218
-
219
-
220
-
221
-
222
-
223
-
224
-
225
-
226
-
227
-
228
-
229
-
230
-
231
-
232
-
233
-
234
-
235
-
236
-
237
-
238
-
239
-
240
-
241
-
242
-
243
-
244
-
245
-
246
-
247
-
248
-
249
-
250
-
251
-
252
-
253
-
254
-
255
-
256
-
257
-
258
-
259
-
260
-
261
-
262
-
263
-
264
-
265
 |
 |