D-Link DGS-1250 User Manual - Page 142
Other Config Flag, RA Max Interval
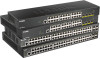 |
View all D-Link DGS-1250 manuals
Add to My Manuals
Save this manual to your list of manuals |
Page 142 highlights
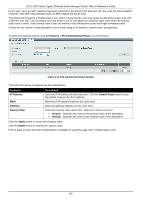
DGS-1250 Series Gigabit Ethernet Smart Managed Switch Web UI Reference Guide Parameter Description use 1 second on the interface and advertise 0 (unspecified) in the Router Advertisement (RA) message. Click the Apply button to accept the changes made. The fields that can be configured for ND Settings are described below: Parameter Hop Limit Reachable Time Managed Config Flag Other Config Flag RA Min Interval RA Max Interval RA Lifetime RA Suppress Description Enter the hop limit value here. The range is from 0 to 255. The IPv6 packet originated by the system will also use this value as the initial hop limit. Enter the Reachable Time here. The range is from 0 to 3600000 milliseconds. If the specified time is 0, the router will use 1200 seconds on the interface and advertise 0 (unspecified) in the RA message. The Reachable Time is used by the IPv6 node in determining the reachability of the neighbor nodes. Turn the Managed Config Flag option On or Off here. When the neighbor host receives the RA which has flag turned on, the host should use a stateful configuration protocol to obtain IPv6 addresses. Turn the Other Config Flag option On or Off here. By setting the other configuration flag on, the router instructs the connected hosts to use a stateful configuration protocol to obtain auto-configuration information other than the IPv6 address. Enter the minimum RA interval time value here. The range is from 3 to 1350 seconds. This value must be smaller than 0.75 times the maximum value. Enter the maximum RA interval time value here. The range is from 4 to 1800 seconds. Enter the RA lifetime value here. The range is from 0 to 9000 seconds. The lifetime value in RA instructs the received host the lifetime value for taking the router as the default router. Select to enable or disable the RA suppress feature here. Click the Apply button to accept the changes made. After selecting the Interface IPv6 Address tab option, at the top of the page, the following page will be available. Figure 6-11 IPv6 Interface (Detail, Interface IPv6 Address) Window Click the Delete button to delete the specified entry. After selecting the Neighbor Discover tab option, at the top of the page, the following page will be available. Figure 6-12 IPv6 Interface (Detail, Neighbor Discover) Window 133
-
 1
1 -
2
-
3
-
4
-
5
-
6
-
7
-
8
-
9
-
10
-
11
-
12
-
13
-
14
-
15
-
16
-
17
-
18
-
19
-
20
-
21
-
22
-
23
-
24
-
25
-
26
-
27
-
28
-
29
-
30
-
31
-
32
-
33
-
34
-
35
-
36
-
37
-
38
-
39
-
40
-
41
-
42
-
43
-
44
-
45
-
46
-
47
-
48
-
49
-
50
-
51
-
52
-
53
-
54
-
55
-
56
-
57
-
58
-
59
-
60
-
61
-
62
-
63
-
64
-
65
-
66
-
67
-
68
-
69
-
70
-
71
-
72
-
73
-
74
-
75
-
76
-
77
-
78
-
79
-
80
-
81
-
82
-
83
-
84
-
85
-
86
-
87
-
88
-
89
-
90
-
91
-
92
-
93
-
94
-
95
-
96
-
97
-
98
-
99
-
100
-
101
-
102
-
103
-
104
-
105
-
106
-
107
-
108
-
109
-
110
-
111
-
112
-
113
-
114
-
115
-
116
-
117
-
118
-
119
-
120
-
121
-
122
-
123
-
124
-
125
-
126
-
127
-
128
-
129
-
130
-
131
-
132
-
133
-
134
-
135
-
136
-
 137
137 -
 138
138 -
 139
139 -
 140
140 -
 141
141 -
 142
142 -
 143
143 -
 144
144 -
 145
145 -
 146
146 -
 147
147 -
148
-
149
-
150
-
151
-
152
-
153
-
154
-
155
-
156
-
157
-
158
-
159
-
160
-
161
-
162
-
163
-
164
-
165
-
166
-
167
-
168
-
169
-
170
-
171
-
172
-
173
-
174
-
175
-
176
-
177
-
178
-
179
-
180
-
181
-
182
-
183
-
184
-
185
-
186
-
187
-
188
-
189
-
190
-
191
-
192
-
193
-
194
-
195
-
196
-
197
-
198
-
199
-
200
-
201
-
202
-
203
-
204
-
205
-
206
-
207
-
208
-
209
-
210
-
211
-
212
-
213
-
214
-
215
-
216
-
217
-
218
-
219
-
220
-
221
-
222
-
223
-
224
-
225
-
226
-
227
-
228
-
229
-
230
-
231
-
232
-
233
-
234
-
235
-
236
-
237
-
238
-
239
-
240
-
241
-
242
-
243
-
244
-
245
-
246
-
247
-
248
-
249
-
250
-
251
-
252
-
253
-
254
-
255
-
256
-
257
-
258
-
259
-
260
-
261
-
262
-
263
-
264
-
265
-
266
-
267
-
268
-
269
-
270
-
271
-
272
-
273
-
274
-
275
-
276
-
277
-
278
-
279
-
280
-
281
-
282
-
283
-
284
-
285
-
286
-
287
-
288
-
289
-
290
-
291
-
292
-
293
-
294
-
295
-
296
-
297
-
298
-
299
-
300
-
301
-
302
-
303
-
304
-
305
-
306
-
307
-
308
-
309
-
310
-
311
-
312
-
313
-
314
-
315
-
316
-
317
-
318
-
319
-
320
 |
 |
