Dell PowerEdge T410 Hardware Owner's Manual - Page 113
Removing Memory Modules
 |
View all Dell PowerEdge T410 manuals
Add to My Manuals
Save this manual to your list of manuals |
Page 113 highlights
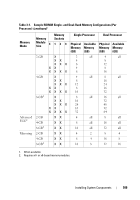
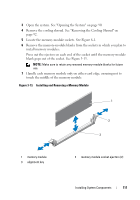
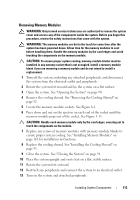
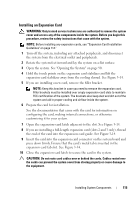
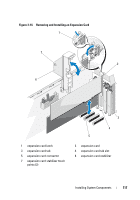
Removing Memory Modules WARNING: Only trained service technicians are authorized to remove the system cover and access any of the components inside the system. Before you begin this procedure, review the safety instructions that came with the system. WARNING: The memory modules are hot to the touch for some time after the system has been powered down. Allow time for the memory modules to cool before handling them. Handle the memory modules by the card edges and avoid touching the components on the memory module. CAUTION: To ensure proper system cooling, memory-module blanks must be installed in any memory socket that is not occupied. Install a memory-module blank if you are removing a memory module and do not intend to install a replacement. 1 Turn off the system, including any attached peripherals, and disconnect the system from the electrical outlet and peripherals. 2 Rotate the system feet inward and lay the system on a flat surface. 3 Open the system. See "Opening the System" on page 90. 4 Remove the cooling shroud. See "Removing the Cooling Shroud" on page 92. 5 Locate the memory module sockets. See Figure 6-1. 6 Press down and out on the ejectors on each end of the socket until the memory module pops out of the socket. See Figure 3-13. CAUTION: Handle each memory module only by the card edges, ensuring not to touch the components on the module. 7 Replace any removed memory modules with memory-module blanks to ensure proper system cooling. See "Installing Memory Modules" on page 110 for installation instructions. 8 Replace the cooling shroud. See "Installing the Cooling Shroud" on page 93. 9 Close the system. See "Closing the System" on page 91. 10 Place the system upright and on its feet on a flat, stable surface. 11 Rotate the system feet outward. 12 Reattach any peripherals and connect the system to an electrical outlet. 13 Turn on the system and attached peripherals. Installing System Components 113
-
 1
1 -
2
-
3
-
4
-
5
-
6
-
7
-
8
-
9
-
10
-
11
-
12
-
13
-
14
-
15
-
16
-
17
-
18
-
19
-
20
-
21
-
22
-
23
-
24
-
25
-
26
-
27
-
28
-
29
-
30
-
31
-
32
-
33
-
34
-
35
-
36
-
37
-
38
-
39
-
40
-
41
-
42
-
43
-
44
-
45
-
46
-
47
-
48
-
49
-
50
-
51
-
52
-
53
-
54
-
55
-
56
-
57
-
58
-
59
-
60
-
61
-
62
-
63
-
64
-
65
-
66
-
67
-
68
-
69
-
70
-
71
-
72
-
73
-
74
-
75
-
76
-
77
-
78
-
79
-
80
-
81
-
82
-
83
-
84
-
85
-
86
-
87
-
88
-
89
-
90
-
91
-
92
-
93
-
94
-
95
-
96
-
97
-
98
-
99
-
100
-
101
-
102
-
103
-
104
-
105
-
106
-
107
-
 108
108 -
 109
109 -
 110
110 -
 111
111 -
 112
112 -
 113
113 -
 114
114 -
 115
115 -
 116
116 -
 117
117 -
 118
118 -
119
-
120
-
121
-
122
-
123
-
124
-
125
-
126
-
127
-
128
-
129
-
130
-
131
-
132
-
133
-
134
-
135
-
136
-
137
-
138
-
139
-
140
-
141
-
142
-
143
-
144
-
145
-
146
-
147
-
148
-
149
-
150
-
151
-
152
-
153
-
154
-
155
-
156
-
157
-
158
-
159
-
160
-
161
-
162
-
163
-
164
-
165
-
166
-
167
-
168
-
169
-
170
-
171
-
172
-
173
-
174
-
175
-
176
-
177
-
178
-
179
-
180
-
181
-
182
-
183
-
184
-
185
-
186
-
187
-
188
-
189
-
190
-
191
-
192
-
193
-
194
-
195
-
196
-
197
-
198
-
199
-
200
-
201
-
202
-
203
-
204
 |
 |