Dell PowerEdge T410 Hardware Owner's Manual - Page 140
properly. See Using the System Setup Program and UEFI Boot Manager, Exit the System Setup program.
 |
View all Dell PowerEdge T410 manuals
Add to My Manuals
Save this manual to your list of manuals |
Page 140 highlights
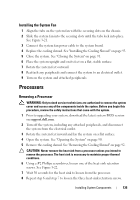
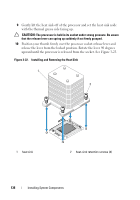
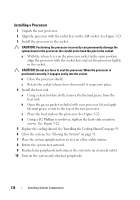
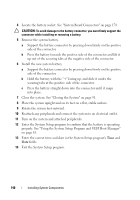
4 Locate the battery socket. See "System Board Connectors" on page 178. CAUTION: To avoid damage to the battery connector, you must firmly support the connector while installing or removing a battery. 5 Remove the system battery. a Support the battery connector by pressing down firmly on the positive side of the connector. b Press the battery towards the positive side of the connector and lift it up out of the securing tabs at the negative side of the connector. 6 Install the new system battery. a Support the battery connector by pressing down firmly on the positive side of the connector. b Hold the battery with the "+" facing up, and slide it under the securing tabs at the positive side of the connector. c Press the battery straight down into the connector until it snaps into place. 7 Close the system. See "Closing the System" on page 91. 8 Place the system upright and on its feet on a flat, stable surface. 9 Rotate the system feet outward. 10 Reattach any peripherals and connect the system to an electrical outlet. 11 Turn on the system and attached peripherals. 12 Enter the System Setup program to confirm that the battery is operating properly. See "Using the System Setup Program and UEFI Boot Manager" on page 61. 13 Enter the correct time and date in the System Setup program's Time and Date fields. 14 Exit the System Setup program. 140 Installing System Components
-
 1
1 -
2
-
3
-
4
-
5
-
6
-
7
-
8
-
9
-
10
-
11
-
12
-
13
-
14
-
15
-
16
-
17
-
18
-
19
-
20
-
21
-
22
-
23
-
24
-
25
-
26
-
27
-
28
-
29
-
30
-
31
-
32
-
33
-
34
-
35
-
36
-
37
-
38
-
39
-
40
-
41
-
42
-
43
-
44
-
45
-
46
-
47
-
48
-
49
-
50
-
51
-
52
-
53
-
54
-
55
-
56
-
57
-
58
-
59
-
60
-
61
-
62
-
63
-
64
-
65
-
66
-
67
-
68
-
69
-
70
-
71
-
72
-
73
-
74
-
75
-
76
-
77
-
78
-
79
-
80
-
81
-
82
-
83
-
84
-
85
-
86
-
87
-
88
-
89
-
90
-
91
-
92
-
93
-
94
-
95
-
96
-
97
-
98
-
99
-
100
-
101
-
102
-
103
-
104
-
105
-
106
-
107
-
108
-
109
-
110
-
111
-
112
-
113
-
114
-
115
-
116
-
117
-
118
-
119
-
120
-
121
-
122
-
123
-
124
-
125
-
126
-
127
-
128
-
129
-
130
-
131
-
132
-
133
-
134
-
 135
135 -
 136
136 -
 137
137 -
 138
138 -
 139
139 -
 140
140 -
 141
141 -
 142
142 -
 143
143 -
 144
144 -
 145
145 -
146
-
147
-
148
-
149
-
150
-
151
-
152
-
153
-
154
-
155
-
156
-
157
-
158
-
159
-
160
-
161
-
162
-
163
-
164
-
165
-
166
-
167
-
168
-
169
-
170
-
171
-
172
-
173
-
174
-
175
-
176
-
177
-
178
-
179
-
180
-
181
-
182
-
183
-
184
-
185
-
186
-
187
-
188
-
189
-
190
-
191
-
192
-
193
-
194
-
195
-
196
-
197
-
198
-
199
-
200
-
201
-
202
-
203
-
204
 |
 |