Dell PowerEdge T410 Hardware Owner's Manual - Page 96
Installing a Hot-Swap Hard Drive, Install the hard drive carrier on the hard drive.
 |
View all Dell PowerEdge T410 manuals
Add to My Manuals
Save this manual to your list of manuals |
Page 96 highlights
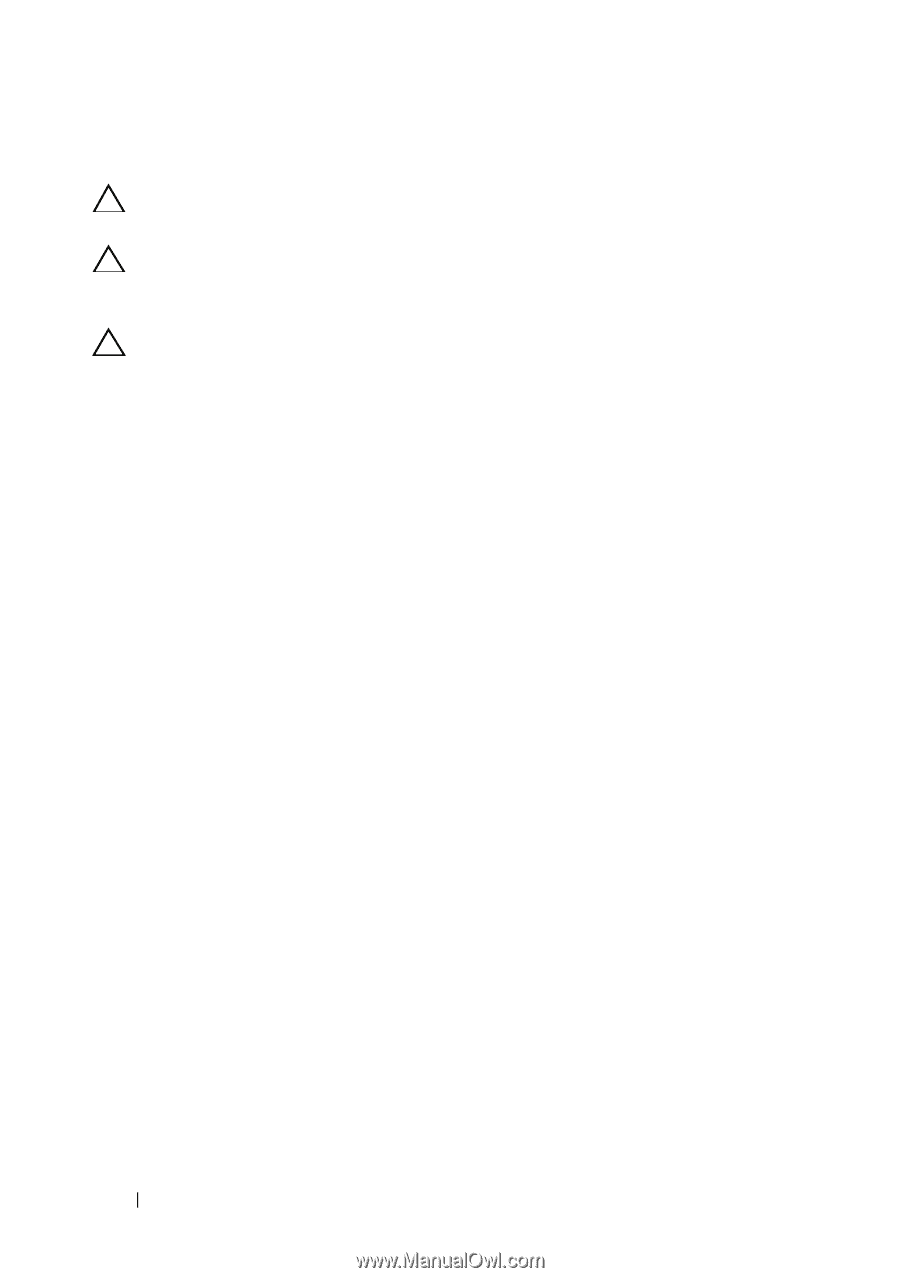
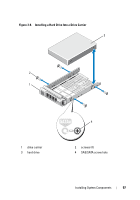
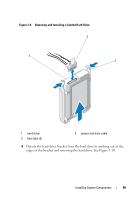
Installing a Hot-Swap Hard Drive CAUTION: Use only hard drives that have been tested and approved for use with the SAS/SATA backplane. CAUTION: Not all operating systems support hot-swappable hard drive installation. See the documentation supplied with your operating system for more information. CAUTION: Combining SATA and SAS hard drives in the same system configuration is not supported. 1 Remove the front bezel. See "Removing the Front Bezel" on page 85. 2 Press the button on the front of the drive carrier, rotate the carrier handle outward, and remove the carrier from the drive bay. 3 Install the hard drive carrier on the hard drive. a Insert the hard drive into the hard-drive carrier with the connector end of the drive at the rear. See Figure 3-8. b Align the screw holes on the hard drive with the holes on the harddrive carrier. When aligned correctly, the rear of the hard drive will be flush with the rear of the hard-drive carrier. c Attach the four screws to secure the hard drive to the hard-drive carrier. See Figure 3-8. 96 Installing System Components
-
 1
1 -
2
-
3
-
4
-
5
-
6
-
7
-
8
-
9
-
10
-
11
-
12
-
13
-
14
-
15
-
16
-
17
-
18
-
19
-
20
-
21
-
22
-
23
-
24
-
25
-
26
-
27
-
28
-
29
-
30
-
31
-
32
-
33
-
34
-
35
-
36
-
37
-
38
-
39
-
40
-
41
-
42
-
43
-
44
-
45
-
46
-
47
-
48
-
49
-
50
-
51
-
52
-
53
-
54
-
55
-
56
-
57
-
58
-
59
-
60
-
61
-
62
-
63
-
64
-
65
-
66
-
67
-
68
-
69
-
70
-
71
-
72
-
73
-
74
-
75
-
76
-
77
-
78
-
79
-
80
-
81
-
82
-
83
-
84
-
85
-
86
-
87
-
88
-
89
-
90
-
 91
91 -
 92
92 -
 93
93 -
 94
94 -
 95
95 -
 96
96 -
 97
97 -
 98
98 -
 99
99 -
 100
100 -
 101
101 -
102
-
103
-
104
-
105
-
106
-
107
-
108
-
109
-
110
-
111
-
112
-
113
-
114
-
115
-
116
-
117
-
118
-
119
-
120
-
121
-
122
-
123
-
124
-
125
-
126
-
127
-
128
-
129
-
130
-
131
-
132
-
133
-
134
-
135
-
136
-
137
-
138
-
139
-
140
-
141
-
142
-
143
-
144
-
145
-
146
-
147
-
148
-
149
-
150
-
151
-
152
-
153
-
154
-
155
-
156
-
157
-
158
-
159
-
160
-
161
-
162
-
163
-
164
-
165
-
166
-
167
-
168
-
169
-
170
-
171
-
172
-
173
-
174
-
175
-
176
-
177
-
178
-
179
-
180
-
181
-
182
-
183
-
184
-
185
-
186
-
187
-
188
-
189
-
190
-
191
-
192
-
193
-
194
-
195
-
196
-
197
-
198
-
199
-
200
-
201
-
202
-
203
-
204
 |
 |