Dell PowerEdge T430 Dell PowerEdge T430 Owners Manual - Page 117
CAUTION: Do not use force to seat the processor. When the processor is positioned
 |
View all Dell PowerEdge T430 manuals
Add to My Manuals
Save this manual to your list of manuals |
Page 117 highlights
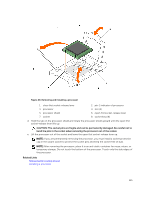
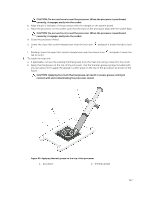
CAUTION: Do not use force to seat the processor. When the processor is positioned correctly, it engages easily into the socket. b. Align the pin-1 indicator of the processor with the triangle on the system board. c. Place the processor on the socket such that the slots on the processor align with the socket keys. CAUTION: Do not use force to seat the processor. When the processor is positioned correctly, it engages easily into the socket. d. Close the processor shield. e. Lower the close first socket-release lever near the lock icon it. and push it under the tab to lock f. Similarly, lower the open first socket-release lever near the unlock icon tab to lock it. and push it under the 9. To install the heat sink: a. If applicable, remove the existing thermal grease from the heat sink using a clean lint-free cloth. b. Apply thermal grease on the top of the processor. Use the thermal-grease syringe included with your processor kit to apply the grease in a thin spiral on the top of the processor as shown in the figure. CAUTION: Applying too much thermal grease can result in excess grease coming in contact with and contaminating the processor socket. Figure 49. Applying thermal grease on the top of the processor 1. processor 2. thermal grease 117
-
 1
1 -
2
-
3
-
4
-
5
-
6
-
7
-
8
-
9
-
10
-
11
-
12
-
13
-
14
-
15
-
16
-
17
-
18
-
19
-
20
-
21
-
22
-
23
-
24
-
25
-
26
-
27
-
28
-
29
-
30
-
31
-
32
-
33
-
34
-
35
-
36
-
37
-
38
-
39
-
40
-
41
-
42
-
43
-
44
-
45
-
46
-
47
-
48
-
49
-
50
-
51
-
52
-
53
-
54
-
55
-
56
-
57
-
58
-
59
-
60
-
61
-
62
-
63
-
64
-
65
-
66
-
67
-
68
-
69
-
70
-
71
-
72
-
73
-
74
-
75
-
76
-
77
-
78
-
79
-
80
-
81
-
82
-
83
-
84
-
85
-
86
-
87
-
88
-
89
-
90
-
91
-
92
-
93
-
94
-
95
-
96
-
97
-
98
-
99
-
100
-
101
-
102
-
103
-
104
-
105
-
106
-
107
-
108
-
109
-
110
-
111
-
 112
112 -
 113
113 -
 114
114 -
 115
115 -
 116
116 -
 117
117 -
 118
118 -
 119
119 -
 120
120 -
 121
121 -
 122
122 -
123
-
124
-
125
-
126
-
127
-
128
-
129
-
130
-
131
-
132
-
133
-
134
-
135
-
136
-
137
-
138
-
139
-
140
-
141
-
142
-
143
-
144
-
145
-
146
-
147
-
148
-
149
-
150
-
151
-
152
-
153
-
154
-
155
-
156
-
157
-
158
-
159
-
160
-
161
-
162
-
163
-
164
-
165
-
166
-
167
-
168
-
169
-
170
-
171
-
172
-
173
-
174
-
175
-
176
-
177
-
178
-
179
 |
 |
