HP 2500c Service Manual - Page 151
Removal and Replacement of Parts without, Calibration
 |
View all HP 2500c manuals
Add to My Manuals
Save this manual to your list of manuals |
Page 151 highlights
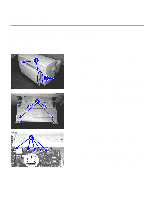
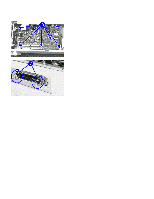
Chapter 7 Removal and Replacement of Parts (without Calibration) This chapter describes how the printer can be disassembled for repair and maintenance. This section covers the removal of parts that can be reassembled without calibration. To reassemble the printer, reverse the order of the procedure. Where required, additional explanation will also be provided for any special adjustments or procedure steps (such as instances where reassembly differs from disassembly). You should also take note that it may not be necessary to disassemble the printer to service certain components. Removal and Replacement Tools To disassemble the printer, you will need the following tools : 1. A TORX® screwdriver with T-10 and T-20 screw bits. 2. Needle nose pliers. 3. Straight tweezers. 4. A flat-blade screw driver (Philips no.1 or flathead no.5). 5. Instruction manual. It is strongly recommended that proper tools (including screws) be used for the job. Removal and Replacement of Parts (without Calibration) 7-1
-
 1
1 -
2
-
3
-
4
-
5
-
6
-
7
-
8
-
9
-
10
-
11
-
12
-
13
-
14
-
15
-
16
-
17
-
18
-
19
-
20
-
21
-
22
-
23
-
24
-
25
-
26
-
27
-
28
-
29
-
30
-
31
-
32
-
33
-
34
-
35
-
36
-
37
-
38
-
39
-
40
-
41
-
42
-
43
-
44
-
45
-
46
-
47
-
48
-
49
-
50
-
51
-
52
-
53
-
54
-
55
-
56
-
57
-
58
-
59
-
60
-
61
-
62
-
63
-
64
-
65
-
66
-
67
-
68
-
69
-
70
-
71
-
72
-
73
-
74
-
75
-
76
-
77
-
78
-
79
-
80
-
81
-
82
-
83
-
84
-
85
-
86
-
87
-
88
-
89
-
90
-
91
-
92
-
93
-
94
-
95
-
96
-
97
-
98
-
99
-
100
-
101
-
102
-
103
-
104
-
105
-
106
-
107
-
108
-
109
-
110
-
111
-
112
-
113
-
114
-
115
-
116
-
117
-
118
-
119
-
120
-
121
-
122
-
123
-
124
-
125
-
126
-
127
-
128
-
129
-
130
-
131
-
132
-
133
-
134
-
135
-
136
-
137
-
138
-
139
-
140
-
141
-
142
-
143
-
144
-
145
-
 146
146 -
 147
147 -
 148
148 -
 149
149 -
 150
150 -
 151
151 -
 152
152 -
 153
153 -
 154
154 -
 155
155 -
 156
156 -
157
-
158
-
159
-
160
-
161
-
162
-
163
-
164
-
165
-
166
-
167
-
168
-
169
-
170
-
171
-
172
-
173
-
174
-
175
-
176
-
177
-
178
-
179
-
180
-
181
-
182
-
183
-
184
-
185
-
186
-
187
-
188
-
189
-
190
-
191
-
192
-
193
-
194
-
195
-
196
-
197
-
198
-
199
-
200
-
201
-
202
-
203
-
204
-
205
-
206
-
207
-
208
-
209
-
210
-
211
-
212
-
213
-
214
-
215
-
216
-
217
-
218
-
219
-
220
-
221
-
222
-
223
-
224
-
225
 |
 |