HP 2500c Service Manual - Page 199
Installing the Absorber, Ink Supply Station, Installing, the Ink Supply Station, Replacement of Ink
 |
View all HP 2500c manuals
Add to My Manuals
Save this manual to your list of manuals |
Page 199 highlights
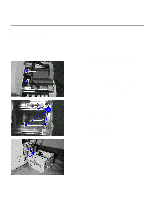
Replacement of Parts Installing the Absorber Step 1. Replace the absorbers into position. Step 2. Gently slide the new service station into the printer until the screw holes are aligned. Step 3. Replace the service station connector. Ensure that it is properly plugged in. Step 4. Replace the three screws at the top of the service station in order (that is, replace number one, followed by two and then three). Step 5. Replace the remaining components for the Ink Supply Station (refer to the procedures in Installing the Ink Supply Station from Replacement of Ink Supply Station). Removal and Replacement of Parts (without Calibration) 7-47
-
 1
1 -
2
-
3
-
4
-
5
-
6
-
7
-
8
-
9
-
10
-
11
-
12
-
13
-
14
-
15
-
16
-
17
-
18
-
19
-
20
-
21
-
22
-
23
-
24
-
25
-
26
-
27
-
28
-
29
-
30
-
31
-
32
-
33
-
34
-
35
-
36
-
37
-
38
-
39
-
40
-
41
-
42
-
43
-
44
-
45
-
46
-
47
-
48
-
49
-
50
-
51
-
52
-
53
-
54
-
55
-
56
-
57
-
58
-
59
-
60
-
61
-
62
-
63
-
64
-
65
-
66
-
67
-
68
-
69
-
70
-
71
-
72
-
73
-
74
-
75
-
76
-
77
-
78
-
79
-
80
-
81
-
82
-
83
-
84
-
85
-
86
-
87
-
88
-
89
-
90
-
91
-
92
-
93
-
94
-
95
-
96
-
97
-
98
-
99
-
100
-
101
-
102
-
103
-
104
-
105
-
106
-
107
-
108
-
109
-
110
-
111
-
112
-
113
-
114
-
115
-
116
-
117
-
118
-
119
-
120
-
121
-
122
-
123
-
124
-
125
-
126
-
127
-
128
-
129
-
130
-
131
-
132
-
133
-
134
-
135
-
136
-
137
-
138
-
139
-
140
-
141
-
142
-
143
-
144
-
145
-
146
-
147
-
148
-
149
-
150
-
151
-
152
-
153
-
154
-
155
-
156
-
157
-
158
-
159
-
160
-
161
-
162
-
163
-
164
-
165
-
166
-
167
-
168
-
169
-
170
-
171
-
172
-
173
-
174
-
175
-
176
-
177
-
178
-
179
-
180
-
181
-
182
-
183
-
184
-
185
-
186
-
187
-
188
-
189
-
190
-
191
-
192
-
193
-
 194
194 -
 195
195 -
 196
196 -
 197
197 -
 198
198 -
 199
199 -
 200
200 -
 201
201 -
 202
202 -
 203
203 -
 204
204 -
205
-
206
-
207
-
208
-
209
-
210
-
211
-
212
-
213
-
214
-
215
-
216
-
217
-
218
-
219
-
220
-
221
-
222
-
223
-
224
-
225
 |
 |

Removal and Replacement of Parts (without Calibration)
7-47
Replacement of Parts
Installing the Absorber
Step 1.
Replace the absorbers into position.
Step 2.
Gently slide the new service station into the printer until the screw holes are aligned.
Step 3.
Replace the service station connector.
Ensure that it is properly plugged in.
Step 4.
Replace the three screws at the top of the service station in order (that is, replace number one,
followed by two and then three).
Step 5.
Replace the remaining components for the
Ink Supply Station
(refer to the procedures in
Installing
the Ink Supply Station
from
Replacement of Ink Supply Station
).